Scissors for Windows 7 and Scissors for Windows 8 are software scissors that allow any user to select the desired part on the screen and then photograph this part, that is, take a screenshot for it.
But before we move on to Snipping Tool, we can’t help but mention one universal charm on your keyboard for taking screenshots.
Despite the fact that today there are a huge variety of different programs available for creating screenshots, there are often times, for example, when you are at a stranger’s computer and you urgently need to take a screenshot of what is happening on the monitor screen.
This is easy to do by pressing the Print Screen key on your keyboard and pasting the contents from the clipboard into such standard program Windows, like the graphic editor Paint. Here you can edit the image by adding some marks and making the necessary selections, more about this.
The wonderful Print Screen button on the keyboard always allows you to take screenshots in any operating room Windows system(XP, Vista, 7, 8).
But in the Windows 7 operating system, Microsoft has implemented a much more convenient tool for instantly creating screenshots - this is the standard “Scissors” mini-application, which was inherited by Windows 8 and its adjusted edition of Windows 8.1.
- it's built into Windows program, which does not require additional downloading and installation. It is available in such categories as Home Advanced, Professional, Maximum, Corporate. Unfortunately, there is no Snipping Tool in the Basic version of Windows 7. You can read about how to find out the version of your operating system.
The Snipping Tool program is available not only in Windows 7 and Windows Vista. It also “migrated” to Windows 8, Windows 8.1, Windows R.T 8.1.
So, “Scissors” is a minimalistic, simplest standard tool in Windows 7 and 8, which nevertheless has some options for capturing the monitor screen in various forms and with a built-in mini-editor for the created screenshots.
Where is Snipping Tool in Windows 7?
You can find “Scissors”
- in the Start menu,
- then “All programs”,
- further “Standard” (number 1 in Fig. 1),
- further, in fact, “Scissors” (number 2 in Fig. 1).
Rice. 1 Looking for Scissors for Windows 7:
Start button – All Programs – Accessories – Snipping Tool
The second way to find “Scissors” for Windows 7 is to enter the word “scissors” in the search bar (number 3 in Fig. 1) without quotes, and the operating system itself will quickly find this program.
To avoid searching for Scissors, you can keep this program “at hand” as follows. Right-clicking the mouse in the “Start” menu on “Scissors” (number 2 in Fig. 1) opens context menu, in which you can:
- click on the “Pin to taskbar” option to keep Snipping Tool on the Windows taskbar or
- Click on another option - “Pin to Start Menu”, which will allow you to see the Snipping Tool shortcut when you open the Start menu.
Where is Snipping Tool in Windows 8?
Snipping Tools for Windows 8 can be found:
- in “Applications” – “Accessories – Windows”,
- or through "Search".
Let's consider the first option. Users who have not returned the Start button to Windows 8 and 8.1 using third-party software (additionally installed programs), will be able to find “Scissors” through the “Applications” section. To do this, you need to switch to the Start screen and click the down arrow located in the lower left corner.

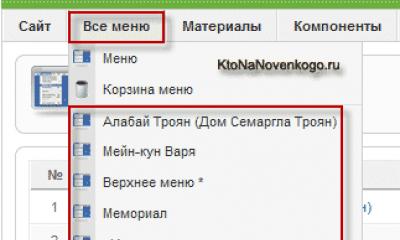
Rice. 2 “All apps” button for Windows 8
A list of all installed applications and programs where “Scissors” is displayed at the end of the list.

Rice. 3 Scissors among other Standard ones Windows applications 8
Looking for “Scissors” for Windows 8 via “Search”
If you have a touch screen, then quickly swipe from the right edge of the screen and tap the Search button.
If you are using a mouse, then move the cursor to the lower right corner of the screen, and then move it up and click on the “Search” button.
All that remains is to enter “Scissors” into the search bar without quotes, and then select the found element “Scissors”.

Rice. 4 Ioem Scissors via Search in Windows 8
Scissors functionality
Getting acquainted with the functionality of “Scissors” is quite simple; it is the same for Windows 7 and 8. Everything is quite obvious from the start of launching this mini-application.
Taking a screenshot
In the button " Create“After clicking on the small triangle to the right of the word “Create”, a drop-down list appears (number 1 in Fig. 5), in which you can select one of the possible forms of screenshots:
- free
- rectangle,
- active window,
- the entire screen (indicated by numbers 7, 8, 9 and 10 in Fig. 6).
We click on the “Create” button (Fig. 5), and thereby we start photographing the screen. Moreover, after clicking the “Create” button, all objects on the screen will be darkened. You need to drag your pointer across the screen while holding down the left mouse button to highlight the objects you want to capture in the screenshot. After you release the mouse button, a new window with a screenshot will appear.
If you don't like the screenshot you took, you can try again. To do this, simply click on the “Create” button in “Scissors” again and re-select the desired object.
Now you can edit the screenshot and then be sure to save it.

Rice. 5 The Scissors application is open, Click on the triangle with the number 1, select the area to highlight the screenshot.
Click on the Create button to create a screenshot
Editing the screenshot
After taking a photo, the latter immediately opens in a separate simple editor"Scissors." The capabilities of this editor are limited when compared with the same Paint, but you can still make certain marks on a screenshot using a pen line and a marker of different colors (indicated by numbers 4 and 5 in Fig. 6).
The drawn lines are erased with an eraser (number 6 in Fig. 6).
For the pen and marker, you can customize the line type and thickness using the “Customize” option, indicated by number 11 in Fig. 6.

Rice. 6 Scissor Editor
Using the “Copy” button (number 2 in Fig. 6) of the “Scissors” editor, the taken screenshot will go to the clipboard, from where it can then be pasted into any other program - a text editor, photo editor, etc. To do this, in this program you need to click on the “Paste” option, or press the hot keys Ctrl + V.
Saving the screenshot is the most important thing!
You can also click on the “File” option in the top menu, and in the window that opens, click on the “Save As” command. Here everything is the same as when you click on the floppy disk icon (number 1 in Fig. 6).
Receive the latest articles on computer literacy directly to your mailbox
.
Already more 3,000 subscribers
I looked through several similar programs, but did not find a worthy replacement for the standard Windows 7 scissors, since most of them took screenshots, but did not provide a preview of the image and only saved the fragments captured on the screen to files. Purely by chance, while communicating with one of my friends, I noticed that he very quickly takes screenshots and sends me links to images, then I was surprised and realized that I needed to dig about of this instrument deeper. As a result, I found the tool, installed it and started using it; at first I had a lot of positive impressions from using it. But I won’t tell my stories so as not to bore you, but rather I’ll get straight to the point and demonstrate the capabilities of the software. 😉
Analog of scissors Windows 7 - program and service Clip2net
U of this service There is both a paid version, which includes a lot of features, and a free one with a standard package of features. Currently, I am using the free version and I am satisfied with the set of all the functions that the program has.
So, let's figure out what free features the service provides, as opposed to standard ones Windows scissors 7
- Instant screenshot with editing capabilities.
- The ability to upload a screenshot to the Internet in 1 click, which will be available via a link; the link will appear immediately on the LCD after uploading.
- Ability to save a screenshot on your computer in 1 click.
- Ability to copy a screenshot without saving and pasting, for example in Word.
The advanced version (PRO) has the following features:
- Cloud storage. Screenshots can be saved on the server and returned to them if necessary. If you have used the capabilities of DropBox or Yandex Disk, you should understand what cloud storage is and how to work with it.
- Ability to shorten links.
- Publishing files of any type in the storage: video, photo, audio, presentations, documents and any other materials.
As you can see, the possibilities free version will be enough to perform operations on the created screenshots.
Setting up the Clip2net program
After starting the program, you need to make settings for ease of use, and in general you should always start starting programs with the settings so that it is easier for you to understand what functions the program has and what can be used when working with the program.
Initially, you need to go to the website: http://clip2net.com and download the program, to do this you need to click on the button with the text “Download Clip2net for free”. After downloading the program, run it for installation and follow all recommended installation steps.
When you launch the program for the first time, a window will appear in front of you where you need to enter your login and password or register a new user. If you do not use the extended version of the program, then there is no need to register, so we skip the first tab. For clarity, the display of the tab is shown below, filmed, by the way, using this program. 😉

In the “Settings” tab, you can set the program settings and select the optimal parameters that you need; I advise you to leave a checkmark on the “Launch when booting Windows"so that you don't have to run the program manually if necessary. The program does not heavily load the computer, so it can always hang in the tray.
On the “Keys” tab, you can assign hot keys so that when you press specified combinations, you do not have to perform additional actions and proceed immediately to the required action.
If you use a proxy to access the Internet and are encrypted from someone, then the “Proxy” tab will help you with this; the download will be made through the proxy server you use.
The "Servers" tab is more suitable for PRO versions program, but you can also use it if you want to save files for up to 30 days.
Demonstration of the Clip2net program - an analogue of scissors in Windows 7
If you previously used regular scissors in Windows 7, you should remember their functionality, where you could take a screenshot, paint the necessary text with a standard marker or brush, draw curved arrows, etc.
Everything is different here, but by the way, what I’m telling you, let me demonstrate it right away. In the screenshot below, each of the elements is marked with a number, which I will try to explain in more detail.

Now there is an explanation for each element, the list number will correspond to the designated element.
That's all the main functions that this program has, you should definitely use them or at least try them to make sure how useful the program is.
By the way, after publication you can receive not only a direct link to the page with the image, but also a convenient option for posting the image on a forum, blog, or adding a post to a social network.

Conclusion
There are many tools that can simplify routine processes, and each one is unique in some way. The Clip2net tool is an advanced analogue of Windows 7 scissors and has great advantages over the standard tool. If you are still using scissors, then I advise you to take it to the next level and use Clip2net in your workflow.
If you use similar programs, the functions of which are more advanced and allow you to use your time less labor-intensively, I will be glad to listen and discuss your suggestions.
That's all for today. Don’t forget to subscribe to the blog’s RSS to receive information about the release of new articles on the blog by email, the link to the RSS is located along with the links social networks, on the right, at the top of the page.
is one of the simplest tools for taking screenshots. Allows you to take a screenshot of the entire screen or a selected area. New version makes it possible to set a screen capture delay from 1 to 5 seconds in order to have time to make the necessary changes. Can highlight the border of a photo with a pre-selected color.
The simplest tools for drawing on a screenshot are built in: a pen, a marker and an eraser. It can save a screenshot to the clipboard, an HTML document (you can add a URL under the picture), a graphic file in jpg, gif or png format, or send it by mail.
Advantages and Disadvantages of Screen Scissors
A very simple program, familiar from others Windows versions;
+ delay tool allows you to quickly make changes;
+ you can draw an inscription or mark an important fragment;
+ everything is in Russian, although it’s understandable;
+ you can immediately send the result by mail;
– minimal functionality for drawing (they could add a rectangle and a circle).
Key Features
- take a screenshot of the entire screen;
- take a screenshot of a rectangular or arbitrary shape;
- delay screen capture for 1-5 seconds;
- highlight the border of the screenshot with color;
- choose colors to paint;
- draw using a pen, marker and eraser;
- copy the image to the clipboard;
- save the image as a graphic file;
- save the image in an html document;
- send a screenshot by mail.
General information
Taking “screenshots” or, as they are more often called, “screenshots” in Windows 7 has become easier and faster.
Screenshots are now used everywhere, for example, to design topics on various sites and forums, or to post online an image of a window with an error, or to design articles, instructions, etc. etc.
To make the screenshot clearer, you need to cut off everything unnecessary (leaving one window, for example) and highlight the desired element with color. The application will help us with this Scissors(Snipping Tool) is the most convenient feature of Windows 7.
Scissors available Windows users 7 following versions:
- Home Premium
- Professional
- Maximum
For users of other versions, there are many alternatives on the Internet, including free ones.
Launching the application
To launch the application, click:
Start ---> All programs ---> Standard ---> Scissors

For the convenience of subsequent launches, you can pin the application icon in the taskbar; to do this, right-click on the icon open application and select:

You can also assign " hotkey" to open the application, press:
Start---> All programs ---> Standard ---> right-click on "Scissors" ---> Properties---> place the cursor in the "Shortcut" field and press the key (or key combination) that you want to use for the shortcut.

Cut out the desired fragment
You can take a photo:
- entire screen
- a single window or element, such as the Start button, an entire toolbar, or a single gadget
- element of rectangular or arbitrary shape.

To take a photo of a menu that automatically collapses, such as the Start menu, use the following algorithm:
- Launch the Snipping app.
- Press " Esc".
- Open the desired menu.
- Click " Ctrl+Print Screen(Prt Scr)".
- Click the arrow next to the New button, select the desired option from the list, and highlight the desired area.
At this stage, the cut fragment is copied to the clipboard and the markup window.
Editing and saving the result
Using a pen and marker, you can add the necessary notes in the markup window.

You can also simply close the markup window and continue editing in a graphical editor, for example in the built-in editor Paint(Start ---> All Programs ---> Accessories ---> Paint), it has been completely redesigned and has become much more convenient:
Or in the built-in editor WordPad(Start ---> All Programs ---> Accessories ---> WordPad), which has also been redesigned and now supports, among other things, saving in the format *.docx(Microsoft Word 2007, 2010).
Report a bug
Broken link for download File does not match description Other
Screen Scissors is a program designed for creating screenshots. Compared to the built-in Screenshot, the application has expanded functionality. The program can be installed on ten. It should be noted that anyone can download screen scissors for free.

Using screen scissors, it is possible to take a screenshot of the entire screen as well as a selected area. This is very convenient, since you will not need to use additional editors to cut out a specific area from the image.
Key Features
- Capture the area of interest on the screen;
- Possibility of using a “pencil” for drawing;
- Saving screenshots on the Internet;
- Launching the program along with the operating system;
- Ability to save pictures to your computer;
- Working with hot keys;
- Ability to work with 2-3 monitors;
- Work from the tray.
Advantages
Screenshot software has several advantages. It is recommended that you review them. The main advantage is that the program does not require installation. You just need to download it and you can start working right away. If necessary, the application can be saved on a flash drive.
A program such as “Scissors” is perfect for Windows XP, as well as more modern operating systems. At the same time, the application practically does not consume system resources, which means it can be installed on weak computers.
Another advantage is the multilingual nature of the program. Thanks to this, you don't need to use translators to understand how to operate the Scissors. It is enough to install the Russian language and you can start working.
Screen Scissors for Windows saves its settings in an external file that has an "ini" extension. This is very convenient, since you can change the file at any time without going into the program.
Flaws
Snipping Tool for Windows 7 is a popular program, so you should consider all the disadvantages. In fact, there are no significant disadvantages to the program.
Some users consider the disadvantage that the program is suitable for Windows 8, but cannot be installed on other operating systems (Linux, Mac OS). Perhaps in the future the developers will correct this defect.
Another minor drawback is the inability to save the file in the “gif” format. Otherwise, no cons were found, so you can safely download Screenshoter for Windows Seven.
Download the program
First you need to download scissors to your computer. This can be done from the website located at: “www.userprograms.com”. When home page resource will be downloaded, you need to hover your mouse over the “Programs” item, and then select “Screen Scissors” from the drop-down menu.

In a moment, a new page will open with a description of the product. To download the application, you must click on the appropriate hyperlink. It should be noted that the site has a version for 32-bit and 64-bit systems.

Operating principle
Once the application is downloaded, you can start taking pictures. To do this, you need to perform the following sequence of actions:
- Press the “PrtSc” button. If you wish, you can simply click on the program icon;
- Using the mouse, select the area of interest in the window;
- If you need to make notes (add text, highlight a fragment);
- Click on the “floppy disk” icon or press “Enter” on the keyboard.

It is important to note that the file will be saved to the drive specified in the settings. It could be cloud service on the Internet or disk on your computer.
Conclusion
Windows 10 and earlier versions have a built-in “screenshot”, but it does not have additional features. Therefore, it is recommended to install Screen Snippers. The tool will be of interest to those who take screenshots daily. The program does not need to be installed, which means that if you don’t like how it works, you can remove it. Thanks to the ability to save a photo on the Internet, it is possible to quickly share screenshots with friends and colleagues.
Video review “Screen scissors”