The final version of macOS today is macOS 10.13 High Sierra.
The latest version of macOS is called macOS 10.13 High Sierra and was released on September 25, 2017. Apple usually releases a new version software once a year. These updates are free and available on Mac App Store.
Latest version of macOS – 10.13 High Sierra
The newest version of the Mac software is macOS 10.13, aka macOS High Sierra. This is the fourteenth version of the operating system released by Apple for Mac.
macOS 10.13 High Sierra has the same requirements for hardware, the same as macOS 10.12 Sierra. You can install it on the following devices:
- MacBook (Late 2009 or newer);
- MacBook Pro(mid 2010 or newer);
- MacBook Air (Late 2010 or newer);
- Mac mini (mid 2010 or later);
- iMac (Late 2009 or newer);
- Mac Pro(mid 2010 or newer).
High Sierra contains several interesting improvements. The Safari browser has begun to block the automatic playback of videos and advertisements that haunt the user on the Internet. Spotlight search is now available in the Mail app. The Photos app offers a set of more advanced editing tools. Apple started using the new one by default file system APFS, and also improved graphics support. Mac can now use external graphics cards. Metal 2 graphics engine has improved playback and Metal for VR has improved support virtual reality on Mac.
How to check if you have the latest version
To find out which version of macOS your computer is running, click the menu icon “ Apple” in the upper left corner of the screen and select the option “About this Mac“.

A window will open where in the “Overview” tab you will see the name and version number of the operating system installed on this computer. Each version has several small updates, which are indicated by numbers (in this case “.4”). Such updates contain security patches and other fixes. They appear regularly in the Mac App Store.

How to update your operating system to the latest version
If you don't already have it installed on your MacmacOS High Sierra, you can easily update it on MacApp Store. Open it, search for “High Sierra” or follow the linkupdate operating system.
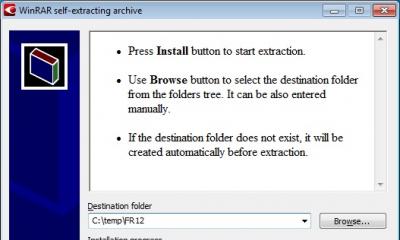
Click the “ Download” on the macOS High Sierra page so you can install it on your Mac. The file size is over 5 GB, so downloading will take some time. Once the file is completely downloaded to your Mac, it will automatically launch the installer. Follow its instructions to install the new version.

And its update. Before you begin, it is important to decide what exactly you need to do. That is, it will be necessary to understand whether a complete reinstallation of the operating system or a simple update is required. You will also need to prepare the device for reinstallation (for example, if you are going to sell your device).
In addition, you can restore from backup copy TimeMachine if you have configured this. So, first things first:
- If you want to update your Mac OS, you can create a backup copy just in case, so that in case of unforeseen circumstances, you can restore the system.
- If you are going to restore the operating system, then no action is required. However, you can check for backups if you want to install one of them.
- At complete reinstallation you will need, as in the first point, to create a copy. Then be sure to deauthorize your computer or laptop from iTunes. To do this, launch the program, open the “Account” tab, select the authorization item, and then open the deauthorization item. Please note that your Apple ID password may be required. Next, exit iCloud service, after disabling Find My Mac if it was previously enabled. Also log out of your account in iMessage and FaceTime services. At this point, your preparation ends. Let's move on, friends.
Reinstallation
- First of all, please note that the following instructions provide for reinstallation with the installation of the version of the operating system that was installed when you purchased the device. That is, if you purchased a Macbook with OSX Mavericks, and then upgraded it to ElCaptain, then after reinstallation the laptop will have Mavericks again. It is also worth remembering that all your data will be deleted from your computer. This method is suitable for those who want to sell their device, give it to someone, or simply receive the device “out of the box.” If this method does not suit you, then go to the “Recovery” paragraph.
- So, let's get started: immediately after turning on the computer, hold down the key combination Option+Command+R.

- Once you see the logo Apple, you can release the buttons.
- If you did everything correctly, Disk Utility will launch, with which you will need to clean up the built-in hard drive. Please note that Extended journal format must be used. After this you can close the window.
- Now click on “Reinstall mac OS”. Follow the prompts on your computer or laptop screen to complete the steps indicated.
- When your device restarts, you'll see the Setup Assistant that opens when you turn on macOS computers for the first time. If you don't want to configure it (for example, as mentioned above, when selling the device), then use the Command+Q combination to turn off the Mac. This way, you will give the opportunity to configure the settings to another user, your future buyer. Ready! This completes the reinstallation.
Update
Updating macOS is much easier than any other operating system on the computer. This process is accompanied by fewer problems and questions. This will be especially noticeable by those people who have updated Windows at least once. In order to update your Mac computer or laptop, you only need an Internet connection and a little time.
- Launch a store Mac applications AppStore.
- In shopping or in other sections of the store, find the new version of the operating system. Most often it is in the first places of the “Top Chart” or in the “Selection”.
- Click the “Download” button or “Install” if the system has already been downloaded previously. Wait for the operation to complete and continue using the now updated mac OS.
Recovery

Recovery using Time Machine
If you have a Time Machine backup, you will need to boot the device from the recovery partition using Command+R when you turn on the computer. In the service window mac programs OS, select the item of the same name. Please note that all data from the disk will be cleared and replaced with information and files from your backup. The recovery itself is easy to do using the instructions on the computer screen.
If you want to reinstall your Mac device without erasing your data (that is, restore it), repeat the steps in the previous paragraph to launch the Utilities window. If necessary, clean up the disk using a utility you are already familiar with. If you do not know it, then return to the third point of the reinstallation paragraph. After closing the program window, click on “Reinstall mac OS” and follow the steps that the assistant dictates to you.
Conclusion
Dear friends, today we have completely cleared up all the issues related to working with macOS:
- Reinstallation with cleaning and deleting all data for further sale of the device or transfer to another user.
- Updating the operating system through the Mac App Store.
- Restoring the system from a Time Machine backup.
- Reinstallation while saving personal data.
We hope that everything worked out for you and there are no misunderstandings or questions left. Tell us in the comments how your reinstallation went or macOS recovery. Enjoy your use, dear readers!
Hello, poppy growers! The latest macOS Mojave is coming out very soon and many will want to update their current macOS. But how can you do this without damaging your data, settings, and the Mac itself? Now I’ll tell you how to properly update macOS, let’s go!
By the way, before you start reading the text, I’ll warn you right away - this is an article about preparing for the update, not instructions for installing macOS Mojave! Moreover, this instruction will be relevant before each macOS update, even in a month, even in a few years.
macOS Mojave system requirements
Like all latest versions of macOS 10.14 will be distributed through the store Apps Store and can be installed on a specific type of computer. More precisely, not even the type, but the year of release of the Mac, and depending on the model it will be:
- iMacs released in late 2012 or later;
- MacBooks released in early 2015 or later;
- MacBook Pro released in mid-2012 or later;
- MacBook Air released in mid-2012 or later;
- Mac mini released in late 2012 or later;
- Mac Pro released in late 2013 and mid-2010 and 2012 with a recommended graphics card that supports Metal;
- iMac Pro released in late 2017 or later.
As you can see, this time the updates will not include computers older than 2012. Alas, my home Mac mini 2010 will remain with macOS High Sierra, although I will downgrade it to 10.11 and let it work :)
What do all these models have in common? It seems to me that Apple has almost completely eliminated computers without SSDs, although they are still available. In my experience, most Mac growers now know that they can replace their old hard drive to a new SSD and most have already done this. If you haven’t gotten to this point yet, then I can help you with moving to a new drive - :)
What to do before updating macOS
Here it is, the most important part - preparing for the update! So let’s go thoughtfully, slowly, and don’t skip points again unless you’re absolutely sure that you don’t need it. Some users may say that they don’t need some of what is presented below or that they have never done anything, but everything works fine - that’s their right! I myself know such lucky people who always update just like that and everything works OK for them. But I also know hundreds of users whose entire system crashed during the same updates. Here you can’t guess who will be lucky and who will not, and therefore it is better to protect yourself and prepare thoroughly. I do this and recommend it to you!
Don't install beta versions or early releases of macOS
Perhaps this is a rather stupid warning, but I cannot ignore this point. Alas, among my friends and acquaintances there are those who imagine themselves to be cool hackers and decided to install the latest macOS before others. For what? Yes, my hands were just itching and I really wanted to. And the fact that pampering with the beta version takes place on a single, working Mac, on which business processes depend! The problem is that freshly baked the system may not work correctly with old programs, such as Parallels, Adobe CC and others, on which your earnings depend.
For exactly the same reason, I do not recommend installing the latest macOS or iOS in the first days after release. If you use something other than a browser and instant messengers in your daily work, then it’s better to wait. Large companies will release updates for their products, fix bugs, and you can calmly and painlessly switch to a new operating system and software. Don’t worry, without you there will be a lot of people in a hurry (including me) who will test the performance of all programs for themselves. You shouldn’t walk through a minefield yourself :)
Create a backup of your data before updating macOS
“Oh, yes, as much as possible, you talk about creating a backup every word!” - almost any reader of my site will say. Now, instead of being outraged, just go ahead and make a backup copy of your data. By the way, there are several ways to save your documents.
Using Time Machine- this is a method as old as Mac OS X 10.5 (that's how funny I am)! We connect an external drive (empty), go to the Time Machine program, configure the creation of a backup and start saving data. Everything is super simple, but if you need instructions with pictures, then...

Using the cloud- one more the simplest way saving data. And although your cloud drive is much smaller in size than your external one, you will definitely be able to save documents on it. It is possible that you already use iCloud Drive to store your documents from the Desktop and Documents folder. Well, owners of Yandex.Disk and Google Drive can upload their photos to them, without wasting a single byte of space (but with ).
Manual copying to flash drives/disks- the oldest backup method. Just manually copy the necessary files and folders and forget about automatic recovery. Although you can use the ChronoSync program for convenient folder synchronization. Again, for this case I have .
Free up space before upgrading macOS
This point is very important, along with the previous one, about backups. By the way, I recommend following exactly this sequence - first create a backup copy, and then delete unnecessary things from the disk. I hope the logic of the sequence is clear :)
When installing macOS, the installer will use the free space one way or another. If there is very little disk space, the installation time can increase to several hours. In addition, the installation of macOS itself may not take place due to a lack of free space, and this problem will be much more difficult to deal with.
So, what can you delete on a Mac before installing macOS:
- unnecessary programs: it is generally better to remove them more often;
- unnecessary backup iPhone copies and iPad;
- clear cache in user libraries;
- watched films (this is just a classic - I watched the film and did not delete it);
- programs for iPhone in the iTunes folder;
- the contents of the Downloads folder for the last 3-5 years (no comments, there is so much junk in there, you won’t believe it);
If you go through this list, you can free up a lot of space, I assure you. And for picture lovers, I have a whole article with detailed explanations (with pictures)!
Check S.M.A.R.T. disk before installing macOS
This is a very important point, although it does not come first. First of all, I recommend downloading a program or similar to check S.M.A.R.T. your disk. This program reads data from the disk's built-in self-diagnosis chip and issues a report on the drive's status. In the screenshot below you can see a disk on which, under no circumstances, should you install macOS or use it at all (you can, if you understand what the problem is):

If you see something yellow or even red on your screen, then urgently go to backup(in case you missed it). Most likely, you will need to replace your dying disk with a new one in the near future. If everything is OK there, then you can move on!

Turn off FileVault before upgrading macOS
Friends, I’ll say right away that this is such a controversial point for which the apple community does not have a clear answer. I’ll tell you how I would do it, but it’s up to you to decide whether to do it or not, taking into account that you’ve already made a backup of the data :)
So, all new macOS, starting with High Sierra, received the new APFS file system, which is faster and stronger than the old HFS+. Moreover, this file system will be automatically installed on your system SSD drive during the installation of macOS High Sierra 10.13, unless you dance with a tambourine first. And here lies a small ambush, concerning specifically the disk with HFS+ on which it was enabled FileVault encryption. The installer will automatically convert the disk from HFS+ to APFS, and somewhere in there it will disable the old encryption and enable the new one built into the APFS file system. I read it myself and realized how difficult everything is with these systems...
As a result, in order for the system to install at all and not go into an endless reboot (which I have observed more than once), I recommend disable FileVault disk encryption. To do this, you only need to have a few hours of free time, since decrypting the disk takes several hours.

So, you need to go to System Settings-> Protection and Security -> FileVault. In the window that appears, you must first remove the lock in the lower left corner, and then click on the right button - Turn Off FileVault (Turn Off FileVault...) After this, the system will prompt you to restart the Mac and wait until the disk is decrypted.
Check disk health before installing macOS
If all the previous points have been completed, and most importantly, S.M.A.R.T. your disk inspires you to do great things - it’s time to check the disk for errors. To be fair, the macOS installer itself will check the disk before starting the installation, but this will be a process out of your control. If errors are found on the disk during the scan and they cannot be corrected, the installer will terminate the installation with an error. And it may well turn out that you no longer have the old macOS, but the new one has not yet been installed and cannot do this due to errors. That’s why, in order to avoid such an unpleasant situation, after which you will definitely have a hard time, I recommend the following.
First you need to turn on your Mac with the Alt key(Option) and on the boot screen select Recovery or Recovery mode (depending on the installed macOS and language). Or, if nothing appears on the screen except your disk with the operating system, you need to press the CMD+R key combination. In this case, macOS will be loaded from a hidden partition on your disk.
Then go to Disk Utility, in which you need to run a disk error check:

When the icon appears hard drive with a green check mark, it means everything went well and you can start installing the latest macOS! But if some yellow or red icons appear, it means the disk is bad and needs to continue to be diagnosed with cooler programs!

Installing or updating macOS
Hurray, it seems all the checks and preparations have been completed and now you can safely dive into the abyss of fresh glitches, bugs, and just plain crookedness of the new macOS! On the other hand, if you did everything correctly and point by point, then it is likely that most of the glitches and problems will pass you by and the new macOS will only make you happy :) Well, you already know what to do next -
Advanced computer users, as well as security experts, recommend using the latest versions of software, including operating systems. Next, we want to talk about the procedure for updating an iMac or MacBook to latest version macOS.
The latest at the time of writing this article is macOS Mojave 10.14.3, released in October 2018. Among the notable innovations, this release brought the long-awaited dark theme, deeper integration of the Siri assistant, a file organization tool called Stacks, as well as improved tools for removing screenshots The general system requirements to install this update are as follows:
- OS X 10.8 or later;
- 2 GB RAM;
- 12.5 GB of free disk space;
Please note that not all Apple devices can install Mojave - make sure yours matches the list below.
- MacBook released in 2015 or later;
- MacBook Air released in 2012 or later;
- MacBook Pro released in 2012 or later;
- Mac mini released in 2012 or later;
- iMac released in 2012 or later;
- iMac Pro;
- Mac Pro released in 2013, 2010 and 2012 with a video card that supports Metal technology.
Procedure to update to macOS Mojave
Before proceeding with the update, we recommend making a backup copy using Time Machine: firstly, this will help restore functionality to the computer in case of problems with the update; secondly, it will secure important data; thirdly, it will allow you to roll back if the update does not suit you.


Now you can start updating.
- Open the Mac AppStore from the Dock.
- Use the search and enter your query macos mojave.

Select a result from a category "Utilities".
- Click on the button "Download" to start downloading the installation file.

Pay attention! The installer is approximately 6 GB in size, so the download process may take a long time!
- Once the download is complete, open Finder and go to the catalog "Programs".

A new item should appear in them called "Installing macOS Mojave". Launch this application.
- Select an item "Continue".

You will also need to accept the license agreement.
- Next, the installer will ask you to select a disk to install the new version of MacOS. Most often the main drive will be available, "macintosh HD", choose it.
- The installation procedure for the newest version will begin. It may take some time, up to 30 minutes. During the process, the computer will restart several times - do not pay attention, this is normal, you just need to wait.
- As a rule, the update picks up all user settings, so after installation you only need to enter the administrator password and select a light or dark system design.


Done - yours Apple device updated to the latest version of the operating system.
Possible problems and their solutions
Some users may experience difficulty downloading or installing updates. Below we describe the most common problems and methods for eliminating them.
Mojave installer takes too long to load
First of all, the problem is that the Internet connection is not fast enough. The download may also freeze if the connection is lost or there are problems with Apple servers. The latter can be checked at the following link.
There is also a reason to use a wired connection rather than Wi-Fi - just connect your computer to the router or plug the Internet cable into the appropriate connector.
The installer gives the error “macOS could not be installed on your computer”
If the installer for the latest macOS reports that it cannot install the update, do the following:

The installation was not completed correctly, the computer does not boot the system
If something went wrong at the last stage of installation and the computer cannot boot into the system, go into recovery mode and restore from a backup or reinstall the OS.
Conclusion
Installation latest version macOS is a simple task, subject to the hardware specifications of the device system requirements for update.
In addition to the pleasant Dark Theme, improved Finder and other goodies, the new Mojave from previous version MacOS is also distinguished by the redesigned Mac App Store, which, as you know, Apple has not changed for a very long time.
It’s hard to believe today, but there haven’t been any major changes in the Mac App Store since 2011 (that’s when Macs had OS X Snow Leopard, and all of humanity played Angry Birds).
However, this time the Mac App Store was, of course, updated, but somehow in such a way that there’s nothing particularly surprising there either. For the simple reason that the application simply became more like the one with which all Apple users have been familiar for a long time.
The new Mac App Store now has tabs (“ Opening«, « Creation«, « Job«, « Game«, « Development«, « Categories" And " Updates"), which, in theory, should simplify navigation around the store, there are video previews of applications, and ratings and reviews have become more visible. In general, it seems like it really should be more convenient for the user.
But there is one oddity that is somewhat puzzling at first. The fact is that since time OS X Lion Apple taught users to update the operating system through the Mac App Store. And she did. Everyone is already accustomed to searching for and downloading OS updates through the store.
And today, probably, only those who use Mac a very, very long time ago(that is, at least 8 years) still remember that before the release of OS X Lion it was necessary to update the operating system a little differently: not through the store, but simply in “ System settings". So, in MacOS Mojave this rule applies again.
Don't miss it: You can buy and/or sell a used MacBook (including with the possibility of a preliminary expert assessment) on the specialized online platform macplanet.com.ua - a convenient resource with good recommendations.
So, returning to the topic, if you are also puzzled by questions...
how to update MacOS Mojave and why the Mac App Store does not show system updates
...then now, we repeat, it’s not the store you need. Open " System Settings " and click " Software update "(or click on Apple icon in the corner of the screen, then - “ About this Mac" and further - also " Software update«):
In the “Software Update” window, you can also activate the option “ Automatically install Mac software updates“, and then the computer will look for updates itself. In the section " Additionally"You can also indicate that should do with updates: just check for availability, download, but not install, or search, and download, and install in automatic mode. At the same time, you can also specify what and with what updates (MacOS, applications or security updates) the Mac can do.