What happens when you empty the Trash?
If we empty the trash, this does not mean that the files will disappear forever. They simply lose connection with the file system.The space occupied by deleted files is marked as "reusable" so that the deleted data remains physically intact on the disk until it is replaced by other files.Files will only be deleted when they are replaced by new files.In order to prevent deletion, we must stop using Mac immediately if we want to recover deleted data from garbage.
How to restore deleted files from the cart to Mac
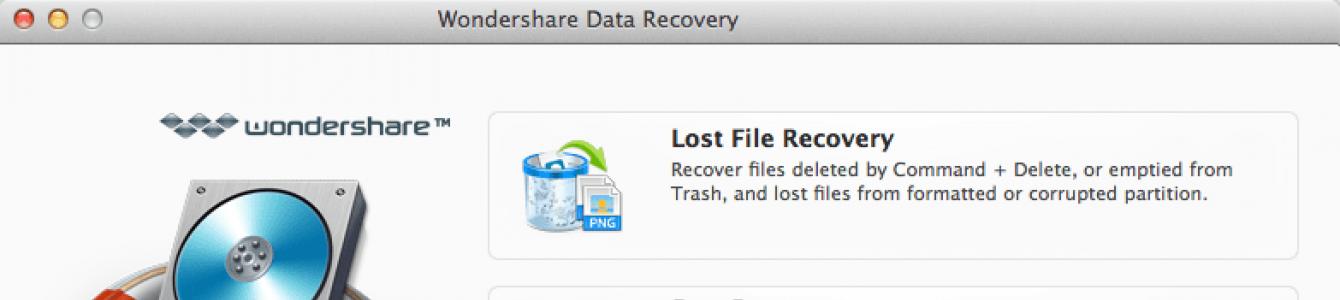
To recover deleted files, we recommend the program Wondershare . It is easy to use for users Mac, and is compatible with Mac OS X Mavericks. With a user-friendly interface, you can restore your recycle bins Mac using just a few clicks.If the space is not overwritten, the deleted data can be recovered 100%.
Why Wondershare
Wonder Share allows you to perform the following actions:
- Recover 550 different formats that are lost in various situations
- Recovering data lost as a result of formatting and deletion and in the absence of access
- Recovery various types files such as images, recordings, documents, songs, videos and more
- This allows you to save data from your Mac desktop B ook, iPod, Mac, USB drives, digital cameras, mobile phones and other media
- Read and recover data from protected storage
- You can download and install any program and not be afraid of losing your data, so you can replace the lost data and install the program on another partition.
Steps to restore the recycle bin to Mac
Step 1 Selectmode"Lost File Recovery"
This option allows you to recover information from a partition or removable media, regardless of how they were deleted - using " Ctrl + Delete » or emptying the Trash.
Advantages of this option: It only takes a few minutes. If you can't retrieve the deleted file in this mode, you can try "Draft Recovery" later versions, which can recover tons of files, including long-lost ones.

Step 2Scan garbage for Mac
Select the device or media from which you deleted files.Then click " Scan " to search for deleted files.

Step 3Browse and recover files from Macgarbage
When the scan is complete, all the information you deleted is listed in a table with the dates and location of deletion (desktop or library).Undoubtedly, the data deleted from the Recycle Bin is located in the "Trash".Or you can search for the file name in the search bar at the top to download it quickly.
Before restoring, you can preview the file to make sure it's the right file and check its size.Common formats for images, documents and archives can be viewed directly.

When checking file recovery, click on "Recover".What you need to keep in mind: do not save recovered files in the same place where you lost them, otherwise you may overwrite them.
Adviсe: Before "emptying the Trash", check your Trash carefully.
He told me how you can recover deleted files on a Mac for free using the Disk Drill utility. The method works with any hard drives and flash drives.
What should you do if you accidentally deleted a file and there is no backup copy? What if the backup disk itself becomes damaged and is no longer recognized by the Mac? Maybe your camera card or flash drive has stopped being read? There are many options. But in all these cases, Disk Drill will help you recover the data.
What information can Disk Drill recover?
It doesn’t matter at all on which drive the files disappeared. If you can physically connect it to your Mac, then Disk Drill will get to work. Even if the computer can't read it. The use cases are as follows:
- Files have disappeared from your internal storage, external storage, USB flash drive or memory card;
- A partition on an external drive has disappeared and can no longer be mounted (often happens when the drive is removed incorrectly);
- The music has disappeared from the MP3 player or e-reader a la Kindle;
- The system has stopped recognizing the memory card, flash drive or hard drive.
Disk Drill works with all popular file systems:
- HFS/HFS+
- FAT/FAT32/exFAT
- EXT3/EXT4
Deep Scan works even with damaged or missing file systems.

How to use Disk Drill
By default, Disk Drill scans your drive and shows all the deleted information it can find. If the file has just been deleted, then the function will handle this Quick Scan(Quick Scan). If not, then it goes Detailed scan(Deep Scan).

Since deleted files lose all metainformation, all found files will have incorrect (random) names, hierarchy and creation/modification date. To find the file you need, you need to sort the information by type and size, and then use the Quick View function to find the file you need.

To avoid this hassle, Disk Drill offers several interesting features. These are the ones I forgot to enable first, so don’t repeat my mistake.
- Recovery Vault- stores a copy of the metadata of all deleted files. If something happens, the names, creation dates and their hierarchy will be preserved during restoration. The function is generally unpretentious to resources. A metadata archive for 10,000 files takes approximately 60 megabytes.
- Guaranteed Recovery- stores invisible copies of all files that end up in the trash. If you deleted something you needed and then regretted it, Guaranteed Recovery will restore any file without any problems. In the Disk Drill settings, you can set how much space you want for hidden copies of files from the recycle bin and how long you need to store them.

Both of these functions work even in free version Disk Drill. So, you can add an additional layer of protection to your files by simply setting trial version. But you will have to pay for the recovery function itself.
The only thing you need to remember is that Recovery Vault and Guaranteed Recovery only work with HFS & HFS+ and FAT partitions. They cannot be enabled for other sections.
How to recover deleted files from a flash drive
To demonstrate the work, I took and formatted my 64 GB flash drive. Initially, it only featured the season of The Man in the High Castle. I don’t even remember what was stored there and deleted before.

A quick disk scan took about 15 minutes. As a result, Disk Drill found:
- all 13 episodes of the series;
- 18 documents from the sketch editor;
- 208 music tracks in mp3;
- 232 photographs;
- some videos in 3gp (I have no idea how they ended up there);
- several videos in mov format.
The Mac OS operating system, like the Windows family of operating systems, is equipped with many protective functions, among which a special place is occupied by the recovery of deleted data. This procedure allows you to regain access to folders and files stored on the hard drive of a Macintosh PC if they were erased as a result of a system failure or unintentional actions of the user.
Methods for recovering information on Mac OS
To start the procedure for restoring erased data, hard drive data can be used as standard tools, built into the very Mac system OS and specialized software. The first group includes:
- basket (Trash);
- utility Time Machine.
Resuscitation of information through the basket
As in Windows, in Mac OS files and folders deleted from the hard drive are first moved to a special area - the Recycle Bin, which is located on the system partition. Therefore, if the Trash was not cleared after erasing the data, you can restore the information directly from the Trash. To do this you need:
After emptying the Recycle Bin, all files from it will be erased, that is, the above-described method of resuscitation will not bring a positive result. In this case, you should use other tools to recover data deleted from the disk on Mac OS.
Using the Time Machine utility
Time Machine is a program built into Mac OS designed to backup data stored on hard drive personal computer. With its help, every hour in automatic mode system restore points are created, which can later be used to return accidentally deleted files. When you first launch the application, a backup of your entire hard drive is created. Subsequent backup affects only the information that has been changed.
To start the data backup procedure you must:

After a successful data backup, accidentally deleted files can be recovered as follows:

Specialized software for resuscitating erased data on Mac OS
When you delete files on Mac OS, they do not disappear without a trace. The system simply sees the space that was previously occupied by data as free. That is, new information can be written to it. And as long as new data does not overwrite the old ones, they can be restored using specialized software.
The most effective resuscitation programs developed specifically for Mac OS are:
- Disk Drill;
- FileSalvage;
- PhotoRec;
- Data Rescue.
All software works according to a similar scheme. Therefore, having mastered one utility, you can easily figure out the rest. As an example, let's look at the principle of recovering data deleted from a disk on Mac OS using Disk Drill. This program works perfectly with all file systems and allows you to regain access not only to lost files, but also to entire partitions.
The sequence of actions will be as follows:

The recovery process can be monitored in the corresponding window. 
No matter why you lost or deleted files on Mac, this article provides best solutions to recover Mac files with or without software. Read on and learn how to recover files and folders on Mac.
How can I recover deleted files on Mac?
I accidentally deleted the entire family folder on my Macbook Pro. I have many treasured family videos and photos in this folder. Which reliable file recovery software can help me recover a deleted folder on Mac?
Is it possible to recover a deleted file on Mac?
Yes, it is. If you did backup copy folders using Time Machine, you can recover deleted folders from Time Machine. If you haven't done this, you don't need to worry too much. Indeed, the deleted folder will be marked as inaccessible data on your Mac. So, if the deleted folder has not been overwritten by new data on your Mac, you can recover it using software Recoverit Mac File Recovery.
Part 1. Best Deleted Folder Recovery Software for Mac
Recover Data Recovery Mac is such a folder recovery software that helps you recover deleted folder on Mac easily, no matter whether the folders on your Mac are lost due to deletion, formatting or even corruption. With its help, you can easily recover almost all types of files from lost Mac folders, including photos, audio files, videos, document files, archive files and much more. Currently, this data recovery tool is fully compatible with Macbook Air, Macbook Pro, iMac, Mac Mini, etc.
Recoverit is the best software to recover deleted files
Recovering deleted or lost folders and files from MacBook is easy, safe and complete.
Recover lost folders due to accidental deletion, formatted hard drive, virus attack or system crash.Recover deleted files and folders such as photos and documents in all formats with a 96% success rate.
Supported OS: Mac OS 10.14, 10.13, macOS 10.12, OS X 10.11, 10.10, 10.9, 10.8; Windows 10/8/7/XP/Vista.
Video tutorial on how to recover deleted files and folders on Mac
Part 2. How to recover deleted folders and files on Mac even from an empty Recycle Bin
How to recover permanently deleted files?
Download and install Recoverit Mac Undelete software on your Mac computer. Please do not install the application on a partition from which your folder has been deleted on your Mac.
Step 1 Select a location for deleted files
Launch the Recoverit data recovery program. To recover deleted files on Mac, you need to select the location or hard drive where your folder or files are deleted or lost.
Step 2 Scan the partition or disk

Recoverit Mac File Recovery will begin scanning the selected partition or hard drive to find deleted files and folders on Mac. While scanning, you can check the scanned files.
Step 3 Preview and Recover Deleted Folder from Mac

After scanning, you can select the recovered deleted folders and view some recoverable files such as photos, pictures and images. Then you just need to mark the folder or files you want to recover and click "Recover" to save them back to your Mac.
Note. To avoid overwriting data, do not save the recovered folder or files back to the original partition.
Part 3. How to Recover Deleted Files on Mac without Software
Apart from Mac data recovery software, we have also found 2 more native solutions for Mac, namely Mac Trash and Time Machine. Unlike Recoverit, they are not always workable and are time consuming in the long run. But in some cases they are really simple and quick. Let's see how they work and why they fail to recover deleted files.
What can cause files to be deleted on Mac?
- Drag unnecessary items to the Trash in the Dock;
- Select the file and press "Command-Delete" to delete the file;
- Select an item in the Trash and select "Delete immediately";
- Empty the Mac Trash to permanently delete files and folders;
- Use the keyboard shortcuts “Option + Command + Delete” to permanently delete files;
- Click the Search icon in the Dock and select Empty Trash;
- Configure your preference settings: “Remove items from cart after 30 days”;
- A virus or Mac system crash can delete your files.
Solution 1: Recover files from Recycle Bin on Mac
The most in a simple way recovering deleted files on Mac should be recovering from the Recycle Bin if files are deleted by dragging them to the Recycle Bin using "Delete" or pressing "Command-Delete". Otherwise, Solution 1 will not be a workable way to help you recover your permanently deleted files. In any case, you have three options for recovering files from the Recycle Bin.
- Option 1: Open Trash and drag deleted items from the Trash.
- Option 2: Open the Trash, select the items you want to recover, and select File > Revert
- Option 3: Open Trash, select and copy items, paste them somewhere safe and different.
By following the instructions, you can get your deleted files back in a minute. How easy and simple, right? However, if you have deleted files permanently and these methods do not help, use Time Machine or Recoverit Mac File Recovery.
Solution 2: Restoring from a Time Machine backup
Time Machine is another built-in Mac program for backing up and restoring data. If you have regular backups of your Mac files, you can always restore them from Time Machine so that your files are not deleted or lost.
- Make sure your Time Machine backup drive is connected and turned on;
- Open the folder where the deleted files are stored and click the Time Machine icon;
- Use the timeline, scroll the screen, or use the search field to find deleted files;
- Select the files you want to recover and press Spacebar to preview;
- Click "Recover" to recover files from Time Machine.
Recover files on mac with software
When you realize that files or folders you need have been deleted from your Mac or external device, you should check the Recycle Bin or Time Machine Backup first, which can save you a lot of time and effort. If the solutions do not work, please contact Recoverit Mac File Recovery immediately. This is your last option to recover lost or deleted files on Mac. It supports Mac data recovery in any situation.
Note. Recover Lost Mac Data under Mac OS X 10.13 (High Sierra)
Due to macOS High Sierra requirement (macOS 10.13) Mac users do not have access to the built-in system disk from any applications. Therefore, if you need to recover lost data from your system drive under macOS 10.13, first disable System Integrity Protection.
How to disable "System integrity protection"?
Please follow the instructions below.
- Step 1 When you hear the startup tone, restart your Mac and simultaneously hold down the “Command + R” keys to boot OS X into recovery mode.
- Step 2 When the OS X Utilities screen appears, instead open the Utilities menu at the top of the screen and select Terminal.
- Step 3 In the Terminal window, type “csrutil disable” and press Enter, then restart your Mac.
Conclusion
This is how you can recover deleted files on a Mac.
Disk Drill is a relatively new data recovery program developed for two platforms - Windows and Mac OS X. Like any other recovery program of this class, it covers a wide range of devices from which the user can perform recovery: computer and laptop, Windows and Mac, phone and tablet, HDD (SSD) drive or flash drive, etc.
Latest on at the moment recovery utility version, Disk Drill 3.0, compatible with all operating systems starting from Mac OS X 10.8.5+. By the way, the recently released Sierra is fully supported. As for the Disk Drill for windows edition, all functions are identical to those of Makov. The latest release is called Disk Drill 2.0 for Windows, available for Windows XP and higher (Vista / 7 / 8 / 10).
Key Features of Disk Drill
We will consider key features programs that are equally relevant for all three versions of Disk Drill Pro / Basic, Disk Drill for Windows and Mac OS X.
Recover all file formats and systems
If the developers are not lying, then their Disk Drill program is capable of recovering files of more than 300 formats from the ashes. Including:
- photos in JPG, PNG or TIFF, pictures AI, PSD and INDD
- video files - AVI, DV and MP4
- music files (AIF, MP3 and WAV audio)
- RAW images– CR2, NEF or DNG
- documents in DOCX, PPTX and XLSX format (thus, the Disk Drill functionality allows you to recover damaged Word and Excel files).
As for file systems, Disk Drill can read and scan file systems of the following formats for remote data: HFS and HFS+, FAT/FAT32/exFAT, NTFS or EXT3/EXT4. Essentially, this suggests that you can attach any data recovery device to your PC or MacBook. In addition, if you use the Deep Scan option, volumes with a missing or damaged file system may also be able to detect something.
Available scan modes and recovery types
Quick SSD/HDD Scan
The quick disk scan mode in disk drill allows you to get files back on your Mac along with their metadata, names and locations. If you recently deleted files, then this is perhaps one of the best recovery options before you formatted the HDD or overwrote a lot of files, which reduced the chances of correct file reconstruction.
SSD/HDD deep scan
Despite the fact that a deep HDD scan will take more time, this mode, built into the disk drill application, allows you to “dig out” what was otherwise impossible. The point is that some files may be damaged, and this requires a careful search for them in the file table. Say, if the system does not read the memory card at all, in Disk Drill you can understand whether it is possible to return the file table or not.
Return of protected data
For Mac computers this is probably one of the best options, if you installed the Disk Drill program before deleting important files, and the Vault and/or Guaranteed Recovery options (they are responsible for saving data on the disk) were already activated within the program.
Universal search and recovery of hard drive partitions
This function allows you to recover mac partitions formatted in HFS+ or NTFS. Support file system fat32 is also available. In all cases, Disk Drill works at a low level with disks as binary elements, quickly scans the disk and looks for signatures, known partition headers. This function is extremely necessary for recovering partitions on a Macbook Air / Pro hard drive or SDD.
HFS+ recovery
The Disk Drill application comes with 3 SSD recovery modules that were created specifically for HFS+ partitions:
- reconstruction of HFS+ directories
- search for deleted HFS+ partitions
- HFS+ extraction
Everything works very quickly, efficiently and brings Mac OS X back to normal.
Supports all storage devices and devices
You can connect a specific device and restore it in a few minutes. In addition to desktop solutions, Disk Drill successfully copes with iOS (available iphone function recovery) and, of course, Android phones, tablets. By the way, we have already written about the wondershare dr fone program.
The free version of Disk Drill can scan virtual and hard drives - including Macintosh hard drives, external HDDs and SSDs, digital cameras, iPhones, iPads, iPods, Android phones, USB flash drives, Kindles and memory cards.
Disk Drill is great for beginners
Most likely, you will not have any questions as you use the disk drill application. Just click on the restore button - the program will do all the operations for you.
In fact, there is no need to spend hours exploring the functionality of the program; it has a built-in step-by-step wizard that will guide you through the necessary steps in a simple manner.
Additional programs for optimization as part of Disk Drill
The program package includes the so-called. an additional package of free disk tools (Extra Free Disk Tools Disk Drill), designed more for home users, but not for professional experts. You can optimize Mac OS X and reduce its size, find duplicate files on your hard drive, perform a backup, check the status of your SSDs and hard drives, and more.
What tools does the Disk Drill program offer as a significant bonus? This is a few free programs for optimization, useful for comprehensive maintenance of order on a computer or laptop:
- Disk Health – checks SMART indicators, as well as disk monitoring. All this together will prevent disk failure.
- Optimization program Mac Cleanup and Duplicate Finder - analyzes the hard drive on Mac OS and searches for junk files on it, the removal of which will only be beneficial and free up space on SSD drive
- Recovery Drive – creating a bootable USB flash drive for later recovery of Mac OS X using Disk Drill tools
- Data Backup – creating a mirror (byte for byte) copy of a disk or partition on an SSD for data reconstruction
Resume. Thus, Disk Drill is another program for recovering files on SSD and HDD (see analogues), positioning itself as a universal solution for both Mac OS X and Windows. As already noted, there is a Pro version that works without restrictions, while the Basic edition allows you to recover up to 2 GB of files.