Upvel is a little-known brand on the Russian network equipment market. Its products are positioned as budget ones. That is, inexpensive and unpretentious routers for home and small wireless networks. This article will look at several sample devices from the company, instructions on how to set up Upvel routers and the main points when using them.
Upvel routers
Upvel has a solid list of routers for home and industrial use. As always, the design of such devices does not have any special fancy elements. Everything that is placed on the body for decoration purposes is minimal and fits harmoniously into the design.
Although the settings of many routers are not much different, they still have some features, then a description of the process will follow, as well as appearance and opportunities specific models from Upvel.
Setting up the Upvel 315BN router
This router is a classic device for creating small networks and connecting to the Internet wirelessly. The most budget option from the entire line of network devices from the manufacturer. Its cost does not exceed 1100 rubles, depending on the store and region. Upvel UR 315BN looks like a regular router, in a simple way - a black box with an antenna and a number of LEDs and ports.
The front panel has a standard row of indicators that indicate the current status of the device and possible problems. 4 LAN LEDs, one each for WAN and WLAN, status and power indicators.
The rear panel is also nothing unusual - 4 LAN ports for creating a wired local network, one for the provider cable, a reset button and the same thing - WPS activation. Power connector and on/off switch.
Connecting cables and setting up
Setting up the Upvel 315BN router begins with connecting all the necessary cables into their corresponding connectors. There is a hole marked DC for the power cord. The WAN port is used to connect the provider’s cable, and one of the LAN connectors will be needed for the initial setup of the router.
An interesting feature is the included disk with the Upvel router setup program, which greatly simplifies the first acquaintance with the device. Once the CD is inserted into the drive, the application should automatically load. Here you need to select a setup wizard, which will guide you step by step through all stages of the configuration. Next you need to install the language. The good news is that there is Russian support. After the greeting, you need to click “Configure a router”.

The window that appears shows in detail and with pictures how and what to connect. After completion, click the “Next” button, and the next page will notify you that the router is connected. The next transition to a new window will show the settings options. Among the available ones, you need to select WAN/Ethernet, since this model cannot be connected in any other way.
A new window will prompt you to specify the connection type. Most modern companies providing Internet access use PPPoE technology, so most likely this is what is needed. Here you will need data from the agreement with the provider. In particular, the login and password for access. After entering them and clicking the “Next” button, the router will configure the connection, which will notify you in the last window. At this stage, setting up the Internet in the Upvel UR 315BN router can be considered complete. All that remains is to configure its wireless distribution.
WiFi
To go to Wi-Fi settings you need to click on the corresponding large orange button in the main panel. The window that opens presents several fields that need to be filled out. The Network Name or SSID is what appears as the name when scanning for available connections. You can enter anything. It is better to choose the most reliable encryption type - WPA2. Well, what remains is the network key, that is, the password, after entering which the connection will be possible.

Actually, this is where the router settings for distributing the Internet over the air end. Their set is quite enough to create a connection in a simple home network. But Upvel at any time, for example, to change a password? Everything is very simple - just enter the IP address in the browser - 192.168.10.1. Thus, the user will have access to the router’s web interface. The authorization page contains two fields: login and password. The factory default is set to admin in both cases. It is recommended to change them immediately after logging into the administrative panel.
Router 344AN4G
The Upvel UR 344AN4G router has richer characteristics and capabilities compared to the previous model. In particular, it supports connecting external drives, connecting via DSL and Ethernet. Its body is slightly larger than its younger brother and has an expanded set of indicators on the front panel:
- Power - constantly lit when switched on.
- DSL—informs that a cable is inserted into the DSL connector and there is a connection.
- Internet - indicates that there is access to the external Network. Flashing means traffic is being transmitted.
- LAN ports 1 to 4. It is noteworthy that in this model, LAN1 port can be used as a WAN when a connection is created via Ethernet. The rest are used to physically connect devices using RJ-45 connectors.
- WLAN—The wireless transmission access point is enabled. Flashing indicates traffic activity in at the moment.
- WPS - can only blink for two minutes, which indicates that the device is waiting to connect via WPS.
- USB. Constantly on - the device is connected, blinking - transmitting data.
The back panel is also much richer than other models, and this is understandable, the Upvel UR 344AN4G router is positioned as a universal tool for creating a variety of networks and services.

From distinctive features It is worth noting the USB and RJ-11 connector for connecting a cable in order to use DSL technology. There is also a physical button to activate wireless data transfer. It is not so common on modern routers.
Connection and setup
This router can connect to the Internet in three ways:
- ADSL;
- 3G/4G modem;
- Ethernet.
Each type has its own connectors, so it will be quite difficult to make a mistake. For the modem - USB, telephone cable - RJ-11, and for Ethernet - LAN1.

Setting up this model is no different from the method described above. There is a slight difference in how to connect a modem and ADSL, but the wizard presented on the disk easily solves this problem, walking you through all the steps step by step.
Router 825AC
The Upvel UR 825AC router is a universal combine with a stated data transfer speed of 1200 Mbit. Manufacturers moved away from the design canons of such devices and introduced a little futurism. This image is complemented by two antennas capable of operating at 5 GHz frequencies. Among the indicators on the front panel, it is worth highlighting two different LEDs for 2.4 GHz and 5 GHz, which light up depending on the frequency used.

On the back panel there are USB ports, 4 LAN, 1 WAN and a power button. It is worth noting that there is another USB connector on the side of the device for convenient connection of modems.
Settings
As usual, Upvel UR 825AC comes with a CD, with which you can perform basic connection setup without delving into all the details of the configuration. When you launch it, there is a separate item “ Quick setup" Using a step-by-step wizard, the program will guide the user through all stages, right up to the final result and a fully configured device.

More subtle settings can be changed by logging directly through the web interface. If this happens at the initial stage, then the computer must be connected to the router using a patch cord. In cases where the connection has already been established, you just need to enter address bar browser IP address 192.168.10.1. The system will ask you to specify a login and password, the default value of which is admin.
There are a lot of settings, and they allow you to configure the device for almost any need.
The article described the process of setting up an Upvel router using the example of several models. Now it’s worth talking about how to increase the performance of a wireless network. This will be relevant not only for WiFi Upvel, but also for other router models.
- There should be as few physical barriers as possible between clients and the router - partitions, walls, etc. Ideally, direct visibility.
- Radio interference from other devices in the room can cause delays in data transmission, which will impact performance. Therefore, the router should be placed away from such devices.
- The 2.4 GHz frequency is very popular among routers and Bluetooth adapters. Therefore, interference and failures when working on it are a common problem. It is better to use the 5 GHz frequency, since fewer devices work on it.
- You can also change the device power in the advanced settings by going to the administrative panel via the web interface.
Conclusion
Apparently, Upvel is just beginning to explore the Russian market. It is worth noting that it does this quite effectively. A wide range of available routers will allow you to choose the right one for a specific task. Setting up an Upvel router does not cause problems even for inexperienced users, thanks to the program included in the kit. The cost of budget versions is also not high and is available for creating simple home networks.
In addition to routers, the company also sells other types of equipment. Smart TV set-top boxes, wireless network adapters, switches and various accessories for them.
UPVEL company specializes in the development of network equipment. Their product list includes a number of router models that are popular with many users. Like most routers, devices from this manufacturer are configured through a unique web interface. Today we will talk in detail about the independent configuration of devices of this type to ensure their correct functioning.
It is important to install the router indoors correctly. Choose the most convenient location so that the signal from the wireless network covers all the necessary points, and the network cable is long enough to connect to the computer. In addition, it is worth considering the presence of partitions between rooms when choosing a location.
Almost all routers from the company in question have a similar shape, where the connectors are located on back panel. Pay attention to her. There you will find WAN port, Ethernet1-4, DC, WPS and on/off button. Connect the network cable, ensure the power supply and proceed further.
All that remains is to check the status of the IPv4 protocol in the operating system. Obtaining IP and DNS must be done automatically. To verify the correctness of these protocols and change them if necessary, please refer to our other article at the link below. Execute Step 1 from section "How to set up a local network on Windows 7".

Setting up the UPVEL router
Most UPVEL router models are configured through the same versions of web interfaces, some of them only have additional functions. If your device has a different type of firmware, simply find the same sections and categories and set the values provided in the instructions below. Let's look at how to enter the settings:

Now you are in the web interface, and you can proceed directly to editing everything you need.
Setup Wizard
The developers provide the opportunity to use a quick configuration tool, which will be useful for inexperienced users or those who do not need to use additional options. Work in the Wizard is carried out as follows:

After pressing the button "Completed" all changes will be saved, and the router will be completely ready for use. However, such a quick adjustment of just a few parameters does not suit many users, so they will need to set everything manually. We will talk about this further.
Manual setting
First of all, you need to deal with the wired connection - after successfully logging into the router’s web interface, follow these steps:
- Expand category "Settings" and select a section in it "WAN Interface".
- In the popup menu "WAN connection type" Find the one that suits you and click on it to display additional options.
- Enter the username, password, DNS, MAC address and other information based on the documentation provided by the provider. At the end, don't forget to click on "Save changes".
- Certain models support 3G and 4G. They are adjusted in a separate window, you can go to it by clicking on "Reserve 3G/4G channel".
- Here you can activate channels, select a provider, and rules for reconnecting and checking IP addresses.
- The last step is to specify the time and date so that software correctly collected statistics and displayed them on the screen. Move to section "Date and time" and there enter the corresponding numbers, then click on "Save changes".


Now the wired connection should function normally and you will have access to the Internet. However, the wireless hotspot is still not working. It also needs the correct configuration:
- Open "Basic Settings" through « Wi-Fi network» .
- Set the appropriate range. Typically the standard 2.4 GHz is optimal. Type a friendly name for your location so you can easily find it in searches. You can limit the data transfer rate or leave the default value. Once completed, apply the changes by clicking on the appropriate button.
- Some models support active operation of several access points at once. To view them, click on "Complex of access points".
- You will see a list of all VAPs and can assign individual parameters to each of them.
- It is worth paying attention to Wi-Fi protection. Go to section "Setting up protection". In the window that opens, select your point and encryption type. It has already been said above that the best option is currently "WPA2".
- Each type of encryption has its own parameters. Usually it is enough just to set a strong password without changing other items.
- If the router supports VAP, this means that the WDS tool is present in the web interface. It connects all connections with each other, this increases the Wi-Fi coverage area. Read the instructions provided by the developers for setting up this function and edit the necessary items.
- Wireless network connections are controlled through the section "Access Control". There are two functions here − “Ban listed” or "Allow listed". Set a suitable rule and add the MAC addresses to which it will apply.
- WPS is designed for faster connection to the access point and its reliable protection. In the corresponding tab you can activate this mode, edit its state and change the PIN code to a more convenient one.


So. We have, within reach, a WiFi network available to us. The task is to get Internet through wireless connection for "sharing" on our internal network. To do this, we need to turn one of the routers (Upvel UR-315BN) into a client (repeater).
We go into the router settings through the browser of a computer connected by a patch cord to the device we are testing, entering its own IP address in the line and typing the login and password for accessing the interface that we previously set for security purposes. Immediately after this, open the tab "Operating mode" and change the "daw" to "Wireless WAN connection".
Be sure to save the changes using the button below and go to the tab "Basic WiFi settings". Here we change the operating mode to "Client" and enter the SSID (network name) to which we intend to connect.
We do everything as in the screenshot below, remembering that the channel and encryption method on the access point and our repeater must be identical (that’s why the channel number is set to “auto”). A little about encryption from the inscriptions in the figure... Be sure to remember to save the changes with the button below (otherwise all our movements were in vain).

Next, click on the button "Search WiFi networks" and we get to the page that actually searches for networks. Click here "Search"(strange, how could you not guess?!) and we are presented with a table with the networks available in our area.
We find the network we need, mark it with a “daw” and click “Connect” at the bottom. We will be prompted to enter the SSID and password. Enter the name and password of the network to which we are connecting. Save.

Depending on the firmware, either the router starts to reboot itself, or we need to click the “reboot” button on the “status” page (at the very beginning of the interface).
After this, the router thinks for some time (at the same time it urgently asks not to turn it off or reboot it). After a minute of waiting, you will most likely be asked again to enter your login and password to access the router interface (but this is not a fact - no one can be sure what is on his mind). So, look at the "Status" tab.
If in the list " WiFi Settings" -> "Status" the inscription appeared "Connected", then everything is OK and we have connected to the remote access point.

You can immediately check the availability of the Internet in your browser by opening a website. Well, and for cmd lovers, of course: ping, tracert, pathping. If such an inscription about the connection does not appear for too long, then the procedure should be repeated from the very beginning.
So, after one of our routers (in our case it’s Upvel) has turned into a repeater, now you can connect the rest to it via twisted pair cable from the LAN repeater to the WAN access of our network.
I already spoke last time about how the others are set up and therefore I will not repeat myself. I’ll just note that they work in “gateway” mode, and in the WAN interface settings there is a DHCP client (that is, it is connected to a dedicated line that does not require entering the provider’s login and password).
That's probably all. Let's look at the speed.

We didn’t come across a super high-speed access point, of course, but there was no fish. Yes, also, each of the routers can be accessed from each device connected to any network access point by entering its IP in the browser line and typing the login and security password of this router. Maybe it will be useful to someone.
Many thanks to Ivan for sharing this useful information on setting up the Upvel router in repeater (client) mode.
Upvel is an American company that offers a wide range of equipment for accessing the Internet. We work closely with many providers, who often offer an Upvel router for rent or in installments as part of the connection kit. The equipment is not inferior in characteristics to analogues of more well-known brands and has an affordable price.
The most popular are the budget models UpvelUR-315BN and UR-325BN. They fit the technical capabilities of most operators, so they are widely used. Usually a quick installation disk is included in the kit, but manually setting up the Upvel router will not cause any difficulties. It is enough to obtain the network parameters data from the provider and start studying the instructions.
Models UR-315BN and UR-325BN practically do not differ in price and are similar in characteristics.

Router Upvel UR-315BN:
- maximum Wi-Fi speed 150 Mbps;
- transmitter power 13 dBM;
- one 2dBi antenna;
- 4 LAN ports 100 Mbps;
- presence of a firewall, NAT, DHCP, dynamic DNS, static routing;
- support for all communication protocols used in the Russian Federation;
- VLAN and IPTV support.
Router Upvel UR-325BN:
- frequency 2.4 GHz, standard 802.11n;
- maximum Wi-Fi speed 300 Mbps;
- MIMO support;
- encryption WEP, WPA, WPA2, 802.1x;
- transmitter power 13 dBM;
- range of action outdoors is 300 meters, indoors up to 100 meters;
- 4 LAN ports 100 Mbps;
- support for bridge mode, repeater mode, WDS technology;
- support for communication protocols used in the Russian Federation, the presence of static and dynamic routing, and a firewall.
- 2 antennas of 2 dBi;
- 32 megabytes of RAM;
- VLAN and IPTV support.

As you can see, the main difference is in the number of antennas and the maximum possible speed wireless connection. The routers have very decent characteristics for their price category; VLAN support is worth noting among the obvious advantages.
Instructions for setting up an Upvel router
Before you configure the router, you need to connect it correctly and set the parameters network card. The WLAN connector on the back of the case must be connected to the Internet cable from the provider, brought into the room. The computer's network card must be connected to one of the LAN ports. If you use an IPTV set-top box, you also need to connect it to one of these ports.
In the settings of the network card in the properties of the TCP/IP protocol, the checkboxes should be checked to automatically obtain DNS and IP. Usually in Windows they are this way by default, but it’s better to check it anyway so you don’t have to return to this issue later.
Setting up an Upvel router includes the following steps:
- Authorization and password change.
- Setting up Wi-Fi.
- Network setup.
- Settings
- Port settings and factory reset.
Authorization and password setting
Before you start, you need to log into the router’s web interface and set your access password. This is necessary in order to prevent penetration and theft of traffic by intruders. To do this, follow these steps:

Wi-Fi Settings
Now let’s go to the “Wi-Fi network” tab and see what options are offered there. The “Frequency” and SSID items can be left unchanged. The router operates on 2.4 GHz, and the SSID is simply the network name that is visible to everyone within the antenna's coverage area. You can enter any word you like. And also, you should not change the channel width - this is a standard parameter for all equipment.
But you can experiment with the channel number in the future. When setting up for the first time, you can set auto-selection, then the router itself will find the optimal one in its opinion. This doesn't always work well, so if your connection is unstable or slow, you can download a special Wi-Fi scanning app that will let you know which channel is best to use. After this, you can change the parameter in the Upvel web interface.
An important point is the encryption method. It is recommended to select WPA-mixed, select both TKIP and AES checkboxes in the cipher set, private authentication method, select “password” for the key format and enter a set of numbers that will be used as a password. This set needs to be remembered or written down somewhere; without it, access to Wi-Fi will be impossible.

Network settings
By opening the “Settings” tab, you will see the sub-items “LAN Interface”, “WAN Interface”, “VLAN Interface”, “Date and Time”. Everything is clear with the last point, you just need to set the current values. In the first point, there are also few possibilities: you can simply change the address of the router on the network. That is, you need to log into the web interface not through the address 192. 168.10.1, but through the one you come up with yourself.
Let's look at how the WAN interface is configured. You will need the data provided by the provider.
First of all, the connection type can be DHCP, PPPoE, PPTP, L2TP depending on the operator.
With DHCP, you simply select this connection type and do not change anything else. Yes, this is the physical address of the equipment. But you shouldn’t touch these settings again, at least without agreement with your provider.

If your connection type is PPPoE, then enter the username and password information provided by your service provider. As a rule, they are specified in the contract.

If the connection type is L2TP, select dynamic IP, enter domain name server (data from the provider), login and password (also see in the contract), permanent connection type, DNS automatically.
The VLAN interface will allow you to configure work with an IPTV set-top box.
IPTV settings
Connect the set-top box to the fourth LAN port on the case. In the settings of the previous section (WAN Interface), the following items should be checked:
- Allow uPNP;
- Allow IGMP proxy;
- Allow pings over WAN.
After that, go to the VLAN settings and check the “Activate” box. The Ethernetport 4 line should have a checkmark and the Bridge parameter, priority 3.
The page allows you to manage VLAN settings, but this is not required for the first setup.
Other features
The router also allows you to reconfigure ports, if you want to make some kind of server on the local network, then Upvel will redirect requests from certain services to the local host for firewall. If you enable this function, you need to specify the IP to which the redirection will be, the port range and protocol.
If you don't need anything like that, just leave this item alone.
And finally, the last point allows you to:
- Save the current router settings to a file in case of reinstallation or other problems. Then in the future you will not have to manually check the boxes; you will only need to download the settings file.
- Load from file - an item that allows you to set all the necessary parameters with one click. If you bought a router from a provider, then most likely they will provide you with a settings file.
- Set default settings - reset equipment settings to factory defaults.
Thus, you can manually configure the Upvel router, and also run automatic installation parameters. Any communication problems or changes to key parameters should be discussed with the operator’s technical support. If you rent a router or rent it in installments along with a connection to tariff plan, then, most likely, it will already be ready for work. However, it is useful to be able to set the parameters to suit your preferences, especially when it comes to Wi-Fi networks.
A special feature of the Upvel router is the non-standard default IP address 192.168.10.1. A novice admin automatically types the “standard” combination 192.168.0.1, tries to log in, and fails. Less often, the setup causes a crash because someone previously bothered to change the Apvel IP. The latter is an effective measure to protect the router against a group of viruses that spoof DNS server names. Using the administration panel, carefully save the results of each stage of settings.
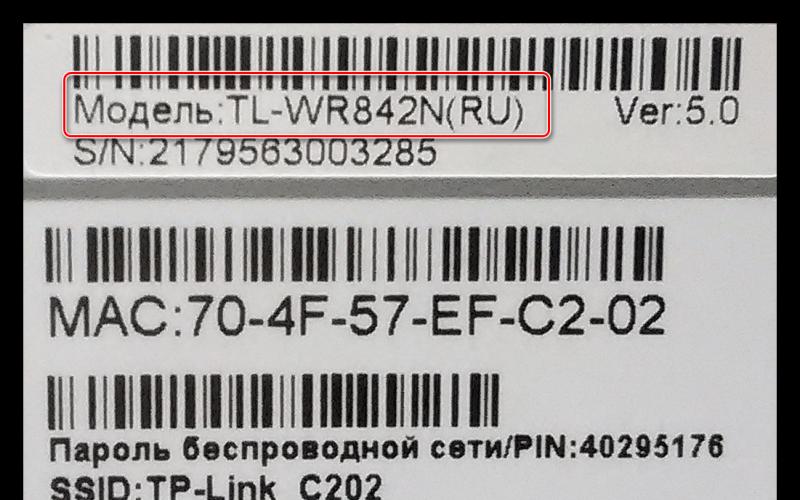
Hard reset
The case sticker sometimes contains information about factory settings. If you have completely lost access, reset your password immediately. At the same time, the IP address value is returned. Typical data set (sticker):
- Password, login:
- 168.10.1 – IP.
- The serial number and MAC often help determine the SSID.
Settings
It is carried out in stages. Let's try to connect using the example of UR 315BN.
- Connect the cables.
- Turn on the power.
- Boot your PC.
- The hardware applies the configuration for some time (5-30 seconds). The network status is not defined: the splash screen is different from the break, but loading Internet pages is impossible.
Safety
- Open your browser.
- Go to settings by typing 192.168.10.1.
- Enter your login and password for the admin panel.
- We recommend that you immediately change the factory security settings (Tools → Password). Recently, many Chinese IoTs were hacked due to a unified password. Some models will allow you to come up with a user-friendly username. Take advantage of the opportunity offered.
Wireless network
- Open the Wi-Fi network tab → Basic settings.
- Enter the SSID, or leave the one suggested by the system. BN tries to set a widely used identifier on Wi-Fi. Change it to make the combination unique. Otherwise the names will be mixed up, operating system will refuse to catch the wave.
- Select a channel (usually 2.4 GHz, combined mode, supporting IEEE11 B, G, N standards).
- Set the authentication type to the last one from the list (usually WPA2).
- Create a password.
- Click Apply changes.

WAN
Wi-Fi connection occurs indirectly. The Internet network is provided by the provider, an external Ethernet cable is connected to the WAN port.
- Open Basic Settings → WAN Interface.
- Select the connection method provided by your provider. PPPoE requires a password, DHCP obtains the address automatically. The difference is sometimes critical. Example: according to the forum, OnLime began to give subscribers gray numbers that are invisible from outside the provider’s network. DHCP will distribute local addresses, blocking the possibility of organizing servers like HTTP.
- Sometimes the provider uses MAC address binding. Then select "clone". The characteristics of the PC's network card will be forwarded. The server will perform the binding.
- Click "Apply Changes".
This is interesting! Typically, DNS names are obtained automatically. Some viruses overwrite fields, distorting traffic directions. Hackers steal passwords and keys.
Custom Settings
Export the result of your work correctly so that you can configure the Upvel router faster:
- Click Save Settings.
- Specify a file name.
Later, refresh your settings with one click. Very convenient for those using password login.
Upvel Availability
According to legend, Upvel was registered (2010) in Los Angeles (original spelling retained). Americans can purchase equipment on ebay, amazon. Other electronic stores sell modems. The website upvel.ru was specially created for Russians. Californians really appreciate the foreign buyer.

Beeline users were the first to gnaw on the granite of settings. Those who wish can study the vicissitudes of mutual struggle today (homenet.beeline.ru/index.php?/forum/1135-upvel/). In addition to official stores, equipment is sold on electronic bulletin boards. The goods are sold:
- M-Video.
- Messenger.
- Formosa.
- Ozon.
- Auchan.
Partners include:
- Citylink.
- El Dorado.
- MediaMarkt.
- Technosila.
- Technopark.
- Yulmart.

A map of points is provided on the official website - go in and click on the Where to buy menu item. You will need to enter the name of the city. The high characteristics of the equipment make one wonder about the lack of popularity among Native Americans. Judge for yourself: UR-814ac is declared fourth generation mobile communications(4G), provides Wi-Fi transmission speed of 750 Mbps.
The bourgeoisie is giving advanced technologies to Russia. Official foreign distributors greet the routers coldly (apparently, economic sanctions are having an effect):
- Sears (a company founded over 100 years ago is now losing money).
- ItoSolutions (the official website is devoid of promising products).