Our shelf arrived - a very interesting copy appeared in my collection - Micron TransPort XKE 1995, a very charismatic and interesting laptop, I must say, but it had a problem - an absolutely dead battery. All my attempts to "rock" it were unsuccessful, and it was decided to disassemble it and try to repair it. No sooner said than done, the battery was dismantled, and a depressing picture appeared before my eyes:
What happened next? (carefully - traffic) 
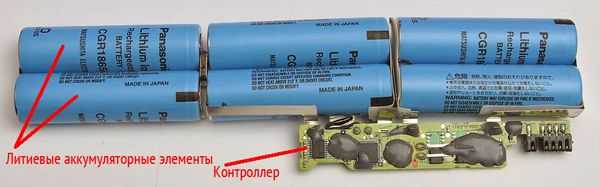
Banks flowed, voltage measurements showed that two-thirds of the cans were dead.
Along the way, I had to solve a puzzle and draw up a schematic diagram of connecting battery cans (I give a photo of a special draft, which always lies under the keyboard for urgent entries): 
The diagram was simplified and it became clear that the battery consists of 3 series-connected blocks of 4 elements each: 
But where did ours go? My eyes fell on a battery from a ThinkPad t60 with a dead controller and quite live elements, an autopsy showed that there are the same 3 blocks of cans, but only 3 cells each, the voltage was similar, the capacity of the IBM battery was larger, well - worse will not. The elements were disassembled and soldered again in the form that would fit in the battery case. 
Attention! You need to work with banks very carefully so as not to arrange a short circuit and not overheat the bank. 
Trial testing showed that the laptop starts from this design. There was no limit to the joy, but it was here that the first trouble awaited me, the banks from ThinkPad were a little thicker and longer than their relatives, so I had to rework the arrangement of elements in the case and process the case itself with a file, and with grief in half the banks fell into place: 
Everything was neatly soldered, checking the battery showed that the banks were working. 
But when it was decided to pack the battery back, the problem of the dimensions of the cans surfaced again - the lid closed only under load, and therefore such a cocoon was made for gluing with superglue, and left for several hours with electrical tape, the fact that the lid is closed is important): 
Next, the seams were cleaned with sandpaper, and as a result I got a monolithic structure with very good gluing seams for the first lump of a pancake: 


The battery fell into place like a glove, the test run was successful. Practice has shown that the life time from the restored battery is about 4 hours (I will test it in more detail when reviewing the laptop itself next time) 
By the way, you can buy new cans for your voltage, capacity, size and color. The price will still be cheaper than a new battery.
And I repeat once again - during these works, it is necessary to be careful and safe, as well as carefully study the parameters of the cans and the connection diagram, so as not to mess up and burn the controller.
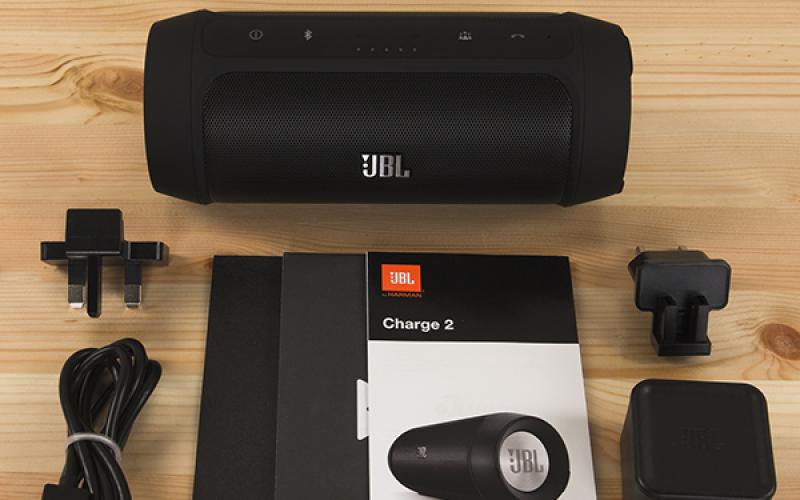
And in the end, a special thank you, thanks to which this beast now lives with me (I don’t post a general photo on purpose in order to leave material for a subsequent detailed and interesting review of this device).

How to repair your laptop battery
Modern man is becoming more and more mobile in all spheres of life. And if quite recently stationary computers were in vogue, now laptops have firmly come into use. With their help, you can carry with you all your documents, contacts, programs on business trips or on vacation. Also with a laptop, you always have multimedia entertainment and games at your fingertips. You can take your laptop with you on the plane and watch your favorite movies during the flight. But all this is possible only if the laptop has a working battery. When a laptop battery fails, it turns into a desktop tethered to an outlet. If the battery fails, you can buy a new one. But a situation may arise when batteries for your laptop model have ceased to be produced due to its obsolescence. Then you can start repairing the battery. Today we will talk about how to repair a laptop battery.
Modern laptop models are equipped with. The battery life of this type is 400-500 charge-discharge cycles. After that, the battery loses more than half of its original capacity and runs offline for less than an hour. In time, this can be an interval from 1 to 4 years, depending on the intensity of use. You can read more about and batteries at the links provided.

A laptop battery usually includes from 4 to 8 battery cells (less often it can be 2 and 12) and a controller. The latter controls the processes of charging and discharging these battery cells. Laptop battery repair may be required in the following cases:
- battery cell wear. Or the failure of individual cans. It is individual lithium batteries (cans) as part of the battery. At the same time, the controller remains in working condition, and the repair comes down to replacing the cans, also called “repacking” the battery;
- deep discharge of batteries. In this case, the problem is that the controller is blocking the charging of the cans. Battery repair in this case can be reduced to balancing the entire assembly using a special charger or to charging each element separately;
- failure of the controller or its individual elements. The controller is a printed circuit board. If it breaks down (for example, some elements burn out), the repair comes down to replacing it.
The image above shows the components of a typical battery laptop.
Tools to fix laptop battery
To repair a laptop battery, you may need the following:
- Knife, scalpel, screwdriver and other tools for opening the battery case;
- Soldering iron, soldering acid, tin;
- Multimeter;
- multifunctional Charger(balance). Example, ;
- New lithium batteries, glue, electrical tape.
As for rechargeable lithium batteries for replacement, they should have similar electrical characteristics. Ideally, these should be the same batteries, only new ones.
DIY laptop battery repair
Dismantling the battery case
This stage is not as simple as it might seem at first glance. Most laptop battery cases are glued together. This makes them extremely unrepairable. There are models that are assembled on latches, but this is an exception to the rule. There are even cases made of solid plastic. In order to get to the battery cells in such models, you will have to cut them, and glue them after repair.

But most battery cases are held on with glue. To disassemble them, it is recommended to slightly heat the plastic along the seam and lightly tap with a hammer. Next, use a scalpel, knife, screwdriver to pry the plastic along the seam and gradually open the case. Control the force so as not to pierce the plastic and damage the lithium cells. This may cause them to ignite.
After disassembling the case, the first thing to do is visually inspect the battery assembly.
Check the controller for burned out cells and the batteries themselves. On normal banks there should be no smudges, swelling, damage.

If the controller is alive and the battery cells are deeply discharged, then there will be voltage at the terminals. It will be much lower than the face value, but it will definitely be present. If there is no voltage at all, then this indicates problems with the controller or a break in the battery assembly circuit. In the case of a deep discharge, you can try to get by with "little blood". That is, unsolder one wire from the controller and connect the iMax B6 (or other similar device) in balancing mode. Before that, you will still need to find balancing points on the controller board to connect the device.
If this does not work, then you will have to disassemble the assembly, unsolder the battery cells and work with each separately. If they can be brought out of their stupor, then good. If not, then battery repair will involve replacing the cans.
Battery cell replacement
If you have to change the battery cells in the battery, first make a scheme for assembling your battery. That is, sketch the arrangement of elements with the designation of positive and negative conclusions. Also put on the paper the connection of the assemblies, the places of their soldering to the controller board. Remember where the thermal sensor was soldered in the circuit, if there is one in your battery.
Before you repair a laptop battery, you need to purchase new cans that are similar in parameters to your old cells. A bank in a laptop battery is a .
It is difficult to give advice for all occasions here. You need to look at what kind of batteries it is in each case. Most often, 18650 lithium batteries with a voltage of 3.7 volts and a capacity of 2200 mAh (2400, 2600) are installed in laptop batteries.
After new batteries are found, you can start replacing the cells.

The cans in the assembly are connected by spot welding. At home, this will be difficult to implement. Therefore, connecting new batteries to the battery circuit is done by simple soldering, and copper wires can be used instead of tape. Ideally, when disassembling the battery, leave pieces of tape on the ends of healthy batteries so that you can then solder them to them. When you solder the wires to the banks, try to do it carefully and quickly so as not to overheat them. After the assembly is ready, solder the controller.
Laptop batteries are expensive equipment, so if you have an old laptop that works fine but needs a battery replacement, then before you consider whether or not to discard your dead laptop battery and replace it with a new one, you'll want to know how you can still revive a dead or dying battery if it is at least 60% of the total capacity. Fortunately, there are many ways to help recover a dead battery, some of them are technical, some of them are beautiful, and some of them are weird.
But before moving on, you should also be aware that it depends entirely on the battery and the factors that led to its death, although the process may or may not work. But, it is worth giving a try to revive the battery using these methods before buying a new one.
Ways to revive a dead or dying laptop battery:
Method 1 - Freeze the battery
Actually, it sounds ridiculous that freezing a dead laptop battery can bring it back to life, but it's true. You can freeze your laptop battery and thus prolong its life. To do this, follow this procedure on how to do it:
Step 1: First, remove the battery and place it in a sealed bag or plastic bag.
Step 2: After that, put the bag in the freezer and leave for 12 hours. (You can also leave it for a longer period, but not more than 24 hours)
Step 3: Once you take the battery out of the refrigerator, remove the plastic bag and let it warm up to room temperature.
Please note: once it warms up, make sure you wrap it in a towel and wipe off any condensation.
Step 4: insert the battery and charge it fully.
Step 5: Once it is charged, unplug it from the mains and let the battery discharge until it is completely discharged.
Then repeat steps 4 and 5 at least 4 times, fully charge the battery and then discharge it completely.
Note: this process is performed only on NiCd or NiMH batteries. Avoid trying this method on a lithium battery as it will only make things worse for the battery. Unfortunately, there is no way to regenerate a lithium battery, but it may help extend battery life. We follow method 2.
Method 2 - Cool down your laptop
If you have a lithium-ion battery installed, you can extend its life by cooling your laptop. In case you have a laptop that gets really hot while working, it can damage the battery and shorten battery life.
I personally tried this method on my laptop Sony VAIO and significantly increased laptop battery life.
Method 3 - Calibrate the battery
This process is not necessary for a new battery, but if the battery dies, then it is a fairly old battery. So, in this case, the inter-verification test will be beneficial for her. Battery recalibration is done because in some cases the OS cannot figure out how much power is left in the battery. This happens when the laptop is always plugged in or if the battery has never been removed from the laptop.

If your battery isn't charging to 100%, let's say only 95%, or if the OS says you're experiencing 35 minutes of battery life but the machine dies sooner or much later, then your laptop battery needs to be calibrated. There are many calibration tools available online for specific model laptop to do the process automatically, but if you have to manually calibrate the battery, follow the process below.
Step 1: first, charge to 100% or the maximum capacity the battery can reach and then leave it to cool down for 2 hours.
Step 2: After that, turn off the power and let the battery discharge. You can do this in two ways, first, let the battery drain while the laptop is running and then set it to sleep or hibernate by about 3 to 5%. Also, you need to make sure the display stays on until it either turns off or goes to sleep.
Step 3: next, let the machine be turned off for 3 to 5 hours > then turn the laptop back on and charge it to 100%.
Hopefully after doing this your laptop should be able to give you a more accurate reading of the actual battery capacity.
Method 4 – Remove the battery while it is connected
If your laptop has a removable battery, then try removing the battery while plugged in. You need to check at the same time how the laptop will work normally with the battery removed. Although, if the laptop is working fine and connected to a power source all the time, you can simply remove the battery.

Chemical reactions continue to occur in the battery whether it is installed in a laptop or not. But, it can increase battery life since the battery is cool when it's plugged in.
But, you also need to make sure that the operation of the laptop will not shorten its life, otherwise the laptop will immediately die, and this may lead to data loss. But if you didn't find this method worthwhile, then follow the last best way.
Method 5 - Charge the battery to 100%

In this method, you need to charge the battery to 100% and then unplug the laptop from the mains and when it dies (less than 5%), then plug it into the computer and charge. Conversely, it shortens battery life on a new lithium-ion battery; so in this case, you can't let the level drop from 35% to 45% and then charge it from 75% to 85%. This will apparently be aiming for better battery life, as this method won't use as many charges and recharge cycles.
The laptop, even when connected to the network, the problem is either in the memory or in the battery. Everyone knows that when a laptop battery finally fails, it can be very difficult to find the exact same one, and often impossible, because past models quickly become obsolete. What if the battery has finally exhausted its potential, and there is no way to purchase a similar one? There are three options: still spend a certain amount of time in order to find the same battery somewhere on the Internet, or contact a professional service center, or try to repair the laptop battery yourself.
Selecting new elements
In this case, battery repair does not mean a partial replacement, but a complete replacement of the entire battery pack. It should be noted right away that this task is not the easiest and will require not only certain knowledge, but also tools, which are also not so easy to acquire.
First you need to open the battery pack itself to see how many cells are installed there and which company - although, in fact, this is not so important. It also does not matter what model the computer that needs to replace the battery has: for Asus laptop you can buy the same batteries as for an HP laptop without paying extra for a brand or logo.
First of all, it is important that the number of batteries matches the number of old cells: it can vary from 4 to 12, depending on the type of laptop. When choosing cells, you should pay special attention to the following indicators: capacity, rated voltage, internal resistance and type of battery. All these parameters, as a rule, are affixed to the laptop itself and the battery pack. Regarding the laptop battery type , now all laptop PCs use advanced .
The capacity of cells for laptops is recommended to be set either nominal (the one that was in old batteries), or more: in this case, the battery can work much longer than the old one. For example, if the battery capacity was 1800 mAh, you can set 1800, 2000, 2100, 2200 mAh. Of course, elements of a larger capacity will cost more, but over time they will really justify themselves.
We open the battery
The battery pack must be opened carefully so as not to damage the plastic case. You can use a screwdriver without sharpening it too hard. Carefully remove the old batteries from the case, paying attention to the fact that adhesive materials can be very strong. It is important not to damage the controller board and wiring. You need to separate the batteries from the electronics from the larger plus sign to the small one, and you can easily determine which sign is which one visually. If there are difficulties with the definition, you can use a multimeter.
How to weld (solder) new batteries
Before starting the welding process, the batteries are connected together overnight: with a positive charge - to positive, and with a negative - to negative, which is necessary to equalize the potential on them.
First of all, they must be soldered together in the same way as the previous ones, and at first one should not rush to throw away the old bunch of batteries: it never hurts to look at the principle of soldering. Despite the fact that brave electronics lovers fearlessly weld a battery bundle with an ordinary soldering iron, it is still strongly not recommended to use it. The fact is that the conductors are soldered until the place of soldering warms up. Such heating is very harmful for the elements: irreversible chemical processes can occur from the soldering iron, which “kill” the battery capacity.

If, nevertheless, the incentive and desire to repair the battery does not disappear on its own, care should be taken to purchase a special machine for microspot welding. When using it, welding occurs very quickly, in a split second, and the batteries simply do not have time to heat up during this time. There is another option: order a bunch of batteries with already welded petals in the workshop, and at home you can already weld the petals in the right order with a soldering iron.
Reprogramming the battery controller using the Battery EEPROM
After the welding of new elements has been carried out, one should not immediately rush to solder them to the electronics. Before this, it is imperative to reprogram the battery controller, which “remembers” all the information about the old battery: how many “charge-discharge” cycles were carried out, what was their capacity level.
For example, if once the capacity of the old battery was 4000 mAh, and after several years of operation it dropped to 200 mAh, the controller will “remember” these numbers and will not accept the indicators of the new battery without first resetting the previous data.
The process of resetting the old data of the controller (in other words, flashing), in theory, can only be carried out by experienced specialists in the field of electronics. But, thanks to the existence of a special Battery EEPROM Works program, this do-it-yourself laptop battery repair becomes possible. It is carried out ten times easier and is available to a large number of people.
The EEPROM chip containing the memory is connected to the charger. The RESET button is pressed, and all other options software will do it automatically. Battery capacity (Full Charge Capacity) will show the real capacity of the batteries that are currently available. Cycles Count is reset to zero, the date also becomes the one that is in the laptop on this moment. The blocking (Permanent Failure Flag) is removed, and all other necessary changes are made automatically. Thus, the battery controller database is reset to zero and is completely ready to accept a new battery pack.
Checking the operation of a new battery and conclusion
After completing all the manipulations with the controller, the battery is finally inserted into the laptop to check its operation, followed by. To see how the battery is charging, just look at its indicator, which is available in the laptop itself. But it is best to install the BatMon program for this purpose. Expect a 100% battery charge for some time.

When the battery is 100% charged, create a new scheme in Windows, in the "Power Options" section, called test. With it, for convenience, the screen always remains on. All signaling devices should be turned off. Run the BatMon program, disconnect the charger from the computer and follow the battery discharge curve, which should descend smoothly, without hesitation. If the curve descends normally at first and then dips, the new batteries are bad.
Next, you need to wait until the laptop turns off on its own and put the battery back on charge. It is recommended to carry out at least two or three such cycles. It is important to consider that after the very first cycle, the curve may quickly drop down, and then the laptop may work at 0% for a long time because the self-shutdown option was temporarily disabled.
After doing this, the computer turns off, but there is no need to panic. The electronic circuit of the battery has not yet fixed where the main "points" of the batteries are located, ensuring their charge and discharge. Therefore, it is necessary to carry out a full charge and discharge cycle at least 2-3 times - to ensure the correct operation of the battery electronic circuit.
Largely due to the creation of certain programs that allow you to reprogram the controller with minimal effort, it became possible to repair the laptop battery with your own hands. However, you should always remember that the use of a specialized spot welding machine when soldering is also an important condition in order to carry out repairs without “destroying” new batteries. If these two conditions are met, the risk of failure becomes much less, and the opportunity to do a useful thing on your own is much greater.
Modern laptops can work for several hours without recharging, it all depends on the manufacturer and the specific model. With time this indicator decreases, and many users are thinking about a complete battery replacement. Is it possible to restore a laptop battery on your own, and how does it happen? Let's find out more!
The cheapest option is to replace individual components
Battery structure
All batteries are made of several elements soldered together, planted in a case. The reason for the deterioration of the quality of the battery may be the breakdown of one of these components, so you can’t immediately run to the store and throw money away for a new battery. Experienced experts say that a worn-out battery can be brought back to life.
There can be a maximum of 8 components in the battery case, all of them resemble batteries that are familiar to us (those used in the TV remote control, for example). The work of all these parts is controlled by a special microcontroller. The scheme is designed so that the user can view information on the battery temperature and charge level on the device screen. It is impossible to do without reprogramming the specified microcircuit during the battery repair process. This condition is mandatory, the procedure requires certain knowledge, so not everyone can do it with their own hands.
Calibration
Laptop battery repair can be done by calibration. The task is to return the original capacity of the product, we are talking about adjusting the work of the power components, the microcircuit and the control unit. There are times when the battery loses its capacity very quickly, instantly lowering the mark from 100 to 30 percent. The reason for this behavior is called the inconsistency of the internal components.
Calibration is most conveniently performed using special programs. One of these is the BatteryCare utility. Among the main advantages of this tool are the following:
- simple interface;
- automatic update;
- switching settings automatically;
- useful hints;
- does not affect system performance;
- convenient monitoring of battery status.

BatteryCare has a range functionality. For example, you can find out how much the capacity of the device has decreased compared to the information declared by the manufacturer. The laptop battery recovery software displays the number of charge cycles, voltage, calibration date, temperature and more. She will tell you about the need for calibration and give useful recommendations on how to perform this procedure. Calculation of the remaining life cycle calculated on the basis of statistical data.

Using the battery recovery utility, you can also monitor the current temperature of the hard drive and processor.
The calibration process itself consists of three stages. First you need to charge the battery to 100%, then discharge it to zero and recharge it to full capacity. During such manipulations, the battery level on the microcircuit will even out, the controller will now again show the real value.

Replacing elements
The second way is to replace failed components. Batteries that have become unusable are removed from the battery, new ones are installed in their place, after which the whole structure is soldered. After replacement, it is necessary to calibrate and reprogram the chip. Solving the problem with your own hands is quite difficult, it is best to use the services of a specialist.
Replacing components can save you money, as it will cost significantly less than a complete battery replacement. The procedure can be repeated several times, and this is very beneficial. A refurbished battery performs even better than a new one.

If this does not help, and your laptop is useful at home, you can connect it to the mains and work stationary. In this case, it is recommended to remove the battery.