Microsoft has no plans yet to release a second service pack for Windows 7, but this does not mean that the company will stop releasing updates for the most popular PC OS.
In October, Microsoft released a number of updates for its users, some of them led to sad consequences, but there was one update that all Windows 7 fans had been waiting for for a very long time.
Recently, instead of releasing a full-fledged service pack, Microsoft released the "Disk Cleanup" application for Windows users 7 SP1, which allows you to clean the WinSxS folder from old files. The application is available for download from Windows Update and has a status of "Important" but not "Critical".
It's about updating KB2852386, which allows you to remove outdated updates (updates that have been superseded by newer ones) using a new option in the standard cleanup wizard Windows disk 7 – Windows Cleanup Tool ( cleanmgr.exe)
.
Let us remind you that in Windows 7, when installing any system update, system files are replaced by new ones, and their old versions are stored in the directory WinSxS(C:\Windows\WinSxS). Thanks to this approach, you can safely remove any system update at any time.
However, this approach leads to the fact that over time, as new updates are installed, the directory WinSxS significantly increases in size (it turns out that the older the system and the more updates are installed, the larger the size of the WinSxS folder), which cannot but worry users, especially happy owners of SSD drives and drives with a small system partition size.
Previously, Windows 7 did not have a standard utility for deleting outdated update files, so in order to reduce the size of the WinSxS folder you had to resort to various tricks.
What about Windows 8?
In Windows 8 and 8.1, the Windows Update Cleanup Wizard is a standard feature.
How to clean the WinSxS folder in Windows 7 by removing outdated updates
 Note. It is important to understand that after performing a disk cleanup using this wizard, it will be impossible to uninstall the updates that replaced the removed updates.
 Windows 7 Service Pack 1
You can download Windows 7 Service Pack 1 from the Microsoft website(page Windows boot 7SP 1)
You can also download Windows 7 Service Pack 1 using the direct link:
1) For 32-bit Windows 7, you can download SP1 here (515 MB)
2) For 64-bit Windows 7, you can download SP1 here (866 MB)
3) It is possible to download a universal (x86, x64) and ISO image of Service Pack 1 for Windows 7 (1.9 GB)
It is worth noting that the Windows 7 Service Pack 1 distribution, which can be downloaded from the links provided, contains 36 languages, including Russian and English.
Cleaning the disk from temporary files SP1
And now the best part: we clean the HDD from temporary files that are created during the OS update process. These files can take up to 0.5 GB of space.Why are these files needed? They are intended for the event that you want to remove SP1 from the system. But, most likely, you are not going to do this, and therefore, we do not need these files - that’s why we are getting rid of them.
Note: If you follow the steps below, you will not be able to delete SP1. otherwise than by reinstalling the system. It is also not recommended to perform the following steps if you have a beta version of SP1 or Windows 7 installed 
By default, Microsoft's OS is configured to automatic search and installing the latest patches - this helps to quickly “close” system vulnerabilities, but sometimes such a solution disrupts the stable operation of the computer. This article will show you how to remove Windows 7 updates, and we will look at the process using the example of two situations:
The update was installed successfully
Let's say we want to understand how to remove the KB971033 update in Windows when it was automatically added without your participation. In this case, go to Control Panel → Programs and Features (Add or Remove Programs) → View updates.1. This is where the system stores all already installed updates. We left-click on what interests us, the “Delete” button will appear at the top.

2. When you press it, the OS will immediately request confirmation, after which it will ask you to wait a few minutes (depending on the size of the update). When the window asking you to wait disappears, the job is done. Just in case, it's better to restart your computer. The only disadvantage of this method is that one update is removed at a time. If you want to remove a lot, you will have to be patient.
Error installing update
Before the procedure, be sure to create a system restore point so that you can return to it if something goes wrong.
The problem here is this: uninstalled packages “hang” in the list, preventing themselves from being removed and reinstalled. There is only one way out - clear the list.
1. To do this, open the Start menu, enter “services.msc” in the search bar and run the found file.
2. In the list of services, find “Windows Update”, click right click mouse and select Stop.

3. Go to " C:WindowsSoftwareDistribution»
4. Pay attention to 2 folders: DataStore And Download. Deleting files from Download will free up disk space, because... it stores temporary files. Usually, the system itself erases files 10 days after they are installed, but there are also misfires. If it takes up a lot of space, you can clean it.
But from DataStore delete all existing files. The installed updates will not go anywhere, but the files with the history of downloaded updates, including damaged ones, will. After that, return to Services and turn “Update Center” back on. Now, when you launch it from the Control Panel, you will see that the check for available updates has never been carried out. The last thing left to do is to let the system “for the first time” load a list of files, and then select from them the ones you need.
Conclusion
Now you know how to remove old Windows 7 updates (or install those that are causing problems). It’s easy to “clean out” updates, but once again I remind you of the importance of creating control point recovery before any changes. Following safety precautions will protect you from surprises.
Hello, my dear friends, readers and colleagues in the computer field!
Recently I installed several updates for the system and noticed that it began to slow down quite a bit. The speed of work has decreased, videos have begun to slow down, and I’m generally silent about games, the drop in frame rate is generally terrible. To solve this problem I had to remove some service packs. And I decided to tell you how updates are cleaned in Windows 7, and how it can speed up your computer! Let's go!
What can this do?
Let's imagine you installed an update, and now the system is loading endlessly. This is already a specific bug. Or another situation: after installing the service pack, a conflict arises when starting a game that refers to the graphics library. Not comme il faut either, would you agree? Unfortunately, sometimes updates are installed crookedly, or they are downloaded with broken segments, or they are initially made poorly.
All this can greatly damage the system. It will start to slow down, some software will stop opening, the processor load will be maximum, and the temperature inside the case may rise significantly.

In such difficult cases, you should wisely remove updates one by one until a significant increase in speed and stability is visible. This can be done manually, but it is very difficult, and for users who do not have specialized skills, such an operation is not possible. But there is a simpler and more reliable option. This is what we will look at below.
Via control panel
A standard method that everyone who has ever reinstalled Windows will use. So let's open start and go to control Panel.


Go to the section programs.


You can do everything differently. Open the execute line and write the command there - wuapp.


In the update center, click on this line.


An interface will open with all installed service packs and updates.


Select with the left button and press the delete button that appears.


Or select any one and click the same button in the top line.


A warning window will appear, in it we click “ Yes».


We are waiting for the process to complete.


That's it.
Via command line
Open the menu start and go to the tab all programs.


Now right-click on the command line tab and select from the list run as administrator.


In the black command line window, enter the following command: wusa.exe /uninstall /kb:*******. Instead of asterisks you need to indicate serial number microsoft update package. For example - KB4025341.


Once the package is found, you will be prompted to remove it.


By the way, if you enter the command - wusa.exe /uninstall /kb:4025341 /quiet, then the files will be deleted in the background without warning the user.


Removing via Disk Cleanup
What to do if you didn’t succeed in either the first or second option? Click on the button start and open my computer.


On a logical partition with operating system right click. Next we go to properties such.


Select a tab general and there we click on the button disk cleanup.


Now click on cleaning system files.


The process of counting all data will begin.


Now check the boxes in these sections and click OK.


In the window that appears, click on deletion.


The hard drive will be cleaned.


There we go to the block administration and then look for the block services.


Now we write this path in the explorer line. Copy carefully - C:\Windows\SoftwareDistribution\
We do this in both folders.
Conclusion
Well, that’s all, now you know what to do if you need to remove updates that are slowing down your computer. I tested all these methods myself, they are one hundred percent working and any of them will help you. By the way, here is an excellent video about this.
Well, this is where I will end this material. Share it in social projects with friends and interest groups. Subscribe to the blog and you will always know when new articles are published. All the best and see you on the site!
Updates help ensure maximum efficiency and security of the system, and its relevance to changing external events. However, in certain cases, some of them can harm the system: contain vulnerabilities due to flaws in the developers or conflict with what is installed on the computer software. There are also cases that an unnecessary language pack, which is of no benefit to the user, but only takes up space on the hard drive. Then the question arises of removing such components. Let's find out how you can do this on a computer running Windows 7.
You can delete both updates already installed on the system, and only their installation files. Let's try to consider various ways solving problems, including how to cancel the update Windows systems 7.
Method 1: "Control Panel"
The most popular way to solve the problem under study is to use "Control Panels".
- Click "Start". Go to "Control Panel".
- Go to section "Programs".
- In the block "Programs and Features" choose "View installed updates".

There is another way. Click Win+R. In the appeared shell "Run" enter:
Click "OK".
- Opens "Update Center". On the left side at the very bottom there is a block "Cm. Also". Click on the inscription "Installed updates".
- A list of installed ones will open. Windows components and some software products, mainly from Microsoft. Here you can see not only the name of the elements, but also the date of their installation, as well as the KB code. Thus, if it is decided to remove a component due to an error occurring or a conflict with other programs, remembering the approximate date the error occurred, the user will be able to find a suspicious item in the list based on the date it was installed on the system.
- Find the object you want to remove. If you need to delete Windows component, then look for it in the group of elements « Microsoft Windows»
. Click on it with the right mouse button ( RMB) and select the only option - "Delete".

You can also select a list item with the left mouse button. And then press the button "Delete", which is located above the list.
- A window will appear asking if you really want to delete the selected object. If you act consciously, then press "Yes".
- The removal procedure is in progress.
- After this, a window may open (not always), which says that you need to restart the computer for the changes to take effect. If you want to do this immediately, then click "Reboot Now". If there is no great urgency in eliminating the update, then click "Reboot later". In this case, the component will be completely removed only after you restart the computer manually.
- After the computer is restarted, the selected components will be completely removed.


Other components in the window "Installed updates" are deleted in the same way as deleting Windows elements.


It is important to note that if you have enabled automatic installation, then the removed components via certain time will download again. In this case, it is important to disable the automatic action option so that you can manually choose which components to download and which not.
Method 2: "Command Line"
The operation studied in this article can also be performed by entering a specific command into the window "Command line".
- Click "Start". Select "All programs".
- Navigate to directory "Standard".
- Click RMB By "Command line". Select from the list "Run as administrator".
- A window appears "Command line". You need to enter a command using the following template:
wusa.exe /uninstall /kb:*******
Instead of symbols «*******» you need to install the KB code of the update you want to remove. If you don’t know this code, as mentioned earlier, you can see it in the list of installed updates.
For example, if you need to remove a security component with the code KB4025341, then the command entered into the command line will take the following form:
wusa.exe /uninstall /kb:4025341
After entering, press Enter.
- The extraction in the offline update installer begins.
- At a certain stage, a window appears where you must confirm your desire to extract the component specified in the command. To do this, click "Yes".
- The offline installer performs the procedure of removing the component from the system.
- Upon completion of this procedure for complete removal You may need to restart your computer. You can do this in the usual way or by pressing the button "Reboot Now" in a special dialog box if it appears.


In addition, when deleting using "Command line" You can use additional installer attributes. You can view their full list by entering "Command line" the following command and pressing Enter:

A complete list of operators that can be used in "Command line" while working with the offline installer, including when removing components.

Of course, not all of these operators are suitable for the purposes described in the article, but, for example, if you enter the command:
wusa.exe /uninstall /kb:4025341 /quiet
object KB4025341 will be deleted without any dialog boxes. If a reboot is required, it will happen automatically without user confirmation.

Method 3: Disk Cleanup
But updates are not only in the installed state in Windows 7. Before installation, they are all downloaded to the hard drive and stored there for some time even after installation (10 days). Thus, the installation files take up space on the hard drive all this time, although in fact the installation has already been completed. In addition, there are cases when a package is downloaded to a computer, but the user, updating manually, does not want to install it. Then these components will simply “hang out” on the disk uninstalled, only taking up space that could be used for other needs.
Sometimes it happens that the update was not fully downloaded due to a glitch. Then it not only unproductively takes up space on the hard drive, but also prevents the system from being fully updated, since it considers this component to be already loaded. In all these cases, you need to clean the folder where Windows updates are downloaded.
The simplest way to delete downloaded objects is to clean the disk through its properties.
- Click "Start". Next, follow the inscription "Computer".
- A window opens with a list of storage media connected to the PC. Click RMB on the drive where Windows is located. In the vast majority of cases this section C. Select from the list "Properties".
- The properties window opens. Go to section "General". Click there "Disk Cleanup".
- An assessment is made of the space that can be cleaned by removing various unimportant objects.
- A window appears with the result of what can be cleared. But for our purposes we need to click on "Clean up system files".
- A new estimate of the amount of space that can be cleaned is launched, but this time taking into account system files.
- The cleaning window opens again. In the area "Delete following files» various groups of components that can be removed are displayed. Objects to be deleted are marked with a check mark. The remaining items are unchecked. To solve our problem, you need to check the boxes next to the items "Cleaning Windows Updates" And "Windows Update Log Files". Opposite all other objects, if you no longer want to clean anything, you can remove the checkmarks. To start the cleaning procedure, press "OK".
- A window opens asking if the user really wants to delete the selected objects. It is also warned that deletion is irreversible. If the user is confident in his actions, then he should click "Delete files".
- After this, the procedure for removing the selected components is performed. After it is completed, it is recommended to restart the computer yourself.


Method 4: Manually deleting downloaded files
You can also remove components manually from the folder where they were downloaded.
- To ensure that nothing interferes with the procedure, you need to temporarily disable the update service, as it can block the process of manually deleting files. Click "Start" and go to "Control Panel".
- Choose "System and Security".
- Next click on "Administration".
- In the list of system tools, select "Services".

You can go to the service management window without using "Control Panels". Call the utility "Run" by clicking Win+R. Enter:
Click "OK".
- The service management window opens. Clicking on the column name "Name", arrange service names in alphabetical order for ease of search. Find "Windows Update". Mark this item and click "Stop service".
- Now run "Conductor". In his address bar copy the following address:
C:\Windows\SoftwareDistribution\
Click Enter or click the arrow to the right of the line.
- IN "Explorer" A directory opens containing several folders. We will be particularly interested in catalogs "Download" And "DataStore". The first folder stores the components themselves, and the second contains the logs.
- Go to the folder "Download". Select all its contents by clicking Ctrl+A, and delete using the combination Shift+Delete. It is necessary to use this particular combination because after using a single key press Delete the contents will be sent to the Trash, that is, they will actually continue to occupy a certain disk space. Using the same combination Shift+Delete will be completely permanently deleted.
- True, you will still have to confirm your intentions in the miniature window that will appear after this by pressing the button "Yes". The deletion will now be performed.
- Then move to the folder "DataStore" and in the same way, that is, by pressing Ctr+A, and then Shift+Delete, delete the contents and then confirm your actions in the dialog box.
- After this procedure is completed, in order not to lose the opportunity to update the system in a timely manner, move again to the service management window. Check "Windows Update" and press "Start service".


Method 5: Uninstalling downloaded updates via Command Line
You can also remove downloaded updates using "Command line". As in the previous two methods, this will only remove installation files from the cache, and not roll back installed components, as in the first two methods.


In the examples described above, we saw that it is possible to remove both already installed updates by rolling them back, and boot files, which are downloaded to your computer. Moreover, for each of these tasks there are several ways to solve them: through graphical Windows interface and through "Command line". Each user can choose the one that is more suitable for certain conditions option.
As you know, many users of Windows 7 and 8.1 have recently received a message about the availability of an update to version 10.
Despite the fact that you can use this service if you wish, the update icon after such a message is installed on the computer of everyone with a licensed OS and periodically appears, interfering and annoying during work. But this is only half the trouble, since along with this icon there also appeared new folder, having Name$WINDOWS.~BT, which serves for an easier transition to new version and the data contained therein are not deleted. This phenomenon is not very pleasant for those users who do not want to use the innovation, especially when the system disk is almost full of the necessary data, because the weight of the folder is quite large, even 3 GB.
In addition, all this can cause problematic situations in the functioning of a PC or laptop, which is also not very good. That's why the best option will produce removing unnecessary update, and there are several ways to do this.
It is worth noting that these methods work for rollback any system update.
Uninstall via Update Center
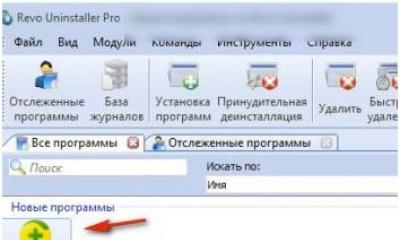
The first method, which is the simplest, is to destroy the component using Parameters And Control panels. To perform this you will need the following operations:

After all the activities, a list of all versions that were installed on the computer will be opened. Among them are selected unnecessary updates and press “ Delete" Next, this action is confirmed and its completion is waited for.


You can also get to the list of updates using Control Panel, in which using the section “ Programs and components", a side menu opens where you select " View installed updates».
Using the command line
The second way to get rid of updates is to use command line. To carry out the process, the following actions will be required: