I am the owner of a once top Samsung Galaxy S2. Lately it has started to slow down and become glitchy, which is why the question arose about rebooting and reflashing it. After re-reading many instructions with old and out-of-date data, I decided to write a short manual for everyone and myself too, from which you will learn how to reflash a Samsung Galaxy of any brand quickly and safely.
This guide was tested on all Galaxy models, from the second generation to 5. I also had a chance to reflash a couple of Note 2 and 3 versions. But you can also apply these instructions to other Samsung phones.
How to reflash Samsung Galaxy
To reflash the phone we need:
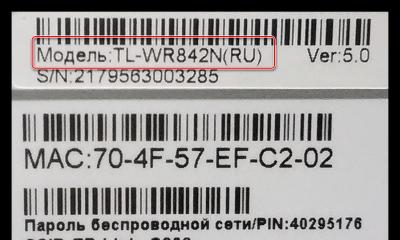
- Required firmware. Download anywhere specifically for your model. If you need the Russian language, then the word SER must be present in the firmware name.
- Program Odin_v3.09. Download.
- USB Drivers so that the computer can see your phone via USB. We also download.
- Data cable.
Instructions for reflashing the phone:
Step 1. Download the firmware (single-file with the extension .md5) and unpack it to any location.
Step 2. Launch the Odin_v3.09 program, click on the AP button and select our firmware. The program will check it for several minutes, then write in the status window (small white window on the left) that the check was completed successfully (Checking MD5 finished Sucessfully).
Step 3. Preparing the phone for flashing. We enter ODIN MODE. To do this, turn off the phone and after turning it off completely, press the following buttons together: Volume (down, down) + center button + on/off button (Power). When you see a yellow triangle, press the button Volume (more, up).
Step 4. We connect the phone to the computer via a USB data cable. The Odin program will recognize your phone and write Added in the status window. After that, press the Start button and wait 10 minutes while the program uploads the firmware to your phone and installs it.
Step 5. Once everything is ready, the phone will reboot and Odin will tell you that everything is ready.
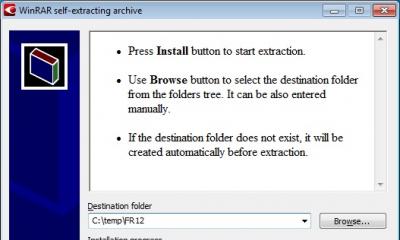
That's it, everything is so simple and easy. This is what the program window looks like, with what you need to work marked in red.
If you want to reset all parameters and format so to speak internal memory device to clean it of all garbage and other files, then that’s a different story. I’ll say right away that it was this cleaning that helped me get rid of the brakes and lags of the device.
How to format Samsung Galaxy
The procedure is as follows:
- Turn off the phone.
- Press the following buttons together: Volume (up, more) - central button - on/off button. We are waiting for the menu to appear.
- We move through the menu using the volume button, and confirm our choice with the power off/on button. We need a line Wipe data/factory reset. We reach it and choose.
- Next, select Yes — delete all user data.
- We reboot your phone by selecting Reboot system now.
How to flash samsung phone?


To flash a Samsung phone, it is not necessary to contact a service center. You can do this work yourself using special software. But it is important to do this process correctly.
Let's take a closer look at how to flash a Samsung phone with your own hands.
Preparing for firmware
Before you start flashing your phone yourself, you must fully charge its battery. After all, if during such a process the phone turns off, then serious problems with its functioning cannot be avoided.
The next thing to do is connect the device to your computer via a USB cable. The PC operating system may offer to install additional drivers for the phone to function correctly. It is recommended to do this, and then restart the computer and disconnect the mobile device.
Samsung phone firmware
Now let's move on to the firmware of the Samsung phone itself. It is performed as follows:
- Launch the MultiLoader program on your mobile device (at this time the phone should not be connected via USB to the PC).
- Go to its main menu. In it you will need to find the BACK UP option and activate it. This will allow you to do backup data in case problems arise during the firmware.
- Go to the main menu, select “Firmware” and then BRCM2133.
- In the window that opens, check the boxes next to the following items: Boot (then in the drop-down menu opposite it, select the bootfiles command), Factory FS, Full Download, Rsrc1, Amss (at this point, select the additional file apps_compresset.bin).
- Now go to Download mode. To do this, hold down the volume, lock and on/off buttons for a few seconds.
- Download should appear on the screen. It will indicate that the process was launched and completed successfully.
- Connect your phone to your computer via a USB cable and wait until operating system The PC will detect the device.
- The following message will appear at the bottom of the window: com15 ready and your phone model. You need to click on the RELOAD button located opposite it and wait a few minutes. During this process, the mobile device may turn on and off, this is a normal process.
- Once completed, you will need to disconnect your phone from the cable and reboot it several times.
- In case the menu mobile device will be on English, then you will need to perform a reconfiguration. The following command will help you do this: *#6984125*#. Next, in the menu that opens, select the Pre-configuration item and specify this password: “*#73561*#. After which the device reboots and this configuration is entered into it: “*2767*3855#. This will complete the firmware. All you have to do is check the functionality of the device.
If you are not sure that you can correctly flash the firmware for a Samsung phone, then it is better to entrust it to specialists. But contact only experienced craftsmen who will provide you with a guarantee for the work performed.
We continue the topic of experimenting with my new phone. From the experience of using routers and other equipment, I have developed a strong habit - first of all, update their “brains”. The thing is that from the moment the device leaves the factory until it falls into your hands, more than one month may pass, and during this time its firmware could undergo significant changes and open up wider possibilities for use for the user. And today we will clearly check how to flash a Samsung phone on Android 4.4 and how safe is it to do it yourself?
Ways to flash a Samsung phone on Android 4.4
There are several ways to flash an Android phone. The first is directly from him through the system. On my Samsung there was Android version 4.4, in it, if you go to the “Settings > Phone information > Software update” section, you can configure automatic checking of new firmware for your model. To do this, check the “Auto-update” box. I also recommend activating the “Wi-Fi Only” item; in this case, the presence of a new version will be checked only when the phone is connected to wireless network, otherwise it will constantly waste your mobile traffic through mobile operator, which is fraught with loss of money.
The scan can be started manually by clicking on “Update”.
Flashing a Samsung phone on Android, like any other, can only be started with a 100% charged battery
However this option updates Samsung firmware Galaxy is not entirely comfortable and can break down in the middle, as happened to me. Therefore, I recommend performing this task using special program installed on a computer and with a phone connected to it via a USB cable.
There are also variations here - you can do it using the official Samsung Kies program, or you can use the popular Odin or its equivalent. In the latter case, it is possible to use both official firmware for Samsung phones on Android, as well as from third-party developers, which are often more convenient and open up wider possibilities for the phone, but it does not cover the factory warranty. Therefore, it is recommended to install third-party firmware only after the warranty period has expired.
How to officially flash a Samsung phone on Android?
So, let's start figuring out how to flash Android using a Samsung update as an example, and turn to the Samsung Kies program, which can be downloaded here. By the way, it was created by analogy with Apple's iTunes and with its help you can completely synchronize your phone with your PC - contacts, files, music, etc.
Before you start updating the Samsung firmware to a new Android, it is recommended to make a backup copy using your phone or via Kies to avoid possible data loss
First we install the program. At the same time, drivers for all kinds of devices from this company will be added to the computer, including yours. We launch it, connect the phone to the computer via USB and wait until it is recognized.
Next, after a window opens with all the basic data about your phone, select “Firmware update” and if it is available, this will be reported in an additional window that opens.

Click the “Update” button, agree to the rules and confirm our desire. And we wait for the end.. Do not touch the phone during this time and under no circumstances disconnect it from the cable from the computer. By the way, I don’t recommend leaving for a long time either, since your antivirus or firewall may crash a couple of times, in which you will need to allow Kies to perform its functions. Also disable the antivirus on the mobile phone itself, otherwise it will not allow the system to update.

As a result, we get this and confirm the end of the software update.

Updating Android Firmware on Samsung Phone via Odin
Now let's turn to the “gray” firmware. I suggest you watch the step-by-step video first, and then we’ll continue.
First of all, you need to put the phone into download mode (“Downloading”), which is done by simultaneously pressing the “Home”, “Power” and “Volume minus” (or “Volume plus” depending on the model) key combination. If done correctly, the Android logo and an inscription about boot mode will appear on the screen.

Next, download and install the Odin MultiDownloader program (it’s easy to find it on any thematic site or Google it in a search engine) - this is a professional program intended for service centers, so you don’t have to be scared, if you do everything correctly in it, then nothing bad will happen to your phone.
And you will also need the firmware files that you downloaded from the official website or any third-party firmware support forum. As a rule, there are four of them - PDA, the main firmware file; PHONE, which is responsible for working with the cellular operator’s network; CSC - phone settings; and PIT - service information storage. Make sure they are all included in the set. However, there are also single-file versions, in which case it will need to be imported in place of the main one - PDA.

If you are working on a computer that has Windows system 7 and above, then this will be enough. If you have XP, then you will definitely have to install the Kies program that we have already disassembled, which will install drivers for your Windows Android phone, or separately the firewood itself - Samsung USB Driver for Mobile Phones. On the same site you can also select firewood specifically for your model and version of the computer OS.
Now you must first kill all Kies processes if you installed and launched it. To do this, press the keyboard shortcut Ctrl+Alt+Del on your computer and look for processes that have the word “Kies” in their names. And we complete them. Then we launch Odin - our smartphone is already in download mode - connect it via a USB cable and press the “Volume Up” button (in relation to the Samsung Galaxy S2).
Now you can start updating the software.
In the Odin program, one (first) ID:COM section should be displayed in yellow (there are several of them for simultaneous work with several phones). In the program, check the boxes for “Re-Partition”, “Autoreboot” and “F.Reset Time”.

Now press the “Start” button and wait for the process to complete until the process graph reaches the end, lights up green and the word “Pass” appears.

After this, the phone will reboot and start working on the new version software. Additional for checking current version you can use the command *#1234#. You can also completely clear all data using the service code *2767*3855#.
This completes the firmware for a Samsung phone based on Android OS, thank you all for your attention!
Flashing Samsung is very easy, but without knowing certain rules you can get an excellent smartphone-cracker! This article is dedicated to avoiding this.
Where can I download Odin?
Download latest versions Odin firmware programs can be found on a special page of the website - Download Odin
Odin firmware samsung - Rules
First rule What you should know is that it is strictly not recommended to flash with Kies and here's why:

- Incompletely downloaded firmware from the Samsung server.
- The smartphone's firmware is not of good quality, resulting in the smartphone constantly rebooting (the /data partition is not erased).
Second rule what you should know, flash only with Odin program
Third rule, flash only with a charged battery on the smartphone and uninterruptible power supply on the computer.
Fourth rule, do not pull out the USB cable while flashing Android firmware.
Fifth rule, The USB cord must be original and not damaged. Lately, it has been very important to use exactly the USB cord that came with the phone, since if you use non-original ones, you may not be able to flash it or break the device!
Sixth rule, the path to the firmware should not contain Russian-language folders (C: folder is not correct, C: or C: samsung is correct).
There are firmwares
Single-file- consist of one firmware file
Two-Three-Four-Five-file(multi-file) - consist of more than one file
Firmwares have extension *.tar or *.tar.md5
Preparing for firmware
1. Download the official firmware
Where to download the Firmware
Or use a special utility that quickly downloads Samsung firmware to your computer - Samfirm instructions.
Firmware SER - Russia and CIS
Firmware SEK - Ukraine and CIS
Other regions - CSC(click on spoiler)
Other regions - CSC >>>
Albania:
A.L.B.
Algeria:
ALG
A.L.R.
Argentina:
ANC
ARO
CTI
UFN
PSN
Aruba:
ARU
Australia:
OPP
O.P.S.
VAU
XSA
TEL
HUT
Austria:
AOM
DRE
MAX
MOB
MOK
ONE
TRG
ATO
Baltika:
SEB
Belarus:
MTB
VEL
Belgium:
B.A.E.
B.S.E.
PRO
XEB
Bosnia-Herzegovina:
BHO
BHT
TEB
Brazil:
BTA
BTM
TMR
ZTA
ZVV
ZTO
ZTM
Bulgaria:
CMF
GBL
MTE
MTL
OMX
PLX
VVT
Canada:
R.G.S.
BMC
TLS
Chile:
CHB
CHE
CHL
CHT
China:
CUH
INT
TEC
TIY
CMC
CHN
M00
Colombia:
COB
COL
COM
COO
Cyprus:
C.Y.V.
Egypt:
EGY
Finland:
ELS
SAU
NEE
France:
OFR
AUC
BOG
COR
DIX
FTM
NRJ
ORC
ORF
SFR
UNI
VGF
XEF
Germany:
DBT
DTM
DUT
EPL
MAN
MBC
VD2
VIA
XEG
Greece:
AOC
COS
EUR
GER
TGR
VGR
C.Y.O.
Romania:
PAN
VDH
WST
TMO
XEH
TMH
India:
HFC
HYA
INA
IND
INU
IMS
REL
TAT
INS
Israel:
CEL
PCL
PTR
Italy:
GOM
HUI
ITV
OMN
TIM
VOM
WIN
XET
F.W.B.
Kazakhstan:
EST
KCL
KMB
KZK
SKZ
Korea:
SKT
KOR
Mongolia:
MPC
Nedirladny:
BEN
MMO
ONL
QIC
TFT
TNL
VDF
VDP
XEN
KPN
New Zealand:
VNZ
TNZ
NZC
Norway:
TEN
NEE
Pakistan:
WDC
PAK
Poland:
ERA
IDE
PLS
PRT
XEO
Romania:
CNX
HAT
ORO
COA
Russia:
AZC
BLN
EMT
ERS
GEO
MTV
SER
SNT
Singapore:
BGD
XSO
XSP
Slovenia:
MOT
SIM
Slovakia:
GTL
IRD
TMS
ORS
South Africa:
XFA
XFC
XFM
XFV
XFE
Spain:
AMN
EUS
FOP
XEC
ATL
Sweden:
BAU
BCN
BME
BSG
BTH
COV
HTS
SEN
TET
TLA
XEE
VDS
TNO
Switzerland:
AUT
ORG
MOZ
SUN
SWC
Taiwan:
TWM
BRI
TCC
TCI
C.W.T.
Thailand:
CAT
THE
THL
THO
T.H.S.
Tanzania:
SOL
Tunisia:
ABS
RNG
Türkiye:
BAS
KVK
TUR
TLP
TRC
Ukraine:
KVR
SEK
UMC
SOUTH AFRICA:
M.I.D.
ARB
XSG
AFR
ITO
United Kingdom:
BTC
O2I
O2U
ORA
TMU
T.S.C.
VOD
XEU
VIR
H3G
CPW
USA:
AWS
DOB
TMB
C.L.W.
Uzbekistan:
UZB
Vinizuela:
VMT
Vietnam:
XXV
PHU
XEV
DNA
FPT
SPT
TLC
VTC
VTL
A simplified way to find firmware
or if you don’t know how to search for firmware already on the sites provided. Download the console program - Samsung Firmware Linker. How to use the program?
For example, if you are looking for firmware for the smartphone GT I9500 (Samsung Galaxy S5)
1. Launch the Samsung Firmware Linker program
2. Select which group your smartphone or tablet belongs to ( EK, GT, SC, SCH, SGH, SHV, SHW, SM, SPH, YP) and press Enter
3. Write a model and press Enter
4. You will be redirected to the page with firmware for your device
That is, if you have a Samsung Galaxy S5 GT I9500 smartphone, write GT, press Enter and write I9500
Switching to firmware mode (bootloader)
When updating the firmware, it is possible to lose programs and their data (but not melodies, pictures, etc., does not apply to Recovery)1. After installing the drivers and downloading the firmware, you need to put Samsung into firmware mode (bootloader or download):
For older smartphones it looks like this (until mid-2011):
Turn off your smartphone/tablet and press the Volume Down buttons plus the On/Off button

after which the following message will appear

If you can’t switch to Download mode
For new smartphones it looks like this:
Turn off the smartphone/tablet and hold down the buttons Volume Down + Center button + On/Off button

We get to this menu, release the buttons and press the Volume Up button

2. Connect Android to your PC and wait until the drivers are installed.


3. Launch Odin, a window should appear in the upper left corner indicating that the device is connected

4. Add firmware files to the Odin program
Now let's move on to the firmware process, more precisely how to configure everything correctly so that it works!
Firmware. If the firmware is Single-file
Insert the firmware into the PDA field (press the PDA button)

If the firmware is Multi-file
File PIT(if any) in the field PIT (press the PIT button)
File APBOOT_xxxxx.tar.md5 in the field Bootloader (click on the Bootloader button)
File CODE_xxxxx.tar.md5 in the field PDA (press the PDA button)
File MODEM_xxxxx.tar.md5 in the field PHONE (press the Phone button)
File CSC_xxxxx.tar.md5 in the field CSC (press the CSC button)

do not change anything and do not check the boxes in the left corner (unless required)

5. After selecting the firmware files, click the button START and after which the Android firmware will begin, which will last from 2 to 5 minutes. After which a message will appear PASS or RESET, the firmware is installed and the smartphone will reboot (you can disconnect the Samsung from the PC).

This completes the firmware. Good luck with your flash!
Samsung won't boot after flashing firmware?
If after flashing Samsung firmware you have an eternal boot, then you need to perform a data reset or the so-called WIPE. , if you Rooted or installed custom firmware, the electricity was turned off or something went wrong - then you need an article after