The only thing worse than unexpectedly crashing applications are those that stop responding to external stimuli in the face of a user desperately pressing buttons, but continue to function, consuming resources and filling up the RAM with digital garbage. Luckily for us, there are at least 5 methods to combat this problem.
How to close a frozen program on MacOS
Method number 1 - hot buttons
Combination of ⌘Command + ⌥Option (Alt) + Esc opens a window for forcing the termination of running programs. The presented list shows those running in at the moment applications, the space on the right is usually empty. If in any line there is an inscription “not responding”, feel free to click on it, highlighting the frozen program. In difficult cases, there may not be an inscription - you will have to call on intuition and observation to help identify the troublemaker.
The only button on the bottom right leaves no alternatives; all we can do is emergency close the selected application. Let's try. But usually we do it easier, as long as we remain within the window of the frozen program, we use a more complex combination of hot buttons ⌘Command + ⌥Option (Alt) + ⇧Shift+ Esc. Hold them down for three long seconds and OS X will automatically close this window.
Method number 2 - using the Apple menu ()
At the very top of the desktop, in the far left corner, there is a magic icon in the form of the company logo , which opens access to the basic functions of the system - in case of a problem, click on it.
 In the drop-down menu, approximately in the middle, there is a line “ Force quit", that's what we need. And then a familiar window opens with a list of currently running applications - you already know what to do, the buggy enemy will be promptly defeated.
Method number 3 - force closing the program from the Dock
Find the shortcut for the frozen program on the bottom panel (in the Dock) and press the button ⌥Option (Alt) and right-click with the mouse - a special service menu will open.

One of the items in the menu that opens is the same forced termination; further steps are obvious.
Method number 4 - use the Terminal
The transition from a window interface to a console interface, a more complex level of interaction with macOS in case the problem turned out to be serious and the previous methods did not bring results. The program is located in the system utilities directory - find it and run it. In the window that opens, type the command “ top” and press the enter key - this is how we instruct the computer to generate and display a short report about its current state. Including reporting on what programs are running and how they behave.
Among the variety of symbols, we are interested in the column entitled “ Command", the names of currently running applications are printed here. You need to manually find the stuck one, and it is worth considering that abbreviations are used for long names - attentiveness will not hurt.
Next to the name of the program you are looking for there is its digital number PID(system identifier) - this is what we need. In the old fashioned way, we copy it into a notepad or, keeping up with the times, take a photo with the iPhone camera.
Press the " q"- this command closes the list and moves the cursor to an empty line, the system is ready to receive new instructions and deal with the problematic application.
This is done with the loud command “ kill", after which, separated by a space, you should write the PID of the intruder. In this case, these are Viber and 403, so the final version looks like “kill 403”.

Click " Enter" - the job is done, but if the system does not respond, you can tighten the order by typing the following command " sudo kill -9 403", should help.
Method No. 5 – using the System Monitoring utility
In this case, this system tool for advanced users can be perceived simply as an expanded version of the menu with a list of running programs. The utility icon is located in the same place as Terminal– find and launch the program.
The extensive list that opens should not frighten you, look for it in the column “ Process name"our frozen application and select it with a mouse click.

At the top and left there is a button " End the process” - this is exactly what it does, unloading software from memory and freeing up system resources on the Mac.
On MacOS, you encounter certain inconveniences while using your computer. Which is quite natural, since the differences are quite significant. Familiar menu elements, functions, modes and options - everything is not the same as before. It’s not difficult to figure all this out, it’s just a matter of time. One of the most used and useful Windows utilities is the well-known Task Manager. Of course, the need for such an application often arises among MacOS users. In this article we will figure out how to open the task manager on a Mac, what utility replaces it and how to use it. Let's get started. Let's go!
For those who switched from Windows to Mac
First of all, it should be noted that Apple developers did not provide a full-fledged analogue of the Task Manager, however, they implemented a somewhat simplified version of this utility, which is called “Force Quit Programs”. Unfortunately, it does not have the range of functions that the application has in Windows, but it does an excellent job of its direct task - forcefully ending programs and processes.

Minimalistic process completion dialog
Getting into the program window is just as easy. To do this, use the key combination command+option(alt)+esc. After this, a utility window will open in front of you, in which you can see a list of running processes. It's very easy to work with. Select the required process and click the “Finish” button.
![]()
Force Quit Programs window
Using the keyboard shortcut Command + Option + Escape, we make the “Force Quit Application” window appear, after which we select the “End” item to close the program. The operation performed is a more simplified version of the command in System Monitoring, which allows you to free several processes from memory at once.

Force termination of a program from the Dock
You need to perform the following combination: move the cursor over the icon in the Dock and, holding ALT (Option) on the keyboard, click the mouse. As a result, the frozen application will be forcibly closed, without additional confirmation.
Force quitting an app from the Apple menu
Hold down the Shift key on your keyboard and click on the Apple logo in the top menu bar. Now select the command “Finish “...” forcibly”. This method is the easiest to remember. However, it happens that the computer does not react in any way to pressing these keys.
Using System Monitoring
In order to run system utility System monitoring, press Command + Space and enter the name of the program in the Spotlight window. After the dialog box appears, we find the “frozen” application either by name (as a rule, tasks that are immune to the effects are marked in red) or by identification number (ID), and then click “End process”. This method of unloading unnecessary software from memory is very similar to that used in Windows, only instead of System Monitor there is Task Manager.

Using the Terminal to unload processes
If none of the above methods helped you, the most effective method in this situation is to use the command line. Launch Terminal and enter one of the following commands:
Killall [process name]
For example, with the “killall Safari” command you will kill all processes associated with the Internet browser. And if you know the ID of the open application, which can be found using the “ps” or “ps aux” commands, you can unload the “frozen” program in the following way:
Kill -9 , where 9 is the aforementioned ID parameter.
You should be extremely careful when taking actions aimed at forcibly closing programs. Any termination of processes may cause the operating system to crash. And if you also work with the command line, this can lead to the loss of unsaved data and system settings failure.
Sometimes an unpleasant situation occurs when Mac OS X programs stop responding to keystrokes or mouse presses - “freezing”. Fortunately, this happens quite rarely, but if you have ever encountered such a problem (and I’m sure that at least once in your life you have encountered such a problem), then you will probably be interested and useful to learn about several ways how this “frozen” application can be terminated.
1
Force Quit via Apple Menu.
Hold down the Shift key ⇧ click menu Apple () and in the drop-down menu find the command “Force quit [program name]”- this is that treasured menu item that allows you to “kill” an unresponsive program.
2
Force exit via the Dock menu.
While holding down the Alt ⌥ key, right-click on the frozen program icon (which you want to close)- a menu will appear containing the item “ Force quit" Selecting this menu item will forcefully terminate the program.
3
Forced exit via hotkey combination.
Combination Alt keys⌥ + Cmd ⌘ + Esc opens the “ Forced termination of programs" The window that appears lists all open programs. Select the frozen program, and then click on the " Complete" An active frozen application can be forcibly terminated using another keyboard shortcut, bypassing the list. To do this, use the keyboard shortcut Alt ⌥ + Shift ⇧ + Cmd ⌘ + Esc.
4
Forced exit through “System Monitoring”.
System utility System monitoring provides information about CPU, memory and network usage. In addition, through it you can also very quickly “kill” anyone system process, and more. This is done like this: select the “hung” process from the list and click on the big red button “ End the process" After this, a dialog box will appear confirming your actions.
5
Force shutdown of an application using the Terminal.
If all the steps described above do not help, then you still have the opportunity to terminate the frozen application through the command line. To do this, run the utility Terminal and run the following command:
Killall [process name]
A live example for forcing a program to terminate " Calculator" will look like this:
Killall Calculator
Please note that the process name or application name is case sensitive, so Calculator And calculator- these are different things. Don't forget that the team killall works at the system level and its thoughtless execution can lead to the loss of unsaved data since automatic saving will not work in this case.
Attention! Use these methods only in emergency situations, when you are sure that the application is really hopelessly frozen. All of the above methods of forcing programs to terminate immediately “kill” the process without the ability to auto-save data. Please keep in mind that all information not saved while the program is running will be lost.
Almost all OS X applications work well and do not cause problems. They can not be closed for months and thanks to the UNIX platform within itself operating system OS X they will work stably. However, there are situations when something goes wrong: the application may freeze or simply behave strangely. In such cases, you can quickly terminate it using various methods.
Quickly close an application from the Dock
Hold down the ⌥ key and press right click to the application icon in the Dock and select Force Quit.
In a similar way, you can quickly restart the Finder by holding ⌥, right-clicking the Finder icon and selecting Restart.
Force Quitting OS X Applications
If quitting via the Dock is not an option, for example when you are playing a game in full screen mode, then you can press the key combination ⌘ + ⌥ + ESC to display the Force Quit Applications window. In this case, the active (or hung) application will already be selected, so to quickly end it all you have to do is press Enter twice.
Terminate applications or processes through System Monitor
By launching the System Monitor application, you will see all the currently running processes. Select the unwanted application or process and click the red End process button. System Monitoring allows you to use a filter to search for the required process; this is very convenient, since not all running applications can run in the background, without displaying a graphical interface.
Applications for Mac OS X It's getting bigger every day. On Mac App Store you can find a lot of pleasant and interesting programs that you just want to try. But the resources of any Mac are not endless, and some programs, despite their attractiveness, consume a fair amount of RAM and can even cause the system to slow down.

Of course, Mac OS X already has a standard System Monitor tool that helps identify these types of applications. But the interface of the standard utility does not look very clear, to put it mildly. And here a small one comes to our aid free program from Mac App Store called OS Track.

The interface is much nicer and more beautiful than in standard monitoring. The application works just as simply - after launch, it hangs in the background and collects statistical information on the following parameters: processor load, traffic consumption, usage RAM.

In the main working window of the program, on the left you can see a list of all applications that were launched at least once while OS Track was running; the statistics themselves are located in the center. Statistics information is shown in the form of layered columns, for which a color scheme is used that is closest to the colors of the icons of the analyzed programs. Each “layer” is one process, and the diagram on the right shows more detailed information. Viewing is also available for periods of 7, 15, 30 and 60 days. Statistical data is stored in the program for a maximum of the last 60 days, all older information is deleted.

There is a search function necessary programs by the first letter of the name of the application or process, which is sometimes very convenient and can be useful. The settings menu is almost absent; only one option is available - “Delete all statistics”.
In conclusion, we can say that OS Track is a very good solution for Mac OS X; the program does not load RAM and will always help identify power-hungry applications.
General information about the program:
Type: Utilities.
Devices: Mac.
Version: 1.03.
Developer: Bloop.
Price: For free.
Requirements: Mac OS X 10.6 or higher.
Tested on MacBook Pro.
Apple makes very reliable computers that can last for weeks or months without rebooting. And OS X is a fairly smart operating system that intelligently distributes system resources. Usually, the average user has no need to look behind the scenes of this entire “kitchen,” but if you want to keep all your Mac’s system resources under control, you can’t do without special applications. Such applications will be discussed in this article.
iStat Menus
One of the most famous utilities that provides detailed information about all the hardware components of your Mac (looking ahead, I’ll say that this is my favorite). The application allows you to very finely customize the display of the necessary elements directly on the menu bar, as well as arrange the necessary information in a drop-down menu. For example, in my menu bar there are indicators for the processor, memory, battery and network activity, and with a glance I can always see how loaded the Mac is at the moment.
Displaying information in a drop-down menu is implemented very conveniently; when you hover over a certain element, detailed consumption graphs are shown (per day, per week, per month). In addition, iStat Menus allows you to adjust fan speed and create profiles for this.
If you want to monitor absolutely all the resources of your Mac, iStat Menus is an ideal option.
gfxCardsStatus
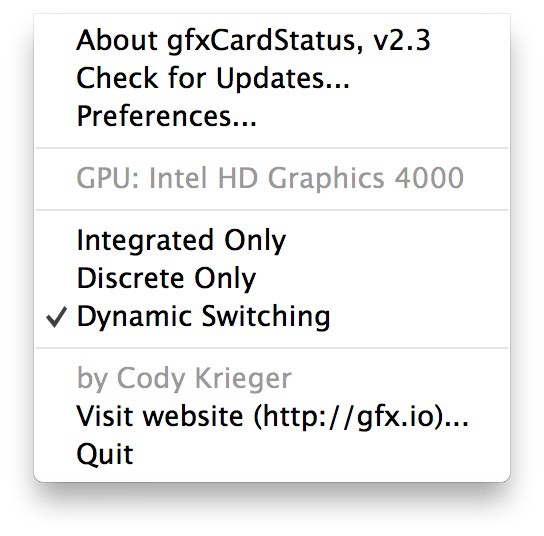 If you are the owner of a Mac with two video cards, I advise you to pay attention to this application. By default, the user cannot choose which graphics card to use, since OS X itself switches between integrated and discrete graphics, depending on the current load. The tiny free utility gfxCardsStatus is designed to correct this shortcoming. Now, if you need high performance or, on the contrary, maximum energy savings, you just need to select the appropriate item in the gfxCardsStatus menu. Everything is in your hands!
Disk Doctor
 We store a large quantity useful information on the disks of our Macs and over time it becomes more and more. Gradually, various unnecessary and no longer relevant information accumulates, which also takes up disk space - application caches, mail attachments and other large files hidden in the depths file system. Disk Doctor will help you monitor your Mac's disks and clean them up in a timely manner, preventing them from becoming full.
If you're running out of disk space, Disk Doctor will help you win it back.

Temperature Gauge
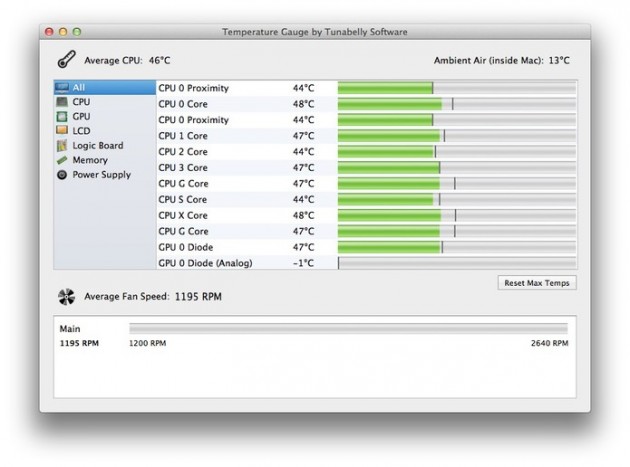 Nowadays, the development of technology has made it possible to eliminate cases of overheating of Macs, but such situations still occur among unwary users. Luckily, with Temperature Gauge you can monitor fan speed and temperature by reading data from all the sensors on your Mac.
If you frequently push your Mac to the limit or just want to keep your gauge bar handy at all times, use the Temperature Gauge.

Memory Clean
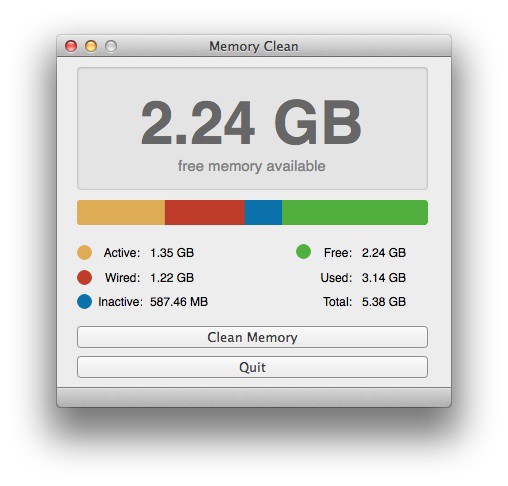 And the last resource that applications tend to “devour” is random access memory or RAM. All applications and games consume memory while running, and the longer they run, the more memory they eat up. Running OS X Mavericks on Macs with less than 4 GB of memory may be uncomfortable and cause delays. Memory Clean will help you identify power-hungry applications and free up memory in one click.
We recommend Memory Clean to all users with a small amount of RAM.
On MacOS, you encounter certain inconveniences while using your computer. Which is quite natural, since the differences are quite significant. Familiar menu elements, functions, modes and options - everything is not the same as before. It’s not difficult to figure all this out, it’s just a matter of time. One of the most used and useful Windows utilities is the well-known Task Manager. Of course, the need for such an application often arises among MacOS users. In this article we will figure out how to open the task manager on a Mac, what utility replaces it and how to use it. Let's get started. Let's go!
For those who switched from Windows to Mac
First of all, it should be noted that Apple developers did not provide a full-fledged analogue of the Task Manager, however, they implemented a somewhat simplified version of this utility, which is called “Force Quit Programs”. Unfortunately, it does not have the range of functions that the application has in Windows, but it does an excellent job of its direct task - forcefully ending programs and processes.

Minimalistic process completion dialog
Getting into the program window is just as easy. To do this, use the key combination command+option(alt)+esc. After this, a utility window will open in front of you, in which you can see a list of running processes. It's very easy to work with. Select the required process and click the “Finish” button.

Keyboard shortcut to launch the utility
In the event that you need to monitor running services and processes, then you will have to use another MacOS application, which is called “System Monitoring”. In it you will be able to monitor the main parameters of the system, including:

The OS asks you to confirm the action
To launch the System Monitor utility, you need to go to the search window, which can be called up by pressing the key combination command+spacebar, and then enter the name of the application.
As you can see, despite the fact that Apple computers A full-fledged analogue of the Windows Task Manager has not been implemented; the necessary functions are available in the “System Monitoring” and “Force Quit Programs” utilities. The combination of these two applications will give you the same capabilities for monitoring parameters and working with processes. Write in the comments whether this article helped you, and ask any questions you have on the topic.
It often happens that just one application or running process can significantly degrade the performance of the entire operating system. This applies to both computers running Windows and devices running OS X. How can you identify such a program among the dozens running in the background?
This may sound strange, but the simplest and quick way- sometimes check the number of running applications. If you see that they literally no longer fit, this is a clear sign that the operating system is overloaded.

In addition, the list of running programs can be viewed in the force termination of applications menu. It is called either by a simple key combination Command+Option+Escape, or through the standard OS X menu.

If you need a detailed report on the operation of the entire system, I advise you to use the built-in “System Monitoring” utility, which can be found through the search. Here you will find almost everything from CPU usage to free hard drive space. It is also possible to instantly terminate a process that consumes too many OS X resources. A kind of analogue of the “Task Manager” in Windows.

For OS X fans, there are certain commands for viewing a list of running programs. To launch the text version of “System Monitor”, you just need to enter one word.
Do you want to instantly identify the most power-hungry application? Sort them by CPU:
top -o cpu

Or by memory usage:
top -p size
As you can see, there are endless ways to monitor OS X activity. Since it is much easier for me to work with regular utilities, I chose the standard “System Monitor”. However, for those who don't typically burden their Mac with multiple desktops, simply quitting applications may be fine.