Welcome everyone to another article! First of all, I would like to inform you that starting today, I am starting to publish answers to your frequently asked questions, primarily related to malfunctions or unsatisfactory operation of your computer, laptop or tablet. To date, I have received and continue to receive over 350 letters from you. In short, the majority of people are mainly interested in issues that directly relate to eliminating various types of errors, both in computers themselves and on mobile devices.
Therefore, if you had to be in a similar situation, when strange things began to happen on the screen of your computer, laptop, tablet, and even on your phone: such as strange pop-up errors, spontaneous rebooting of the device, freezing, then in this case, eliminate such incidents on your device you can do it yourself. To do this, go to my website and, using the site search, you can find the answer to your question. Otherwise, write to me through the form feedback. I will try to help you as soon as possible.
In today’s article I publish another question that was asked to me by Sergey Vasilyevich from Chelyabinsk.
Hello Dmitry. I have been mastering my laptop for about two years, so you can call me an advanced teapot. But today I had a question: how can I boot from a flash drive on an HP brand laptop? There was a desire to install a second system on my laptop. I read your other articles in which you suggest logging into the BIOS using the DEL or F2 buttons, but unfortunately I can’t log into the BIOS this way. Help me please.
Well, Sergey Vasilyevich, so that you don’t waste money on calling a technician, I’ll tell you how to boot from a flash drive on an HP laptop to install operating system. In fact, the process is quite simple, so any novice user can handle it. Just follow my instructions and you will succeed. Typically, the user needs to boot from an external drive to install or change operating system settings. It should be noted that on some laptop computers, booting from a flash drive may differ from the same process on a stationary “machine”.
Important! The instructions described in this article are suitable for all HP laptops. The only thing that may differ is the keys to launch the boot menu when you start the computer. This point is given a small section in the material.
For successful work, we will need a flash drive with installation files and a charged or connected laptop. As a rule, an Internet connection is not required here. If you have no problems with the flash drive, and you are sure that it was written correctly, you can immediately proceed to step by step instructions for launching files from a bootable USB flash drive.
Creating a bootable USB flash drive
If you came to this article, most likely you already have a bootable drive on hand. But if you don’t know how to make such a flash drive, read the simple instructions. I will not describe several methods, we will get by with one, since the article is devoted to a different issue. Create bootable USB flash drive we will use simple and, most importantly, free program UltraISO.
Download the application from here http://ultraiso-ezb.ru/
If necessary, you can use another application to create bootable drives. I believe Ultra ISO is the best option– it is as simple as possible and does not require investment of money. What else does the average computer user need?
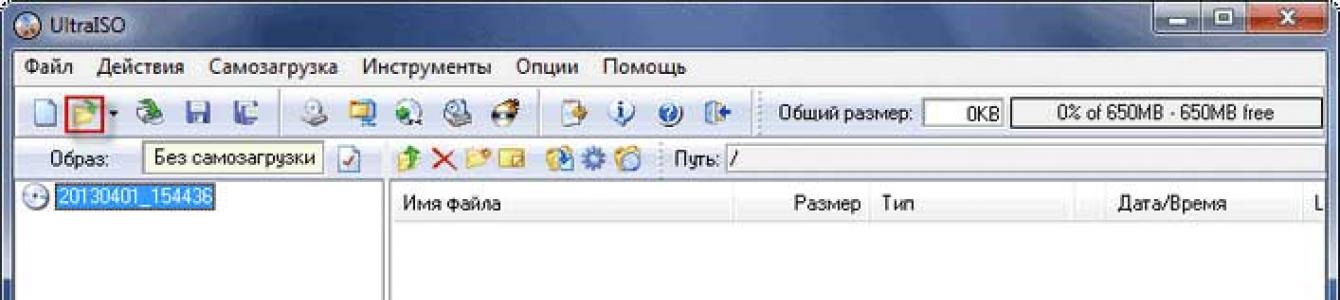
I have already discussed this question in one of the articles, well, perhaps I will repeat it in this article on how to write an image to a flash drive. So, it is desirable that the flash drive is empty and formatted in NTFS. Run the Ultra ISO program as administrator. After opening the application window, you need to click on the “Open” button, which is located in the top toolbar of Ultra ISO. In the screenshot below, the button we need is circled:

In the window that opens, you must specify an image of the operating system or other software for subsequent recording to an external drive. The easiest way to work with images is in the “Open” window ISO file"Select the desired file, and then click on the "Open" button. For example, I chose a Windows 8 Pro system image.

After these steps, on the right side of the program window you will see an image of the operating system, in my case it is Windows 8 Pro. The screenshot shows all the files that are required to create a bootable drive:

Now insert the flash drive into the laptop. Please note that recording modern operating systems requires a drive with at least 4 GB of storage capacity. I already said about formatting. You can perform this procedure directly in Ultra ISO. Don't forget to copy the important data that is present on the flash drive. During the formatting process, all files and folders will be deleted from the flash drive.

So, the flash drive is ready, now in the application window click on the “Boot” button, and then select in context menu item “Burn image” hard drive…».
After this, the process of creating a bootable flash drive will begin. The speed of the procedure depends on the power of your computer and the features of the flash drive. After a while, you will see a message indicating that the recording was completed successfully. We close the Ultra ISO program, we have completed the first stage. Now you can move on to the main process that this material is devoted to - how to enter the BIOS on an HP laptop.
How to boot from a flash drive on an hp laptop?
Now insert the bootable USB flash drive into the laptop and reboot the laptop. The first few seconds the laptop boots up, you need to press a key to enter the boot menu. As practice shows, in most models this is the “F9” button. You can boot from a flash drive through BIOS settings, but this is a longer and more complex process.
IMPORTANT! If the “F9” button does not work, then you can find out the exact key in BIOS menu. To do this, you need to press the “Esc” button while the computer is booting - do this at the moment when the image appears on the screen. The photo below shows the menu; in this model, the “F9” key is responsible for entering Boot Device Options.

Once you know the right key, you can boot from the flash drive. A simple menu will appear in front of you, listing download options. In first place, as a rule, is the hard drive - it is from it that the operating system is always loaded. Our task is to set priority to the flash drive. That is, when you start the computer, booting should not be done from the hard drive, but from a flash drive.
The name of any flash drive in this menu begins with USB Hard Drive– in my example this is KingstonDataTraveler SE9. You need to select the flash drive in this list and press the “Enter” button on your keyboard to apply the changes.

After an automatic reboot, the laptop will start from the flash drive. All you have to do is perform the necessary operations - be it reinstalling the operating system or changing some settings.
Follow this simple procedure to avoid any problems. I saw a thread on the forum where a user decided to research the BIOS and accidentally got into protection. An incorrectly entered password led to defects in the BIOS, so the easiest way to work is with shortcut keys, in our case “F9”.
Concluding today's article, I hope that this material helped you solve your problem. Now you can create bootable flash drives yourself and perform various operations with the system. Plus, you will be surprised how much money people from computer services charge for such simple work. And that’s all for today, if you have any questions, ask them in the comments or send them to me through the feedback form, dear users!
You might also be interested in these articles:
Dear users, if after reading this article you have any questions or would like to add something regarding the subject of this article or the entire Internet resource as a whole, then you can use the comment form. Also ask your questions, suggestions, wishes..
So, for today, that’s actually all I wanted to tell you about in today’s episode. I can only hope that you found interesting and useful information in this article. Well, I, in turn, am waiting for your questions, wishes or suggestions regarding this article or the entire site as a whole
Hello admin! I suffered all day today with my HP Pavillion laptop, I want to install the Windows 7 operating system on it instead of the currently installed Windows 8. I connect a proven bootable Windows 7 flash drive to the USB 2.0 port, then I reboot the laptop and often press the ESC key.

The same thing happens with the Windows 7 boot disk.


As you can see, the Secure Boot option in the BIOS is enabled,


How to boot an HP Pavillion laptop from a flash drive or disk
"To change the safe boot mode, please enter the code below to complete the change. If you did not submit this request, then press ESC to exit without changing." I think you already understand that in this message we are asked to enter this code 8721 on the laptop keyboard (in your case the code will naturally be different) and press Enter, after which your changes in the UEFI BIOS settings will be saved and the laptop will reboot,


What we were dealing with now is nothing more than an additional means of protection from us (malicious users), oh, sorry, that’s not what I meant, of course, this is a remedy against rootkit malware, used on HP laptops.
At the end of the article I also want to say this. All new laptops have the Windows 8 operating system installed and the BIOS interface has been replaced by the UEFI interface. Many readers have questions. What is UEFI BIOS, who invented it and why? What is the Secure Boot tab for and is it possible to disable it, and if so, how to do it? You will learn all this from our next article entitled "".
HP laptops usually come with a pre-installed Windows 8 operating system, which many users prefer to change to the more familiar Windows 7 and turn to service centers for help. We want to help you a little and tell you how to reinstall Windows on an HP laptop yourself.
You can’t do without theory: BIOS and UEFI, MBR and GPT
To reinstall the operating system, as a rule, you should start by going to the BIOS. But in the case of an HP laptop, we will have to deal not with a traditional BIOS, but with BIOS UEFI - a new, more modern interface between the system and equipment.
Among the many new functions of the “Extensible Firmware Interface”, this is how the abbreviation “Unified Extensible Firmware Interface” is translated, we want to note only one - the ability to work with disk space of 9,000,000,000 TB. This is achieved through the use of GPT - a partition table that replaced the usual MBR. For comparison: MBR provides access to disk space of no more than 2 TB.
Disable Secure Boot
One of the pitfalls of Windows 8 is the Secure Boot mode, which does not allow loading operating systems other than it.
Our goal is to provide the ability to boot Windows 7 onto an HP laptop.
- As soon as the laptop starts to boot, press the Esc key and go to the boot menu.
- Using the F10 key, go to the Bios Setup section.
- Select Boot Options from the System Configuration tab.
- Disable Windows Safe Boot Mode:
Secure Boot = Disabled. - We enable support for compatibility with other operating systems:
Legacy support = Enabled . - To save the settings, press the F10 key and confirm in the dialog box that it is impossible to load the current operating system
"...the system unable to boot the OS...". - We re-confirm the change in the loading method by entering the suggested numbers using the main keyboard after the warning
"... Secure Boot mode is pending ...".

Selecting a boot device
- When restarting the laptop, press the Esc key and go to the boot menu.
- Go to the Boot Device Options section using the F9 key and select the boot device (flash drive, laser disk drive).
Now our HP laptop is ready to install new Windows.
If GPT is not suitable
After you have reinstalled licensed Windows 7, all you have to do is deal with the drivers. But what to do if you do not have the ability to quickly activate the operating system? The boot partition created by GPT will be locked as soon as the activation period of Windows 7 expires, the system will go into an inoperative state and you will have to reinstall it again. You can solve this problem by converting a GPT disk to MBR.
Convert to MBR with data deletion
Converting a GPT disk to MBR is performed using the DiskPart utility from the Windows 7 distribution and entails complete deletion of data on the disk. This option is suitable for users who decide to reinstall the operating system immediately after purchasing an HP laptop. For everyone else, be sure to back up your drive before converting.
- Booting from the installation Windows disk 7 and we reach the stage of selecting the OS installation partition.
- In command line mode, launch the DiskPart utility using the key combination +F10:
diskpart - We get a list of hard drives installed on the computer and find the one we need:
list disk - To select a disk, use the command select disk N, where N is the serial number of the disk. Disk numbering starts from zero. Our laptop only has one hard drive, so the disk selection command looks like this:
select dick 0 - Deleting data:
clean - Convert the disk:
convert mbr - We finish working with the command line:
exit - We continue installing Windows.
Convert to MBR without data loss
Converting a GPT disk to MBR without data loss is done using the Paragon Manager utility, which can be found on multiboot disks (Live CDs). We will use the Lex Live CD (build from Lexa 2011).
- Boot from Live CD.
- We launch Paragon Manager and select our hard drive, which Paragon recognized as Basic GPT.
- We start the conversion process by selecting the option Convert to basic MBR disk(Hard disk command of the top menu).

How to boot an HP Pavillion laptop from a flash drive or disk? Hello admin! I suffered all day today with my HP Pavillion laptop, I want to install the Windows 7 operating system on it instead of the currently installed Windows 8. I connect a proven bootable Windows 7 flash drive to the USB 2.0 port, then I reboot the laptop and often press the ESC key.
I get to the “start menu”, now I press F-9 Boot Device Options (change boot settings),
I get to the boot menu, but my Kingston flash drive is not there, although it is already connected to the laptop (the flash drive is definitely bootable).
The same thing happens with the Windows 7 boot disk.
So I’m thinking “a miracle of hostile technology”, then I’ll do it differently, change the boot priority directly in the UEFI BIOS, reboot the laptop, then press ESC again when booting, get to the “start menu”, now press F-10 BIOS Setup
And I enter the UEFI BIOS and select the System Configuration option, and in it the Boot Options tab, I go into it.
As you can see, the Secure Boot option in the BIOS is enabled,
I disable it, set it to the “Disabled” position, and set the “Legacy support” option to the “Enabled” position, a warning appears, select Yes,
Then I press F-10 (I save the settings, press Yes and reboot),
After the reboot, this window appears with the message
A change to the operating system secure boot mode is pending. Please enter the pass code displayed below to complete the change. If you did not initiate this request, press the ESC key to continue without accepting the pending change
I pressed ESC, Enter, and other keys, everything is useless, the laptop reboots and loads the Windows 8 operating system. And if you enter the UEFI BIOS again, then everything is unchanged there, the Secure Boot option is Enabled, and “Legacy” support" is disabled Disabled, that is, as if I did not change anything.
I ask you to explain to me, a simple user, why I can’t boot HP Pavillion laptop from flash drive, why don’t the UEFI BIOS settings change, what am I doing wrong? And most importantly, why on a laptop with a UEFI BIOS you can only install Windows 8, and no other operating system, you have to “knock yourself out” like this and waste your “nerve” cells. Tolyanych from Vitebsk.
How to boot an HP Pavillion laptop from a flash drive or disk
Hello friends! Our reader does everything right until the last screenshot. It was only necessary to correctly translate this message:
"To change safe mode download, please enter the code below to complete the change. If you did not send this request (for a change), then press ESC to exit without changing." I think you already understand that in this message we are asked to enter this code 8721 on the laptop keyboard (in your case the code will naturally be different) and press Enter, after this your changes in the UEFI BIOS settings will be saved and the laptop will reboot,
And after the reboot, press ESC, get to the “start menu”, press F-9 Boot Device Options (change boot settings),
We get to the boot menu and our Kingston flash drive is already present here, select it and press Enter, our laptop boots from the flash drive.
What we were dealing with now is nothing more than an additional means of protection from us (malicious users), oh, sorry, I didn’t mean to say that, of course, this is a remedy against malware rootkits applied on HP laptops.
At the end of the article I also want to say this. All new laptops have an operating system installed Windows system 8 and the BIOS interface has been replaced by the UEFI interface. Many readers have questions. What is UEFI BIOS, who invented it and why? What is the Secure Boot tab for and is it possible to disable it, and if so, how to do it? You will learn all this from our next article entitled "".
Not long ago, the American company Hewlett-Packard released its line of g6 laptops, which are positioned as mid-budget with entry-level business class. The main elements of the external decoration of the body of such devices were glossy plastic elements using the structured surface of the cover, as well as metal elements of the moving body structures. Screen matrices are used by TN-film, providing the necessary level of display of both information for work and multimedia applications. The hardware of the devices varies from initial working capacities to initial gaming ones, which allows the user to choose a device “for themselves”. G6-series laptops run Windows, Linux and ChromOS. The connecting link between the operating system and the hardware of these laptops is a special BIOS settings system. Here the user can enable or disable those integrated into the product, change the boot priorities of hard drives and external media, and also fine-tune individual elements of the laptop.
What is BIOS and how to enter it?
BIOS is an element of computer device software implemented at the microcircuit level that allows operating systems to use the entire arsenal of its hardware.
A special version of this program is also installed in the HP Pavilion g6. devices, we will consider further.
The procedure for entering this settings menu is as follows:
- With the laptop turned off, press the power button.
- Quickly press Esc several times.
- Press the F10 button.
- How to enter the BIOS has been decided. Settings menu on screen.
It is worth noting that changing the settings in this menu must be done by a user who has an idea of what he is doing and why, otherwise there is a high probability that the laptop will malfunction and malfunction due to incorrect changes.

Learn more about BIOS menu items
How to enter the BIOS on the HP Pavilion g6 has already been discussed. Now let's look at each item in the BIOS settings menu separately.
Main menu
Here you can find basic information about the installed processor, RAM, BIOS version, device ID and its elements. It is also possible to configure the system date and time.
Security menu
Password settings for entering the BIOS when connecting to a hard drive and enabling/disabling additional security elements.
 Diagnostic menu
Includes elements for checking the operation of basic hardware elements and displaying information about their status.
System Configuration
After entering the HP Pavilion g6 BIOS, at this point the user can change the menu language, enable/disable processor virtualization technology (if supported), and configure the cooler operating mode. And also in the “Settings” submenu Boot set the boot priority
Exit menu
Everything is simple here: you can select the exit mode with saving changes, without saving, or reset the settings to factory settings.

Basic BIOS settings for installing Windows
Before you start Windows on an HP g6 series laptop, you need to set the appropriate settings in the BIOS.
We place HP Pavilion g6 at the workplace. How to enter the BIOS is already known. Go to the "System Settings" menu and open the Boot settings sub-item. Here, using the F5 and F6 keys, we move the device with the Windows installation image (flash drive, CD) to the very top of the priority tree. This action will allow the system to start the installation process from the specified media upon startup. Before exiting the BIOS settings, in the “Exit” menu, you must select the option to save the settings and confirm your choice. After rebooting the laptop, the installation process will begin.
Having mastered the information on how to enter the BIOS on the HP Pavilion g6, Windows 8, 7, XP can be installed without much difficulty.
Benefits of correct BIOS settings
It is always better to read and understand the instructions for setting up something than to troubleshoot problems later. So it is in the case of owning an HP Pavilion g6 laptop. How to enter the BIOS and configure it correctly before installing/reinstalling the operating system is very important to understand when mastering the device. A properly configured BIOS allows the device to operate stably, quickly and without failures. Therefore, if you install a new operating system without making changes to the BIOS settings, problems may arise in the performance and functionality of the device. It is better to complete the process 100% than to stop halfway.
With the above knowledge, it is easy and simple to unlock the full potential of the HP Pavilion g6 laptop. Now you know how to enter the BIOS and configure it correctly.
HP laptops usually come with a pre-installed Windows 8 operating system, which many users prefer to change to the more familiar Windows 7 and turn to service centers for help. We want to help you a little and tell you how to reinstall Windows on an HP laptop yourself.
You can’t do without theory: BIOS and UEFI, MBR and GPT
To reinstall the operating system, as a rule, you should start by going to the BIOS. But in the case of an HP laptop, we will have to deal not with a traditional BIOS, but with BIOS UEFI - a new, more modern interface between the system and equipment.
Among the many new functions of the “Extensible Firmware Interface”, this is how the abbreviation “Unified Extensible Firmware Interface” is translated, we want to note only one - the ability to work with disk space of 9,000,000,000 TB. This is achieved through the use of GPT - a partition table that replaced the usual MBR. For comparison: MBR provides access to disk space of no more than 2 TB.
Disable Secure Boot
One of the pitfalls of Windows 8 is the Secure Boot mode, which does not allow loading operating systems other than it.
Our goal is to provide the ability to boot Windows 7 onto an HP laptop.
- As soon as the laptop starts to boot, press the Esc key and go to the boot menu.
- Using the F10 key, go to the Bios Setup section.
- Select Boot Options from the System Configuration tab.
- Disable Windows Safe Boot Mode:
Secure Boot = Disabled. - We enable support for compatibility with other operating systems:
Legacy support = Enabled . - To save the settings, press the F10 key and confirm in the dialog box that it is impossible to load the current operating system
"...the system unable to boot the OS...". - We re-confirm the change in the loading method by entering the suggested numbers using the main keyboard after the warning
"... Secure Boot mode is pending ...".

Selecting a boot device
- When restarting the laptop, press the Esc key and go to the boot menu.
- Go to the Boot Device Options section using the F9 key and select the boot device (flash drive, laser disk drive).
Now our HP laptop is ready to install new Windows.
If GPT is not suitable
After you have reinstalled licensed Windows 7, all you have to do is deal with the drivers. But what to do if you do not have the ability to quickly activate the operating system? The boot partition created by GPT will be locked as soon as the period expires Windows activation 7, the system will become inoperative and you will have to reinstall it again. You can solve this problem by converting a GPT disk to MBR.
Convert to MBR with data deletion
Converting a GPT disk to MBR is performed using the DiskPart utility from the Windows 7 distribution and entails complete removal data on disk. This option is suitable for users who decide to reinstall the operating system immediately after purchasing an HP laptop. Everything else must be done backup copy disk before converting.
- We boot from the Windows 7 installation disk and reach the stage of selecting the OS installation partition.
- In mode command line launch the DiskPart utility using a key combination
+F10 :
diskpart - We get a list of hard drives installed on the computer and find the one we need:
list disk - To select a disk, use the command select disk N, where N is the serial number of the disk. Disk numbering starts from zero. Our laptop only has one hard drive, so the disk selection command looks like this:
select dick 0 - Deleting data:
clean - Convert the disk:
convert mbr - We finish working with the command line:
exit - We continue installing Windows.
Convert to MBR without data loss
Converting a GPT disk to MBR without data loss is done using the Paragon Manager utility, which can be found on multiboot disks (Live CD). We will use the Lex Live CD (build from Lexa 2011).
- Boot from Live CD.
- We launch Paragon Manager and select our hard drive, which Paragon recognized as Basic GPT.
- We start the conversion process by selecting the option Convert to basic MBR disk(Hard disk command of the top menu).

Operating systems accumulate over time unnecessary files, parts remote programs. There is a need to reinstall Windows or another OS. Most modern laptops (and sometimes desktop computers) no longer have a CD-ROM, so you need to know how to launch a bootable USB flash drive via BIOS and set the launch priority.
Setting up BIOS to boot from a flash drive
Every modern PC user should know how to set the BIOS to boot from a flash drive. This is due to the gradual abandonment of disks and the convenience of using removable drives. It is much easier to copy the system distribution (installer) onto media and install from it. The only difficulty that everyone who decides to install an OS from a drive faces is the correct one. BIOS setup. It should change the boot priority, which will force the computer to first read data from removable media, and only then launch files from the hard drive.
Some PC owners are faced with the problem that the BIOS does not see the bootable USB flash drive. To avoid this situation, you should follow these recommendations:
- The drive must be in USB before starting the PC.
- Connect the media to the 2.0 connector, because version 7 of the OS does not have drivers for the 3.0 input.
- Sometimes the BIOS does not boot from a flash drive just because the USB controller is turned off (Award version). It must be enabled from the Integrated Peripherals/Advanced Chipset Features section. Make sure that next to this line is the word Enabled.
Booting from a flash drive into Award Bios
Global laptop manufacturers (Lenovo, Asus, Sony, HP) can install different BIOS version to your devices. Below is an example of how to install the Award version in BIOS to boot from a flash drive:
- Restart your computer, press Del or F2 until a blue screen appears.
- Go to Advanced BIOS Features.
- If there is immediately an option called First Boot Device, then you should click on it and switch to removable media with the OS.
- In new versions of system firmware, there is an additional menu section called Boot Seq & Floppy Setup. Inside it, again prioritize the drive as First Boot Device.
- It is advisable to set your hard drive as the second device. This will be needed during the installation process so that it does not start in a circle.
- Use the Esc key to go to the main menu, go to Save & Exit Setup. Confirm saving changes.
How to boot from a flash drive into AMI BIOS

Do not forget that the bootable media must be inserted into the slot in advance. Below are instructions on how to set the BIOS AMI to boot from a flash drive:
- go to settings using the Del button (press during the initial splash screen until the BIOS appears);
- using the arrows, you need to select the Boot section;
- go to the Hard Disk Drives menu, then press enter on the 1st Drive line;
- Select the name of your OS drive from the list and press Enter.
- go to the Boot device priority section;
- enter the First boot device menu by pressing Enter;
- re-install the removable media;
- go to the top menu, select Exit saving changes or Save changes and exit, confirm your consent to make changes.
How to boot from a flash drive in Phoenix-Award Bios
There is another version of global settings. Below is an option on how to set Phoenix BIOS to boot from a flash drive. This option is much less common, but the principle remains the same: you need to assign a boot priority so that the program runs the OS installer. To go to the settings, press Del or F2, then:
- Check if they are included USB port. Go to Peripherals and opposite the line “USB 2.0 Controller” there must be the word “Enabled”.
- After that, go to the Advanced tab, there, opposite the “First Boot Device” line, set the value to USB-HDD.
- Exit the settings and save via Save & Exit Setup.
How to boot Windows from a flash drive to EFI (UEFI) Bios
Latest Windows versions offer the simplest and most intuitive option on how to boot from a flash drive in Bios. If in previous firmware the menu looked like a regular list in which it was necessary to use the arrows on the keyboard for manipulation, the new UEFI interface includes graphic elements and supports the use of the mouse. For different laptop models, the transition occurs using special buttons, for example:
- HP - first ESC, and then F10;
- Asus – Del, then F2.

Some Windows users 8 note that they are having problems with the transition to the UEFI BIOS version. To solve this problem, use one of the following options:
- Go to PC settings through the control panel, select the section with power settings. Here you need to turn off Fast Boot mode.
- Restart your computer and press the buttons indicated on the start screen to go to the BIOS.
- To restart Win 8, press the key combination Shift+Restart. In the menu after reboot, select the Troubleshoot section. Go to “Advanced options”. Here you need to click on UEFI Firmware Settings: you will be redirected to UEFI immediately after rebooting your PC.
There are two ways to start from a drive through a new BIOS. Do not forget that after reinstalling the OS, the boot priority settings will need to be reset to their original form (so that the hard drive boots first). Graphical global settings are very clear; any user can navigate the sections. There are two simple options for setting drive priority.
Quite often, owners or users of laptops have to boot into the BIOS from a flash drive. Especially if the device does not have a CD/DVD drive, but you need to install a new operating system (OS) or install fresh drivers and anti-virus software. Therefore, in this article we will describe in detail how to set boot from a flash drive in the BIOS on laptops from a variety of manufacturers (HP, msi, sony, dell, acer, etc.).
So, to enable booting from a flash drive in the bios on a laptop, you need to:

Do not forget that in the BIOS we can navigate through sections, tabs and lines only using the buttons on the keyboard. The mouse won't help you.
However, BIOS versions are different for all laptop manufacturers and models. Therefore, the algorithm of actions listed above is not suitable for all devices. For example, if you go to the BIOS and see a similar interface, then you have Award Bios.

Then it’s best to launch a bootable USB flash drive like this:
- Go to the “Integrated Peripherals” section.
- Approximately in the middle of the screen, use the arrows on the keyboard to find the “USB Controller” item.
- Press Enter. In the window, select the “Enable” value.
- Please note that the “USB Controller 2.0” line also contains “Enable”.
- Press Esc. Let's leave this section. Then we go to “Advanced BIOS Features”. The name translates as additional or advanced settings. Here we need the “Hard Disk Boot Priority” item.
- Let's go in and see what's in first place. There should be a flash drive, not hard drive. Therefore, select the USB card and use the “+” button to lift it up.
- Press Esc. Select the line “First Boot Device” and set the value to “USB-HDD” (or USB-FDD, if the first option fails to boot from a flash drive into the bios on the laptop).
- Click Esc again. Select “Save & Exit Setup”, then press the Y key.

There are also other BIOS versions. These are both Phoenix-Award BIOS and AMI Bios. True, all of them are found only on old laptops with not the most “fresh” motherboards. How to configure boot from a flash drive for such devices? Everything is the same. Only the names of the sections and items in the BIOS menu differ. The algorithm of actions and settings is as similar as possible.
For reference! As we have already noted, in order to install booting from a flash drive in the BIOS, you need to “disable” the Secure Boot protocol. At the same time, on many lenovo laptops that's not enough. You may also need to enable compatibility mode. It is called differently. Therefore, look for CSM/CSM Boot, UEFI and Legacy OS, Legacy BIOS, Legacy Support, etc.
How to boot a laptop from a flash drive via UEFI?
Many modern computer devices (especially those with latest versions Windows) are equipped with a new interface for initial loading. It's called UEFI. Working with this “option” of BIOS is a little easier. In addition, you can use the mouse here. However, despite the fact that the new interface is more intuitive, not all users know how to work with it. Therefore, we will briefly describe the entire procedure.
For example, to boot from a flash drive on an HP laptop to UEFI, you need to:
- When booting the device, press the ESC key several times. Then F10 to get into Bios Setup.
- Now at the very bottom of the window find the Boot Priority section.
- Just drag the icon in the form of a flash drive to the first place with your mouse.
- Another option is to click on “Exit/Advanced mode”, then confirm the transition to advanced mode by selecting Advanced Mode. Next, complete the setup.
However, there are also quite a few versions of UEFI. There are also Russified versions. As a rule, it’s even easier to set boot from a flash drive here:
- First you need to go to the “Download” section. Sometimes it is made in the form of a subsection. Then you should look for it in additional settings.
- Just select “Disk loading order”.
- In boot priority, put the flash drive first.
- Press F10. Save changes, .
We will also tell you how to boot from a flash drive on devices with Gigabyte motherboards (they are preferred by many popular manufacturers - Acer, Lenovo, Samsung, etc.), on which UEFI BIOS is quite common.
- Let's go to BIOS. You already know how this is done. The easiest way is to press “Delete”, “F2” or “Esc” at the initial boot stage.
- Next, visit the “BIOS Features” tab.
- At the very bottom of the window, click on “Hard Drive BBS Priorities”.
- In the line “Boot Option 1” you need to put our flash drive instead of the hard drive. Therefore, in “Boot Option 2” the hard drive – HDD – will have to appear.
- We save and exit.

How else can you boot from a flash drive on a laptop?
Through the computer's BIOS is not the only option. For example, it is possible to boot from a flash drive to asus laptop, toshiba, samsung, etc. and through a special boot menu. It's called the Boot Menu (by the way, it's also part of the BIOS). You can enter it during the initial loading phase. You just need to press Esc, F8, F11 or F12 quite often. Which key exactly depends on the manufacturer of the motherboard and the BIOS version used in it.
Once in the Boot Menu, you need to select and enable boot from a flash drive using the arrows on the keyboard. Then all you have to do is press Enter. Agree, it’s quite convenient and simple. However, it is not always possible to go to the boot menu. The fact is that on some laptop models the Boot Menu option is deactivated in the BIOS. Therefore, additional steps are required to enable it.
It is worth paying attention to one more point. The Boot Menu does not have a unified design. It can also be called differently: “MultiBoot Menu”, “BBS Popup”, “Boot Agent”, etc. However, any boot menu contains a list of devices from which booting can be done.
Possible problems
At first glance, booting a laptop from a flash drive is not difficult. However, some problems can always arise. Therefore, we decided to describe the most frequent of them. In addition, we will tell you how to eliminate them.

Please note that very old laptops may not be able to boot from USB flash drives at all. Then you need to either upgrade the device by installing a new motherboard and software, or think about purchasing a new computer.