Drivers for Intel components are sometimes very difficult to find. However, you can make this process easier for yourself and automatically identify Intel components - download drivers and install them on your computer. Read our instructions.
Often, many users have problems when the operating system cannot recognize a particular device. When you go into Device Manager, you find that it displays one or more “unknown devices,” indicated by an exclamation point in a yellow triangle.
In some situations, errors appear when installing Nvidia video card software, when the installer displays a message that it is impossible to continue installing Nvidia, you must first install Intel drivers. What should I do to solve this problem?
But now, if your computer has an Intel motherboard or uses other components of this brand, you can easily solve this problem using special program Intel company.
The Intel Driver Update Utility will first scan your computer, detect components from that company, and automatically download and install missing or outdated drivers. Not only does it provide quick access to latest versions Intel drivers, it is in many cases able to recognize components labeled as "Unknown Device".
How to recognize components through Intel Driver Update Utility
Intel Driver Update Utility simplifies the entire recognition, installation, and update process. It is able to recognize the drivers of the following Intel components:
- Video cards (such as integrated graphics Intel processors i5 and i7);
- Sound cards (integrated on motherboards Oh);
- Wi-Fi network cards;
- Ethernet network cards;
- Chipsets;
- Intel motherboards;
- Intel NUC (Intel mini-computers);
- Intel Compute Stick (microcomputer in the form of a flash drive).
If any component from the above list is installed on your PC, the Intel Driver Update Utility will recognize it automatically. In addition, if you use miniature Intel NUC or Intel Compute Stick computers, the program will load all the necessary drivers for the system to function correctly.
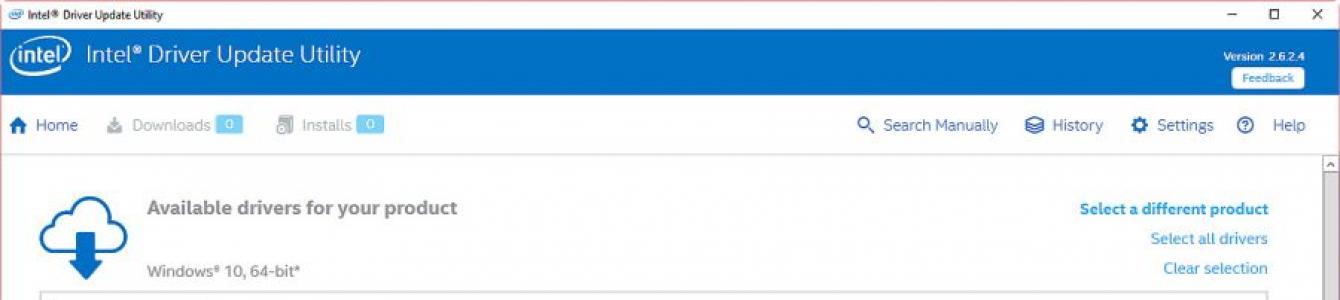
Using the utility is quite simple. After launching it, a window will be displayed through which you can search for missing or new versions of drivers. First, click on the Start scan button and wait until they appear in the “Available drivers for your product” section.
Before downloading, you can create a separate folder to store them. First click on the icon in the Download Directory field and specify the folder into which you will download the files. To download, click on Download.

Once downloaded, you can install them directly from the Intel Driver Update Utility or do it manually by running each installer from the specified folder.
The application not only allows you to automatically recognize devices. You can use it to download any other drivers for Intel devices. To do this, first use the “Search manually” option to find the appropriate driver and select the appropriate option. Thanks to it, it becomes possible to load drivers from another computer.
Alternative installation method
The first thing you need to do after reinstalling the system is to install all the drivers for the computer to function properly. This process is quite lengthy and labor-intensive, but it can be sped up by first creating a backup copy of your current drivers before reinstalling the system. Then, without much hassle, you can install them on a “clean” system.
To create a copy, we use the Free Driver Backup application, which allows you to quickly perform backup selected (or all) drivers.
Creating a backup via Free Driver Backup
The application will automatically scan your computer for all drivers and display them in a simple list. Opposite each one, his name will be displayed, as well as the recommended action on the Action tab. By default, only Recommended ones are displayed. To display all, you need to go to the Scan Driver menu and select Scan all drivers.
To start copying, first select in the list those items that you want to save, or all (Select all), and then click on the Backup button. Unfortunately, the application does not offer to select a folder for saving, so after creating it you can find it in the directory with the program.
The tool also allows you to create other data archives - browser history, individual pages from Internet Explorer, and also, which is very important, the system registry. All these options can be found in the Plugins tab.
After a reinstallation or clean installation of the system, drivers can be restored using Device Manager. First click right click mouse to Start and select Device Manager.
The manager window displays a list of all components of the PC. If, for example, you need to recognize network card(you can find it by name in the Network adapters section), right-click on it and select “Update driver”.
Then select “Search and install drivers manually” in the window that opens, and then specify the path to the folder in which backup(by default the BackUp folder in the Free Driver Backup program directory).
Conclusion
Creating a backup copy is a very convenient solution and will save a lot of time searching. If you are installing a new driver and want to protect yourself from problems by returning to previous version, then make a backup first. This is also a very useful option when old components are installed on your PC, for which you cannot find drivers on official websites.
Due to the fact that the backup copy is saved in the directory with the program, we recommend Free installation Driver Backup is not carried out on the system partition. This way, you will protect it from accidental formatting when reinstalling the system. Better yet, copy it to another local drive or flash drive.
Situations where it is impossible to install a driver on a video card are very common. Such problems always require an immediate solution, since without a driver, instead of a video card, we simply have a few very expensive pieces of hardware.
Reasons why software Refuses to install, quite a lot. Let's look at the main ones.

NVIDIA
“Green” software, despite its ease of use (“install and use”), can be quite sensitive to various system factors, such as errors, software conflicts, incorrect installation or uninstallation of previous editions or additional software.
AMD
The main problem when installing drivers from the “red” ones is the presence of old software. It is for this reason that AMD software may refuse to install on the system. The solution is simple: before installing new software, you need to completely remove the old one. The easiest way to do this is using the official AMD Clean Uninstall program.

Please note that this action will completely remove AMD components from the system, that is, not only the display program, but also other software. If you use a platform from Intel, then this method is suitable for you. If your system is based on AMD, then it is better to use another program called Display Driver Uninstaller. You can read how to use this software in this article.
Intel
Problems with installing drivers on integrated graphics from Intel are quite rare and are mostly complex in nature, that is, they are a consequence of incorrect installation of other software, in particular for the chipset. This most often occurs during software updates on laptops, which we will discuss below.
Laptops
In this section we will talk about the procedure for installing drivers on a laptop, since this is where the “root of evil” lies. The main mistake when solving problems with laptop software is “sorting through”, that is, trying to install different software if “it doesn’t work.” This is exactly the kind of advice you can get on some forums: “did you install this one?”, “try this one again.” The result of such actions in most cases is loss of time and blue screen death.
Let's look at a special case with a Lenovo laptop, which has an AMD video card and an integrated Intel graphics core.
As mentioned above, it is necessary to follow the order of software installation.
- First of all, install the driver for the motherboard chipset (chipset).
- Then we install the software for the integrated Intel graphics.
- The driver for the discrete video card is installed last.
So let's get started.
- Go to the official Lenovo website, find the link "Drivers" in the menu "Support and Warranty".

- On the next page, enter the model of our laptop and click ENTER.

- Next you need to follow the link "Drivers and Software".

- Scroll down the page and find the block with the name "Chipset". Open the list and find the driver for our operating system.

- Click on the eye icon next to the software name, and then click on the link "Download".

- In the same way, download the software for the integrated Intel video core. It is located in the block "Display and video cards".

- Now we install the driver for the chipset in turn, and then for the integrated graphics core. After each installation, a reboot is required.
- The final step is to install the software for the discrete video card. Here you can already use software downloaded manually from the official AMD or NVIDIA website.
Windows 10
The desire of Microsoft developers to automate everything and everyone often leads to some inconvenience. For example, the “ten” provides for updating video card drivers through the standard Windows Update. Attempts to install software manually may lead to errors, including the impossibility of installation. Because a driver is a set system files, then the OS thus “protects” us from software that is incorrect from its point of view.
There is only one way out: manually check for updates and install the driver.
As you can see, there is nothing wrong with installing drivers, the main thing is to follow simple rules and systematize the actions.
Modern Windows 10 and 8.1 usually update drivers automatically, including for Intel equipment, but drivers obtained from the Center Windows updates not always the latest (especially for Intel HD Graphics) and not always exactly what is needed (sometimes just “compatible” according to Microsoft).
This manual contains details about updating Intel drivers (chipset, video card, etc.) using the official utility, how to download any Intel drivers manually, and additional information regarding Intel HD Graphics drivers.
Besides automatic search and installing hardware drivers, the driver update program allows you to search for the required drivers manually in the appropriate section.

The list contains drivers for all common motherboards with Intel chipset, Intel NUC and Compute Stick computers for different versions Windows.
About updating Intel HD Graphics drivers
In some cases, Intel HD Graphics drivers may refuse to install instead of existing drivers, in this case there are two ways:
- First, completely remove the existing Intel HD Graphics drivers (see) and only then install.
- If step 1 did not help, and you have a laptop, look at the official website of the laptop manufacturer at the support page for your model - perhaps there will be an updated and fully compatible driver for the integrated video card.
Also in the context of Intel HD Graphics drivers, the following instructions may be useful: .
This concludes this short instruction that may be useful for some users; I hope that all Intel equipment on your computer is working properly.
Today we will look at:
So, you purchased the NVIDIA video card of your dreams, installed it in your PC, but when installing the video card driver, you receive a message that the installation cannot continue without installing the Intel driver. Read below where to find it and how to install it.
The easiest way: use to update all drivers automatically and get rid of the problem.
In fact, the problem is easily solved, since video card manufacturers include discs with all the necessary drivers with their products. If you have such a disk, then insert it into the drive, find the driver on it and go to the subheading “Install the Intel driver” of this article. If you don’t have a disk, then the Intel driver can be found on the Internet, and there are two ways to do this.
We use special software from Intel
For people who don't want to search for drivers, Intel has developed software that simplifies this task. So, to get the coveted driver, follow this link and download.

Once the search is complete, you will see the Intel drivers in the list that need to be installed on your PC. Find the Intel® HD Graphics Driver and click on the “Download” button. The driver will be downloaded to the directory specified in the Default download directory field.
The good thing about using this software is that it allows you to get all the Intel drivers necessary for the correct operation of your PC.
Download the driver without software
The problem can be solved without software, by downloading the Intel driver yourself. To do this, follow the link and select the driver version for your operating system. Then click on the button with the arrow, this will start the download process.
Installing the Intel Driver

For the driver to start working, you need to restart the computer. That's it, the Intel driver installation is complete!
Installing a video card driver using Display Driver Uninstaller video instructions
Some users prefer to read. Others will prefer to watch a video tutorial. To satisfy the needs of all our visitors, we have made a detailed video on how to install a video card driver using the Display Driver Uninstaller utility.
Bottom line
And that's all.
If you know other ways to install drivers, feel free to share them in the comments. Please also tell us if you have any problems installing the driver. We will be happy to help.
Intel is the largest manufacturer of graphics for desktops, laptops and tablets. You say, why not Nvidia or AMD? Everything is simple here - 95% of consumer processors from Intel have graphics inside them, and the fact that it is Intel that produces the most processors is still a fact. Of course, not everyone uses these video cards, and those who do often have ultrabooks and use them to watch videos and surf the Internet, which such graphics can handle without problems even with drivers that are installed automatically through the update center.
But there are still a number of people who don’t mind playing even on ultrabooks. Yes, of course, you will have to forget about ultra settings and FHD (and what’s there - often you need to forget about HD), but in old games of the year before 2013, as well as in mass online games, it’s quite possible to play with a comfortable fps and resolution. And here the issue of drivers becomes acute, because drivers are installed through the update center... for the month of March:

Yes, they are suitable for watching movies and surfing the Internet, but not so much for games, especially since the Intel website has drivers from the end of August, and they have quite a lot of goodies:

All three new games will be quite playable on integrated video cards, and in general, for all three, graphics are not the most important indicator. But what is the problem then, you say? You just need to download and install the new driver. Everything is correct, but not everything works - when installing a new driver, you will most likely receive this error: 
Why does this happen? No, not because the driver is not suitable for this PC - unlike Nvidia or AMD, all Intel video cards are reference by default. The reason for this is that Intel has up to three (!!) driver branches for the same video card (for example, a separate branch only for Windows 10, a separate one for Windows 7, 8 and 10, and a separate one only for the two newest ones architectures and Windows 10), and when switching between branches the following error appears.
However, it is not very difficult to bypass it - you just need to remove the current driver and install a new one from scratch. I wrote how to completely remove the video driver here -. After removing the old driver and rebooting, the new driver will be installed without problems, but another problem appears here - the update center still considers this driver incorrect, so after some time it will download the old one, from March, and install it. To prevent this from happening, you need to prevent Windows from updating the driver specifically for the video card. The easiest way to do this is with a small Microsoft programs Show or Hide Updates, which you can download.
You need to run this tool, wait while it looks for updates, then click on Hide Updates and select all graphics drivers:

That’s it, now you have the latest graphics driver, and the system can’t do anything about it. If for some reason you are not satisfied with it, just download the latest driver from the laptop manufacturer’s website and install it (or again, through the same tool, allow the drivers to be updated and wait until the system does it).