Random access memory or RAM is one of the most important components personal computer. Malfunction of modules can lead to critical errors in system operation and cause BSODs (blue screens of death).
In this article, we will look at several programs that can analyze RAM and identify faulty modules.
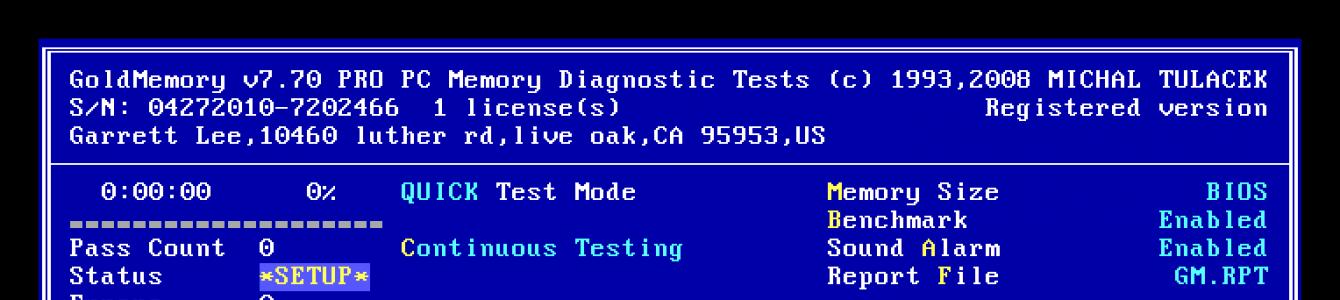
GoldMemory is a program supplied as a bootable image with the distribution. Works without the participation of the operating system when booting from a disk or other media.

The software includes several memory test modes, can test performance, and saves test data to a special file on the hard drive.
MemTest86
Another utility that is distributed already written into an image and works without loading the OS. Allows you to select test options and displays information about the size of the processor cache and memory. The main difference from GoldMemory is that there is no way to save test history for later analysis.

MemTest86+
MemTest86+ is a revised edition of the previous program, created by enthusiasts. It features higher testing speed and support for the latest hardware.
Windows Memory Diagnostic Utility
Another representative of console utilities that work without the participation of the operating system. Developed by Microsoft Corporation, Windows Memory Diagnostic Utility is one of the most effective solutions for identifying RAM errors and is guaranteed to be compatible with Windows 7, as well as newer and older systems from MS.

RightMark Memory Analyzer
This software already has its own GUI and runs under Windows. Basic distinctive feature RightMark Memory Analyzer is a priority setting that makes it possible to check RAM without loading the system.

MEMTEST
A very small program. IN free version can only check the specified amount of memory. In paid editions, it has advanced functions for displaying information, as well as the ability to create bootable media.

MemTach
MemTach is professional-level memory testing software. Conducts many tests of RAM performance in various operations. Due to some features, it is not suitable for the average user, since the purpose of some tests is known only to specialists or advanced users.

SuperRam
This program is multifunctional. It includes a RAM performance testing module and a resource monitor. The main function of SuperRam is RAM optimization. The software scans memory in real time and frees up space that is not used in at the moment processor. In the settings you can set the limits at which this option will be enabled.

Errors in RAM can and should cause problems with the operating system and the computer as a whole. If you suspect that the cause of the failure is the RAM, then you need to test using one of the programs given above. If errors are detected, sadly, you will have to replace the faulty modules.
Appears on your monitor too often even on a newly installed OS, the first thing you need to do is check your RAM. The RAM should also be tested if the computer restarts by itself or freezes. Checking RAM on Windows 7 can be done using standard tools, but if you are using a different version of the OS, you will need to download a small utility from the Internet. Almost always, software crashes that seem counterintuitive at first are caused by RAM problems.
Elimination method
The first verification method does not require launching additional programs. It is relevant if the PC uses more than one stick of RAM. If there is only one bar, you will need an application or another computer to test it. Remove one stick of RAM one at a time, check the overall stability of the OS, if the problem persists, remove the next one, and so on. This method is also good because you can test the motherboard slots at once. At the same time, if one board works normally in another computer without causing failures, perhaps the motherboard is to blame. If, after removing one of the sticks, the computer starts to work normally, it means that it is faulty, and you don’t need to run the Windows 7 memory checker. In addition, physical extraction will not take much time, but testing using the application can take a long time, especially if the amount of RAM is large.
If a completely new computer is installed and the image does not appear even at the BIOS boot It is likely that the processor or motherboard does not support the device from the manufacturer that produced it. Check the official website of the company that produced the motherboard; it is quite possible that the BIOS firmware latest version will solve this problem.
How to check RAM in Windows 7

So, to run the built-in Windows utility, which will conduct a RAM test, go to “Start - - Administrative Tools”, in the list that opens, select “Windows Memory Checker”.
Be careful. Before testing, you must close all applications and save the necessary documents. After clicking on the "Reboot" button, the system will forcefully terminate all programs that require additional actions from the user.
After the reboot, the RAM check will automatically start. Windows 7 performs it in two stages. Each will take about 10 minutes if the amount of RAM is two gigabytes and the memory is working. Otherwise, the tests may take longer. During this time, refrain from unnecessary clicks on the mouse and keyboard buttons. If the RAM is out of order, the bottom of the screen will begin to fill with error information.
When the RAM test is complete, Windows 7 will automatically restart your computer and generate a report of any RAM problems found.
Memtest86+

Detecting problems with RAM using Windows 7 is not always effective enough. For more serious and in-depth tests, it is better to use the Memtest86+ utility, which is completely free and can be used on any computer, no matter what OS is installed.
Available in three possible versions:
- Bootable ISO (designed to create a bootable disk by burning the image with a CD or DVD burner).
- Auto Indtaller For USB Key - (not always suitable for older devices, creates a bootable USB flash drive, and not all computers released a few years ago can boot from USB).
- Pre-Complied for Floppy (an absolutely archaic solution for those who have neither USB sockets nor a CD writer, but do have a floppy drive).
Creating a bootable USB flash drive

Just go to the official Memtest86+ website and download the required distribution. Then you need to unzip it, for this you can use 7-zip or the popular Winrar. After starting the program, you will need to select a drive, which will subsequently become bootable. Be careful, make a backup of your data, all information on the flash drive will be deleted during the process of recording a new one.
Bootable CD/DVD
In some cases, the RAM cannot be checked from a flash drive. Windows 7 sometimes crashes when using a specific flash drive driver, or the drive simply isn’t at hand, or maybe the BIOS is outdated and doesn’t know how to boot the computer from USB devices.
If the flash drive cannot be used, the best solution the distribution will be written to disk. And the Ultra ISO program will help with this. If you install it, then double click on any ISO file will open it in this application. After opening the Memtest86+ file, select the tools menu. Then click on “Burn image”. Memtest86+ is a very small program, so the recording will complete in less than a minute.
Memory test
After burning the distribution to a flash drive or disk, you need to go into the BIOS. To do this, you need to press the "DEL" key while turning on the computer. When the utility BIOS settings will be launched, in the "First Boor Device" column, select your flash drive or CD-ROM.
If all actions were performed correctly, after the reboot an automatic check of RAM will begin. The program makes nine different tests, but after they complete, it goes into a loop and starts all over again. If the first two or three tests were successful and without errors, most likely everything is fine with the RAM.
Prevention

Very often RAM failures are associated with dust. system unit. In this case, checking the RAM (whether Windows 7 is installed on the computer or any other version of the OS) is not necessary. Open the cover of the system unit and blow out the entire internal space. Pay special attention to radiators and slots. In this case, it is advisable to remove all devices except the processor from their sockets and wipe the contacts. It would also be a good idea to wipe the contacts of the slots themselves. This procedure saves not only from dust, but also from metal oxidation.
When performing these steps, be very careful with the microcircuits; the slightest damage to them will damage the device. It is best to use an eraser or alcohol to wipe contacts. This especially often helps if there are several memory sticks, and testing each one separately can take a long time. After wiping the contacts, do not rush to insert the RAM stick into its place, wait a little and let it dry.
When the blue screen of death appears on your device monitor, it’s time to think about checking the RAM. In addition, the RAM must be tested if the computer reboots on its own or freezes.
Standard tools will help you check RAM on Windows 7, but if you are using a different version of the OS, you will need to download a special program from the Internet. Almost always software failures, which at first glance seem illogical, turn out to be related to RAM problems.
Elimination method
The first verification option does not involve launching additional utilities. It is possible when several sticks of RAM are used. If there is only one, you will need to use an application or another device to check. It is necessary to remove the RAM strips one by one and look at the overall stability of the system. This option is good because it allows you to check the motherboard slots at the same time. If one of the boards functions normally in another device without causing failures, it is quite possible that the cause of the failure is the system board. When, after removing one stick, the computer starts to work normally, it is that stick that is faulty. Therefore, the Windows 7 Memory Test Tool does not need to be run.
It is worth noting that physically removing the strips does not take much time, but checking when using special programs is a longer process. This especially applies to situations where the amount of RAM is large. If a completely new memory module is installed and blue screen remains even during the BIOS boot, it is possible that the processor or motherboard does not support the device of the manufacturer that released it. In this case, you need to check the official website of the company that is the manufacturer of the motherboard. You may need to update the latest BIOS firmware.
How to check RAM in Windows 7?
To run a built-in program that can test RAM, you must do the following:
1. Go to “Start”.
2. Go to “Control Panel”.
3. Open Administrative Tools and select Windows Memory Checker.
You should be extremely careful. Before performing the scan, you will need to close all applications and save important documents. When you click on the “Reboot” button, all programs that require additional actions from the user will be forced to end. Next, the computer restarts, after which RAM testing automatically starts. It is performed in two stages. They take a small amount of time if the amount of RAM is two gigabytes and the memory is working. Otherwise, the verification may be delayed. During the testing period, it is recommended to refrain from unnecessary clicks on buttons. If RAM defects are detected, error information will appear at the bottom of the screen. After completion Windows checks 7, the computer automatically reboots, and a report is generated on all RAM problems found by the system.
Memtest86+
It is worth noting that identifying problems with RAM Windows tools 7 does not always show high efficiency. To perform more serious and in-depth tests, you will need to use the Memtest86+ program. It is presented in a free version and can be easily used on any device with any operating system. The program is available in three versions:
Bootable ISO (designed to create a bootable disk by burning an image with a CD or DVD drive;
Auto Indtaller For USB Key (not always suitable for older devices);
Pre-Complied for Floppy (an archaic solution for those who do not have USB sockets or a CD writer, but do have a floppy drive).
Creating a bootable USB flash drive
You need to go to the official Memtest86+ website and download the required distribution. After this you will need to unzip it. For these purposes, it is suggested to use 7-zip or the well-known Winrar. When the program launch is completed, you need to select the drive that will become bootable.
Bootable CD/DVD
Sometimes it is impossible to check RAM from a flash drive. The system crashes when using a specific flash drive driver. There are also situations when the drive may not be at hand, the BIOS is outdated and is not capable of booting the device from USB devices. In such cases, you have to burn the distribution to disk. The Ultra ISO program is designed for this. Once it is installed, double clicking on any ISO file opens it in this application. Then you need to select the tools menu and the “Burn image” item. Memtest86+ is a small program, so recording will be carried out very quickly.
Memory test
After the distribution package is written to a flash drive or disk, you need to go to the BIOS. This must be done while turning on the computer by pressing the “DEL” button. When the program is launched, you should select the flash drive or CD-ROM you are using in the First Boor Device column. When all steps are completed correctly, the reboot is followed by an automatic memory check. The utility performs nine different tests, but after they are completed, the program goes into a loop and starts all over again. As a rule, the first two or three successful tests make it clear that there are no problems with the RAM.
Prevention
Often, operating system failures are caused by dust on the system unit. In this case, OS testing is not required. It is necessary to blow through the entire internal space of the device, paying special attention to radiators and slots. It is advisable to remove all devices, excluding the processor, from their sockets and thoroughly wipe the contacts. You should be careful with microcircuits, as the slightest damage to them can lead to malfunctions.
The cause of many critical errors (BSOD) and subsequent reboots, freezes, and malfunctions is faulty RAM.
The most in a simple way To identify a faulty module, use the standard utility included in Windows 7 - "" (Windows Memory Diagnostic Tool). This tool checking appeared in Windows Vista, but many never used it, and in earlier operating systems it was not included in Windows at all, although it could be downloaded separately. When using the "Windows Memory Checker" you will not have to create additional boot disks to record the utility, but will only need to restart your computer or boot from an existing installation disk. Windows disk 7.
A lot of time has passed since Windows Memory Diagnostic lived a life separate from Windows, and the utility has undergone some changes, the range of tests used has expanded, constant monitoring has appeared, and the interface has been simplified as much as possible for use by the end user.
Typically, the system can automatically detect obvious problems with the computer's memory and prompt you to run a diagnostic tool, but this is only if the OS is installed and booting.
It is necessary to promptly identify and replace faulty memory before blue screens and other symptoms become constant companions of your work.
If changes were made to the BIOS (overclocking, voltage changes, etc., etc.), you need to return everything to its original state and check operation in this mode.
Running from a running OS
Follow: Start ---> Control Panel ---> Administration ---> Windows Memory Checker.
Or: Start---> in the search bar type " mdsched"without quotes and click" Enter".
Or: Start---> in the search bar type " remember" without quotes and select this item:
The following window will appear:

Launch when computer boots
When booting, press the key F8 on the keyboard, the “Additional boot options” selection menu will appear:
Click " Esc" to go to the Windows Boot Manager menu, then " Tab", then " Enter".
Running from a Windows 7 installation disc or system repair disc
You must press any key while this prompt is on the screen.

If you are using installation disk, in the first window click " Next":
Select " System Restore":
The next 3 steps are identical.
Select the first option and click again " Next":
Click " Windows Memory Diagnostics":
We choose the first option:
Working with the utility
After launch, the test will begin immediately (with standard parameters):
To change parameters, click " F1":
You can select different "Test Suites":
The "Basic Set" includes only 3 tests, use it for a quick check:
The "Regular Suite" is used to perform standard tests:
To select the next parameter, press the " Tab".
Enabling/disabling the cache for various tests serves to determine various types errors.
When the cache is disabled, the utility accesses the RAM directly, this ensures the most accurate testing of the modules themselves.

We set the number of passes; the more passes, the greater the likelihood of detecting defects.
We start testing with the specified parameters using the " F10".
When the test is completed, the computer will automatically restart.
Information about testing and problems found/not found is always on the screen; in addition, if errors are detected, information about them will be shown after Windows boots (if the test was run from the OS).
Scheduled launch
It is very convenient to schedule the utility to run on a schedule, for example, once a week. To do this, set the parameters similar to the screenshots below:
Launch the task scheduler ( Start ---> All programs ---> Standard ---> Service ---> Job Scheduler), press " Create a task":
Go to the "Triggers" tab, click " Create":
Go to the "Actions" tab, click " Create", in the "Program or script" field write:
In the "Add arguments" field we type:
/bootsequence (memdiag) /addlast

Go to the "Parameters" tab:
Now once a week, the utility will be automatically added to Windows boot loader and run on the next reboot after adding. A reboot, however, can also be scheduled.
Troubleshooting possible problems related to the operation of the utility
If you encounter that the utility starts every time Windows startup 7 (or the check “goes in a loop” and does not stop in the usual way), the situation is very easy to fix. You must manually remove the utility startup entry from the Windows boot loader.
Conclusion
In this article, I told you how to check RAM using a standard utility included in Windows 7 - " Windows Memory Checker".
If a faulty memory module is detected, you must replace it with a new one; do not forget to check the new module immediately, because Low-quality memory sticks often end up on sale.
Computer failures occur for many reasons. Any system component can be to blame, including RAM. In this article we will tell you how to check your RAM for errors.
What is RAM and what is it used for?
RAM abbreviated as RAM(random access memory) or RAM- in English, random access memory; in slang it is often called “RAM”. Below is one of its options.
The processor performs calculations, but intermediate results need to be stored. Who remembers elementary school: “we write seven, two in our minds.” This is what RAM is for. This is an essential element of any computing machine. Initially, RAM was assembled on magnetic cores and the like, and the amount of information written to it was minimal. Nowadays, RAM is a set of chips with a fairly large capacity. There is another type of memory in computers - ROM(read-only storage device), the BIOS firmware is stored on it.
RAM differs from it in that it depends on the supply voltage; when the PC is turned off, all written bytes are erased. The RAM capacity for modern computing requires a relatively large amount, several GB, and the speed of data exchange is also important. There are two types of RAM - SRAM And DRAM, with static and dynamic access respectively. The first type is based on the fact that each bit is stored in a separate trigger- a cell of two transistors. This type of computer memory places much less information per unit area of the crystal, but is less susceptible to damage, and the recorded data remains unchanged without additional operations until the power is removed from the circuit. It is used most in internal memory processor called cache and is located on its crystals. We are directly interested in the computer's RAM. It works using dynamic access memory (DRAM), and capacitors are used to store information. This approach allows you to significantly increase the capacity per unit area, but somewhat increases the likelihood of a certain number of storage cells failing in emergency situations, such as “stress” in the form of overvoltage, overheating, and the like.
Symptoms of RAM Damage
Signs that there may be problems with RAM are frequent computer crashes into the blue screen of death for XP; for Windows 8, 10 it can be black.

Moreover, most often failures occur when working with resource-intensive applications, such as games and graphic editors. The error codes change all the time. You may also experience some fuzzy flickering on the screen. The computer may not boot at all, giving sound signals, they can be decrypted according to the instructions for motherboard. But all these signs do not necessarily indicate RAM; the video card or processor, or a low-power power supply may be to blame. It is worth conducting a Windows RAM test; it will help localize the cause of the problem. In addition, knowing that the RAM is to blame, you can easily carry out repairs yourself. Sometimes the cause of the failure is not even in the memory clearing chip itself, but in poor contact on the connector.
RAM test on computers with Windows 7 and higher
This operating system has built-in tools that check RAM for errors. Therefore, it is not necessary to search for and install third-party software. The process itself takes a little time. It is also worth noting this Windows feature 7 (64- or 32-bit) and newer versions, as self-diagnosis, that is, if it detects problems in the system, it itself will offer to test the RAM. If you see such a message, you should not refuse.
You can also check the performance of the RAM manually; for this we use one of the following methods:

The program asks when to check, now or the next time you turn on the computer. Select the desired option. At the same time, do not forget that when you reboot, we risk losing all unsaved files. The program automatically turns on forced closing of applications, without giving time to cancel the decision. Therefore, we take precautions and correctly close all running programs. Windows closes and the verification procedure begins.
By pressing the F1 key you can select additional options checks:

Navigation in the menu is carried out using the Tab keys to move between items and arrows to select an option. We dial the number of passes to numeric keypad, having previously removed the standard two. Launch after selecting test parameters using F10.
The memory check process will begin; depending on the amount of RAM, it will take up to half an hour. At the same time, the progress of the process is constantly displayed on the screen: what percentage is checked, what pass is being made, whether problems are found. If you need to interrupt the test (you urgently need a computer), press ESC. After an interruption, you will have to start all over again, including the blocks you have already completed.

When the program finishes running, the computer will automatically start operating system. Moreover, it takes her more time than with the standard procedure. After booting the PC, on Taskbars A notification about the scan results will appear. But it is worth paying attention to the fact that it may not appear at all if no problems are detected, but is displayed only for a couple of minutes. If you run the check and go to the kitchen to drink tea, you might miss it. In this case, “” in the menu will help Control panels in the section " Administration" We find there " Windows logs"among them" System" and in the information list " MemoryDiagnostics-Result».

How to check RAM using utilities
To check the RAM for functionality on a PC or laptop running Windows XP and an earlier version (there are still some), you need to use special programs. In addition, many of these programs offer a broader range of tests than the standard Microsoft tool. On the Internet, most of them can be downloaded quickly and free of charge. When choosing, you need to consider the following factors:
- There are programs that run from Windows. It’s easier to work with them - downloaded, installed, some work without installation, checked. But they are not suitable for cases where there are problems with the operating system. Also, checking from BIOS is more accurate. True, you will need to copy them to a flash drive or disk.
- Many utilities, especially those created a long time ago, cannot work with more than four GB of RAM. If there is more memory (64 bit versions allow this), then you will have to check it in parts, removing the strips, and this is unnecessary trouble.
As an example, let's look at how to work with one of the common free utilities or similar programs. It is necessary to perform the following sequence of actions:

The design of the window in which the test results are displayed may be different, but everything should be intuitive.
If problems are found
Minor damage to the RAM may not affect the operation of the computer, it will simply reduce the amount of memory and slightly reduce performance. But if problems have already arisen, and the memory test shows a malfunction, repairs are necessary. Of course, if the computer is under warranty and sealed, then we contact the service center or the seller. If not, and you are confident in your capabilities, then you can make the repairs yourself. We perform the following actions:

Conclusion
We will be glad if our short article helped you check your computer’s RAM and solve problems that arise with it. We told you how to check your computer's RAM using methods built into the operating system. We also considered that to check outdated RAM Windows versions you need to use special software, which has many additional features and can be applied on newer versions. For example, the Memtest86+ RAM testing program was taken.
Video on the topic