Creating and setting up email is a very trivial task and should not cause any difficulties, but users nevertheless continue to ask questions. Many of them have only recently acquired gadgets and are experiencing difficulties even in such seemingly basic tasks. Email on a mobile phone has become an integral part of the life of a modern business person. The purpose of this material is to explain to newcomers to the Internet how to create email on your phone and use it in the future.
Postal services
First, you need to decide which of the hundreds you want to register with. Among the popular ones are Gmail, Yandex iCloud.com. All of the above have the same operating principle, without any special features.
The first thing you need to do is register your own mailbox. To do this, you need to visit the official website of one of the mail services (it can be Google or Yandex, at your discretion) and go through a simple registration procedure.
In most cases, you will be required to provide the following information:
- First and last name.
- Login (name of your mailbox).
- Password.
- Number mobile phone.
This is a basic set, it is possible that you will be asked to enter a spare box or information about your website, you may have to enter a special code to confirm that you are a person.
Once you fill out all the specified forms, you can breathe out - the box is ready.

How to create an email on an iOS phone?
The next step in setting up your mail is connecting it to your phone. If you own an iOS-based smartphone (gadgets from Apple), then they probably registered already at the time of the first activation. If so, then you already have your iCloud mailbox set up and ready to go. You can easily receive a letter from your phone. If this does not happen or you want to connect a different address, you will have to do it manually. To do this:
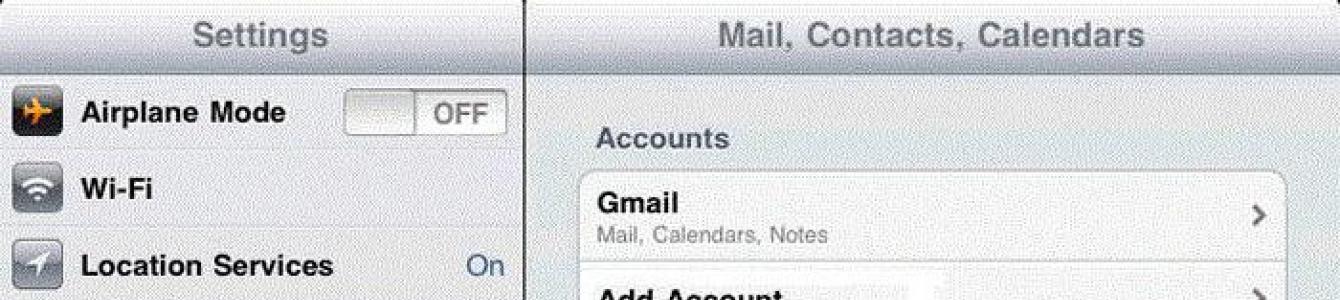
- Go to “Settings > Mail, contacts, calendar > Add account.”
- We look for the provider you need in the list, for example Google.
- We enter the registration data and wait for the mailbox to connect.
If the list of providers does not contain what you need:
- Scroll down and select “Other > Add Mailbox.”
- Enter your registration details (your name, email address and password).
- On the next screen, enter your IMAP information. Let's look at the example of Yandex:
- In the subcategory “Incoming mail server” enter imap.yandex.ru;
- In the subcategory “Outgoing mail server” enter smtp.yandex.ru
These details may vary depending on where the box was registered. In most cases, it will be enough to replace yandex with the name of your email service.

How to create an email on an Android mobile phone
In the case of Android, the principle is the same. By purchasing a new device and registering, you will receive a Google account, and with it a Gmail inbox. Therefore, those who have completed this procedure may no longer think about how to create an email on their phone. If you prefer manual setup or want to connect a mailbox other than Gmail, then first:
- Find the Mail app on your device.
- Click “Add a new account” (if you are offered IMAP and POP3, feel free to select IMAP).
- On the next page, enter your registration information:
- your mailbox address;
- password;
- IMAP and SMTP server data;
- port, information about which can be found on the official website of the mail provider in the “Help” section (for Yandex this is 993 for IMAP and 465 for SMTP).

Using third party email clients
The simplest and fastest method for setting up mail is to download a special one that will help you both create an email on your phone for free and use it to the fullest.
To find one, just visit one of the application stores, in the case of iOS this is the AppStore, in the case of Android - Google Play. In both of them you can find ones created for specific providers.
In most cases, these programs are designed as simply as possible and are ready to work from the moment they are launched. In addition, this option is perfect for those who do not yet have their own mailbox and are just about to start one.
It is obvious that email has become an integral part of modern business and a communication tool for millions of users around the world. However, there are times when access to personal computer is not possible, but there is an urgent need to send or receive an email message. A modern smartphone is designed to solve this problem.
Below we will look at instructions for setting up email on an Android smartphone.
Procedure for setting up mail in Android
1. Go to the menu and open the built-in Mail application.
2. If you do not have an email address, the application will prompt you to create an account on one of the servers. If you already have an email address, you need to go to the accounts menu and click “Add account.”
4. After confirming the password, you need to decide on the protocol for connecting to the mail service; it is recommended to select POP3.
For reference. In Google mail, the mail server is pop.gmail.com, in Mail.ru mail - pop.mail.ru, yandex - pop.yandex.ru If you use Google mail, Android has special applications that make your work easier.
6. Establish SSL and TLS encrypted connections in additional parameters messages.
7. Set/change parameters for outgoing messages. Initially, you need to switch the connection security type to SSL, as well as TLS. Next, you must enter the name used by the outgoing SMTP mail server. It will look like smtp.*mail client domain. So for popular services SMTP will be as follows: Yandex - smtp.yandex.ru, Mail.ru - smtp.mail.ru and Google - smtp.gmail.com
8. If you need to add an additional mailbox to your Android mail client, then follow all the instructions (points 1-7) again.
If you followed all the instructions, the email client will automatically synchronize all incoming and sent messages from your mailbox.
In some smartphones email clients are synchronized with the settings of the servers on which your mail is located. This significantly simplifies the process of setting up mail on Android phone. This convenient feature will allow you to use e-mail services. You will become mobile with constant access to letters from any mailboxes belonging to you.
It is possible to create an email address from a mobile phone if you have an Internet connection. Just go to your browser and enter the name of the desired mail in which you will make the address. Today you'll learn how to do this using Gmail as an example.
Enter a search query with the name of the mail service. Go to the official website. At the top you will see the “Create an account” field, click on it.


Now you can use your email address, and for greater convenience, download the application on the Play Market.
Despite the fact that classic email is losing popularity, it is still one of the most popular methods of online communication. Therefore, users often ask how to set up mail on an Android smartphone.
There are two ways to set up mail on Android: using a client application that is tailored for one email service, or using a universal email program. The first method is best suited if you use only one email service (for example,), the second method will be useful for those who need to receive mail from several mailboxes located on different mail services. In this material we will look at both of these methods of setting up mail on Android.
Method No. 1. Using a special client application.
If you use one specific email service, then you can download an application created specifically for of this service. Such applications are available for all popular email services. As an example, we will demonstrate how this is done for Yandex mail.
First, we need to find and download the client application. To do this, open and enter the name of your email service into the search. Then open the page of the found application.

After installation is complete, launch the application. This can be done directly from the Play Market or using a shortcut on the desktop.
After launching the client application, you should see a form to sign in to your email account. Typically, this form contains only two fields: your login and your password. In general, everything is exactly the same as when accessing email through a browser.

Enter your username/password and click on the “Login” button. After this, the client application will automatically download your letters and display them on the screen.
As you can see, setting up mail on Android using a special client requires very little effort. Install the application, enter your data and you're done.
Method No. 2: Using a universal email application.
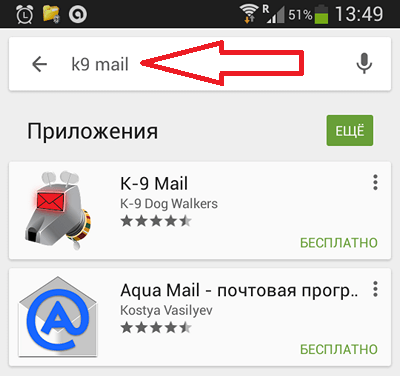
If you want to receive mail from several mail services, or you have corporate mail on a separate domain, then you will have to use universal mail applications. There are quite a lot of such applications for Android. As an example, we will demonstrate how to set up mail using the K9 Mail application as an example.
First, open the Play Market and enter the phrase “K9 Mail” into the search bar. Then open the page of this application.
Here we click on the “Install” button and wait for the installation to complete.

After opening the application, click “Add a new mailbox” and see in front of you a form for entering your login and password. After entering your login and password, you can click on the “Next” button, in which case the application will try to connect to the mail server using standard settings. If you need to enter the settings manually, then click on the “Manual” button.

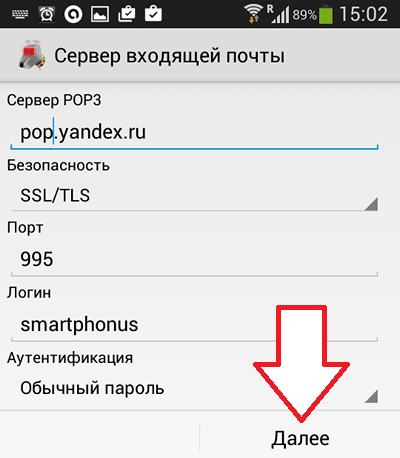
After clicking on the “Manual” button, the application will ask you to select the protocol type for accessing your email. For example, let's choose POP3. You can choose the one you need.

The next step is settings for accessing the mail server. Here you need to enter the server address, security method, connection port and authentication method.
Information about the settings to use can be found in the help of your email service. Or from your administrator if you use corporate email. After filling out all the fields, click on the “Next” button.
If all the entered settings are correct, then after clicking on the “Next” button, the program should download your mail and display it on the screen.
The article talks in detail about how to set up mail on Android. All the most popular email services among CIS users are affected. Thanks to the information received, you will be able to set up a mailbox on your smartphone as quickly as possible.
How to set up Yandex mail on Android using built-in software: instructions
You can set up Yandex mail on Android in several simple and straightforward ways: using utilities from the application store or using the built-in Email program. To begin the synchronization process, the device must have an Internet connection.
Here are brief instructions on how to set up mail on Android using the built-in software of your smartphone. To get started follow these steps:
- Find in the menu of your smartphone a standard utility that is responsible for email. It is available in absolutely every smartphone running Android OS. It should be noted that in different versions OS this utility can be called differently.
- The standard application supports the Yandex mail service, like most other mail services. Enter your email address and password. Click the "Next" button to continue the setup.
- Select the account protocol type. The POP3 protocol allows you to access absolutely all emails from your account on the Yandex server. The IMAP protocol can not only receive all your letters from the Yandex server, but can also save all your actions on them.
- The next step is that the smartphone will set all the necessary settings automatically.
on Android
The above instructions are suitable for setting up all popular email services, including mail.ru. But, if you want to use third-party software, pay attention to the most the best program for synchronization with Mail.ru mail.

The MailDroid.Mail program is a client with the most pleasant user interface among all the programs presented. The application supports the Mail.ru service. Using this utility, the user will be able to sort all incoming letters. There is a choice of themes. The program will provide convenient instructions on how to set up mail on Android.
Synchronization of Gmail and Rambler mailboxes
For synchronization Gmail Google has developed a program that is included in the standard set software any Android smartphone. It is most convenient to use. If you have a number of problems with this program, you can install the Inbox utility from Gmail. It scans emails into the user's inbox, sending the user instant notifications.
If you are unable to synchronize Rambler mail in the standard way, which is indicated in the first paragraph of the article, install the Profi Mail application. This is a fairly popular mail utility on the Android software market. The application has both free and paid versions. There is the ability to synchronize with a huge number of email services, including Yandex. The program runs in the background, instantly notifying the user of new emails.
Connecting Yandex using third-party programs
K-9 Mail is an open source utility that is very popular among Android users. You can download K-9 Mail completely free of charge. With Yandex mail, the application works stably, without errors. Setting up mail takes a minimum amount of time. The application has a nice and user-friendly interface.

Thus, having considered all of the above methods for synchronizing mail with your device, you now know how to set up mail on Android and can choose the most suitable setup option for yourself. The described methods are suitable for all Android devices.