Previously, the state had a rather mediocre understanding of the Internet, so it did not legally interfere with users. Today, while walking on the World Wide Web, you can increasingly come across the phrase: “This site is included in the register of prohibited sites” or “Your ISP has blocked access.”
So, if you want to regain complete freedom of action on the Internet and acquire another level of protection, then you definitely need to familiarize yourself with the technology of virtual private networks - VPN.
VPN: term and principle of operation
Virtual Private Network (VPN) is the name of a technology that allows the creation and overlay of one or more networks on top of any other user network.
Now, how exactly does a VPN work? Your computer has a specific IP address that blocks access to certain sites. You enable VPN technology through some program or extension. VPN changes your address to an address from a server in another country (for example, Holland or Germany).
Next, a security connection is created, which cannot be blocked by the provider. As a result, you get a secure protocol through which you can freely visit any Internet site, and completely anonymously.
Structure and types of technology
The whole technology works in two layers. The first is an internal network, the second is an external one. When you connect to the technology, the system identifies your network and then sends an authentication request. This technology is very similar to authorization in some social network, only here everything is carried out through secure protocols and without the participation of the provider.
Virtual networks themselves are also divided into several categories. The main classification is based on the degree of protection, that is, the user can use both paid and free VPNs.
The difference between them is the secure connection. For example, subscription systems will give you secure protocols such as PPTP, IPSec and others. While free VPNs often provide only “trusted” channels. That is, your network itself must be highly protected, and a VPN will only enhance the level of protection.
To be honest, the biggest disadvantage of free VPN services is not even security, but stability and connection speed. Through free VPN The Internet will most likely work very slowly, and not always stable.
A subscription to paid VPNs does not exceed $10 per month, but not every user needs it. For ordinary tasks, there is no point in purchasing Premium accounts; standard capabilities are sufficient.
Reasons to use a VPN
Every user needs to use VPN technology, and here's why:
- Data protection. Especially suitable for those users who like to connect to a neighbor’s “free” Wi-Fi connection, and then discover that their card data has been stolen. Such situations include gatherings in cafes and generally in any places with free Wi-Fi.
- Complete anonymity. When you open new tab with the site - this action will be displayed on the provider’s server, so that your journey on the Internet can be tracked by any employee of the company. By turning on a VPN, you will hide your browsing history because you are using a different IP address.
- The ability to surf the Internet without obstacles. Bookmakers, online casinos, torrents, forums, sites for adults - all the “underground” of the Internet is again available to you, everything is like in the old days.
- Use of foreign resources. It is, of course, unlikely that you will use English-language services such as hulu.com, but still, you are provided with full access to all popular sites around the world.
How to use a VPN on a computer?
Let's consider a situation where we use a regular browser and want to visit blocked sites. In this situation, you can go two ways:
- install the VPN client (program) on your PC;
- add a browser extension via Webstore.
Either the first or the second option - they are easily implemented, but for the full picture, let’s consider both.
You can also use the free one.
To install a VPN client, you need to download a program on the Internet, for example, “Betternet”. Run the installation file and install the client. We launch it, click: “Connect” and that’s it. The problem is that the program automatically gives us a random IP address, and we cannot select a country, but by pressing just one button we are already using a VPN. And one more disadvantage is the need to constantly launch the program, however, some clients have the ability to launch it simultaneously with the OS.
The second way is to add an extension. The downside here is that, most often, registration is required to use it, plus the extensions have the ability to crash. But the extension is much easier to use - click on the icon in the browser, select the country and profit. On at the moment There are thousands of similar programs, you can choose any of them, for example, “Hotspot Shield”. Add the extension to your browser, register and there will be no more technical issues.
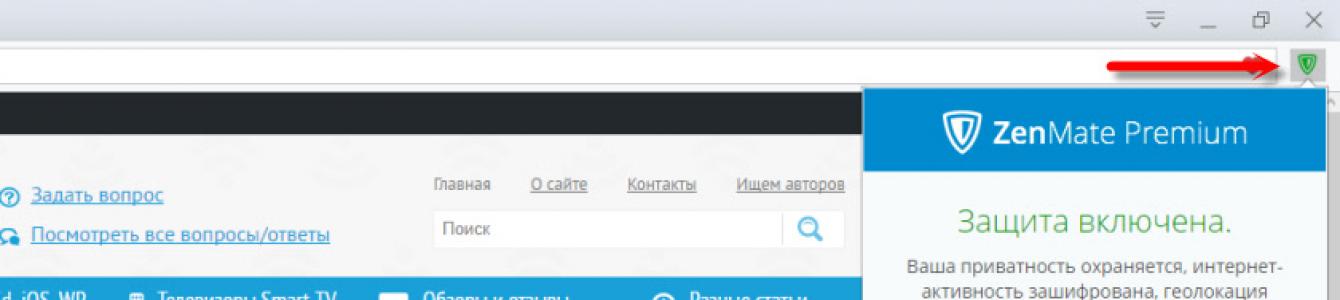
For example, this is how the ZenMate VPN extension works in the browser:

ABOUT VPN extensions For different browsers we wrote in the article: .
How to use VPN on mobile devices?
We will look at those devices that have popular operating systems on board, for example, iOS or Android.
Using a VPN on smartphones or tablets is also quite simple, namely through mobile applications. The problem is that some programs require root rights, and these are additional hassles, plus the possibility of turning the phone into a “brick”. So look for programs that do not require you to have root rights. On Android, for example, it is OpenVPN, and on iOS it is Cloak. You can also use the free and proven one on iPhone and iPad. I use it myself sometimes, it works great.

The download technology is very simple: download the application from Play Market or AppStore, install it on your device. Next, we activate the VPN, select a profile (from where we will get the IP address), then make a connection and that’s all. Now you are surfing the Internet through a VPN, which the application you are using will tell you about.
Now you understand how VPN connection technology is implemented, and now your online experience will become more secure, anonymous, and most importantly - accessible and unlimited.
Virtual Private Network, aka VPN, aka, virtual private network. In fact, in a sense, such networks should be considered a step back, however, a forced and extremely effective step. VPNs allow you to return from global networks to local networks, albeit on a rather unusual scale.
VPN allows you to connect computers scattered around the world into virtual local networks, and you can interact with other network members as if everyone were connected to the same router - play on local network, open shared folders through “Network Neighborhood”, and also print on “shared” printers. So, we suggest you learn how to create VPN networks, connect to them, and also solve some problems that may arise (although not necessarily) while using them. Despite the fact that the general principle always remains the same, we will talk about how to install a VPN on Windows 7.
Creating a server
Let's start creating a VPN server - a computer to which other users of our virtual network will connect. First of all, we need to get to the Network and Sharing Control Center. To do this, perform the following steps:"Start" button; "Control Panel"; "Network Control Center and shared access».

If you see the inscription “Category” in the upper right corner, you need to click on it and switch the mode to “Large icons” - this display mode is used in our instructions.
As a result, you should see something like this:

The window displayed on your screen allows you to control almost any aspect of your computer's networking. Here you need to click on the “Change adapter settings” icon.

To begin creating an incoming connection, follow these steps:

Now you have a window like this on your screen, with a number of small exceptions.

Firstly, there may be other items in the list of accounts, and also, you are unlikely to use “vpnuser”, which we will now create by clicking on the “Add user” button.

Fill in the following fields:“User” - the client’s login is indicated here; “Password” and “Confirmation” - the password of the created account(values must match); The “Full name” field is optional - it can be left empty, as it does not affect the functionality.

After filling out the fields, click on the “OK” button. If you want to add several more VPN users (this may be useful for further control over them), repeat the procedure as many times as necessary. When the creation is finished, click “Next”. In the next window, check the “Via the Internet” box, otherwise the “Next” button will be unavailable. Accordingly, after the checkbox, click on the button and we get the following window:

All that remains is to configure the protocols. Regarding their choice, it is better to leave everything as is. However, if you plan to use applications that require IPv6 support, you can check the box next to this protocol, however, in 99% of cases this is not necessary.
It is extremely important to configure IPv4 correctly:

Everything is necessary so that you can find connected users in the future. In addition, this way you can limit the maximum number of connected people, which can be very useful. When finished, click "OK" and then the "Allow access" button. The VPN server has been created. All that remains is to click on the “Close” button and start setting up clients. Also pay attention to the chapter “Port Forwarding” - it may be useful.

Connection on a computer
Let's start setting up client computers. First of all, you need to find out the server address, if you connect to a “homemade” VPN server, to do this you need to go from it (from the server), for example, to the site myip.ru, which will clearly and clearly display your IP address. In the future, we recommend using services in the spirit of DynDns - so as not to waste time searching for an address.
So, to establish a VPN connection, do the following:

This click will launch a short connection wizard, in the first step of which you need to select “Connect to a workplace” and click “Next”.

Now select the first item from the list. You don’t even have to think about the second one in the 21st century - it is needed for DialUp modems.

If you did everything correctly, it's time to enter the server address. This can be either the IP address that we looked at on the server, or domain name, which can be obtained through dynamic DNS services.

In our case, the address is indicated as 157.57.121.54, however, in your case the numbers will probably be different. You can fill in the “Destination name” field at your own discretion - it will not affect the operation of the network. Also, it’s worth checking the “Don’t connect now” box so as not to waste time during the setup process.

Once the required data is specified, click “Next” and begin filling out the fields:
- “Username” - here you enter the login specified when creating the VPN server;
- “Password” - similar - indicate the pre-set password for the VPN user;
- Optionally, you can check the “Remember password” checkbox.
All you have to do is click on the “Create” button and your VPN connection is ready. If the server is running and you are confident that your actions are correct, you can connect now using the “Connect now” button. In addition, you can always establish a connection using the network icon in the lower right corner.

That's all. If everything has been done correctly, then you can start using your virtual network, however, we recommend that you read this article to the end - even if everything is working perfectly now, there is a risk that problems will appear sooner or later and it is better to be prepared for them.
VPN server in Windows 7
First of all, it should be noted that the built-in VPN server in the “seven” has one important and extremely unpleasant limitation - only one person can connect to your server at a time. If you want more, install Windows Server, however, you can find a fairly effective patch online that removes this annoying limitation - after applying it, several connections will become available. In addition, sometimes for a complete setup it is necessary to configure the firewall and forward ports - we will tell you about this now.
Video: Creating a connection
Setting up firewalls
In some cases, the connection is established, but there is no connection between the computers. It's all about the built-in firewall (or firewall) of Windows.
To make it more friendly, you need to indicate that you trust the connected users.
We establish a connection, go to the “Network Center” and look for the connection icon. On the client it is called “RAS”, and on the server it is called “VPN connection”.

Click on them on both machines and select “Home Network”.

That's all, your problems should disappear.
Port forwarding
Another catch is that home routers and ADSL modems do not open the ports required for VPN by default. In this case, you will have to do it manually.

You will have to open the ports on the server, or rather, on the router to which it is connected - how this is done is described in detail in the instructions for your device, but we will only inform you that the Windows VPN server uses TCP port 1723. Also, if available such a feature, disable GRE blocking.
Setting parameters
Even when the VPN server is already configured, you can change its settings. To do this, open the “Change adapter settings” window that we used in the first part of the article, then click on the “Incoming connections” icon right click and select "Properties".

A window will appear on your screen where you can edit, delete, and add users, as well as configure protocol settings and IP address ranges. In other words, change the parameters that were specified when creating the connection.
Attention! This function Only works fully if the connection is idle - if anyone is connected to you, disconnect it before changing parameters.
Error 807
The network error about an interrupted connection with number 807 is a real scourge for novice admins. To get rid of it (or at least find out the cause of its occurrence), you need to take several steps:

As an additional measure, try setting everything up again.
Enabling debug logs
Sometimes, to obtain additional information, it is necessary to record all server events in an easy-to-read file. To start this process, press Win+R and in the window that opens, enter: netsh ras set tracing * enabled.

Press Enter and go to the Windowstracing directory, there you will find several files (5 pieces) that contain detailed information about connection attempts and transmitted data. They open to anyone text editor. Disabling recording is done with a similar command, however, the word enabled must be replaced with disabled. VPN is a great solution for a number of cases. However, it has gained the greatest popularity in the corporate environment. Let's say you're on a business trip with your laptop, but want to use it as if you were in the office. In this case, a VPN is exactly what you need.

In addition, such a solution is often used for remote access to printers - despite the fact that there are a lot of modern protocols, such a solution still remains simple and convenient.
And, of course, we must not forget about games - a VPN network greatly simplifies the launch of gaming programs designed to work on a local network. Naturally, all this is far from full list possible uses of VPN. Functions of this service can be useful to everyone, so keep these instructions ready.
>VPN (Virtual Private Network) is most often used by ordinary users to access blocked sites or change the IP address for other purposes. Establishing such a connection on a computer is possible using four different methods, each of which involves performing a specific algorithm of actions. Let's look at each option in detail.
First of all, we recommend that you decide on the purpose for which you are installing a VPN on your computer. A regular browser extension will help you bypass a simple block, but the program will allow you to launch some other software that works via the Internet. Next, choose the most suitable method and follow the instructions provided.
Method 1: Third Party Software
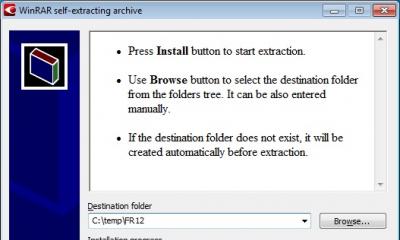
There is free software that allows you to set up a VPN connection. They all work on approximately the same principle, but have different interfaces, number of networks and traffic restrictions. Let's look at this method using Windscribe as an example:
- Go to the official page of the program and download it by clicking on the appropriate button.
- Decide on the installation option. It would be best for the average user to choose "Express installation" to avoid specifying additional parameters.
- Next, a Windows security warning will appear. Confirm the installation by clicking on "Install".
- Wait for the process to complete, then run the program.
- Log in to your profile if you have created one previously or proceed to create a new one.
- You will need to fill out the appropriate form, where you will only need to indicate your username, password and email.
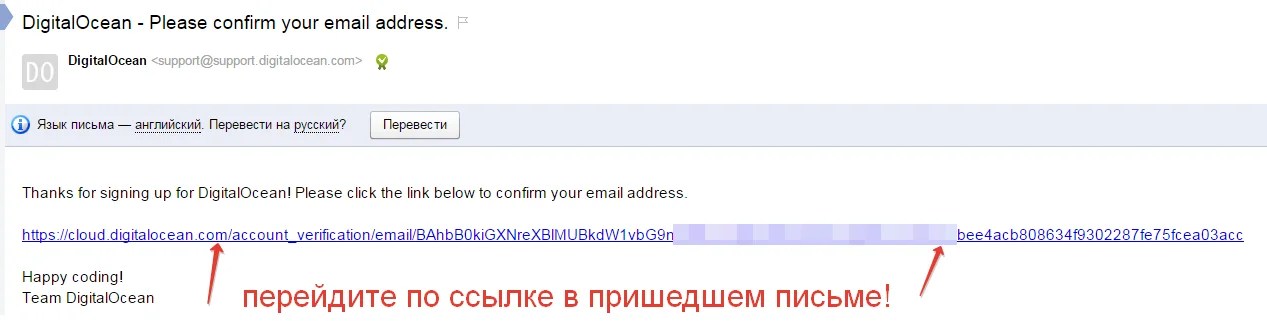
- After completing registration on specified address A confirmation email will be sent. In the message, click the button "Confirm Email".
- Log in to the program and start the VPN connection mode.
- The network location settings window will open. Here you should indicate "Home network".
- All that remains is to specify a convenient location or leave the default IP address.


Most free programs that create a VPN connection, there are restrictions on traffic or locations, so after testing the software, you should think about purchasing the full version or purchasing a subscription if you plan to use it often. Read about other representatives of similar software in our other article at the link below.
Method 2: Browser extensions
As mentioned above, you can bypass site blocking using a regular browser extension. In addition, this method is the simplest, and all actions are performed in just a few minutes. Let's look at installing the extension using an example:

There are a large number of other paid and free browser extensions. Get to know them in detail in our other material, which you will find at the link below.
Method 3: Tor Browser
One of best solutions maintaining anonymity on the Internet is a browser that, in addition to everything, provides access to a pseudo-domain top level .onion. It works on the principle of creating a chain of addresses through which the signal passes from the user to the Internet. The links in the chain are active users. Installation of this web browser occurs as follows:

Thor has analogues whose functionality is approximately similar. Each such web browser is described in detail in our other material.
Method 4: Standard Windows tool
There are many services that provide VPN connection services. If you are registered on one of these resources, you can organize a connection using only standard features OS. This is done this way:
- Click on "Start" and open "Control Panel".
- You will need to navigate to the menu "Network and Sharing Center".
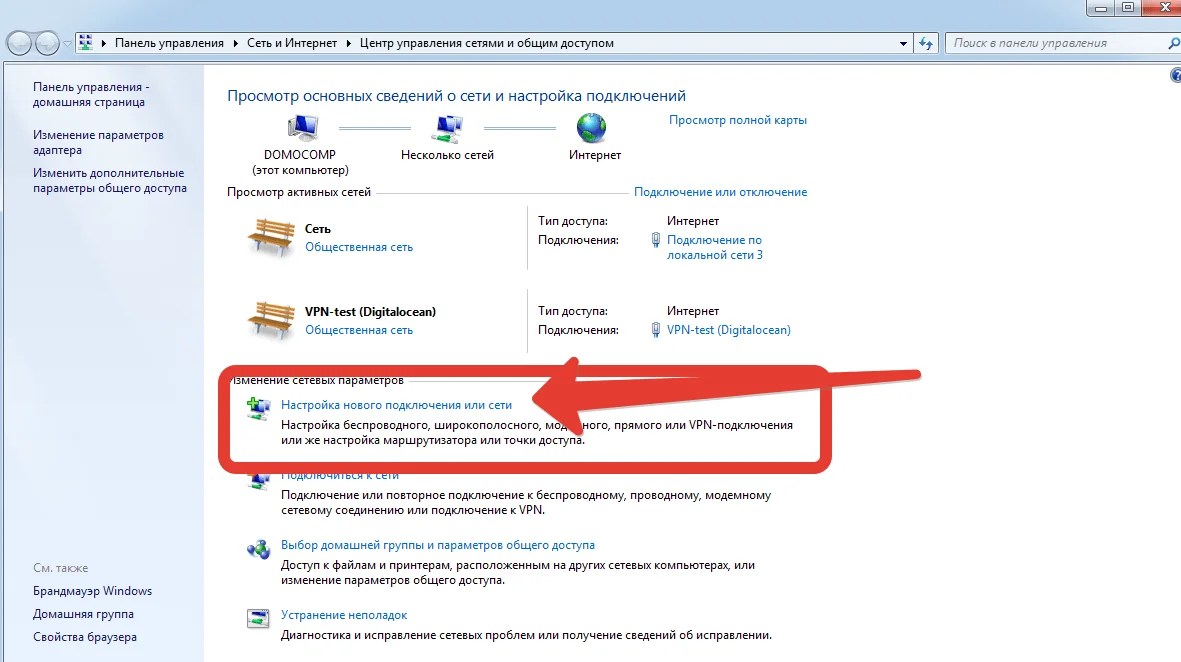
- In the section "Changing network settings" click on "Set up a new connection or network".
- A menu appears with four different options connections. Select "Connecting to the workplace".
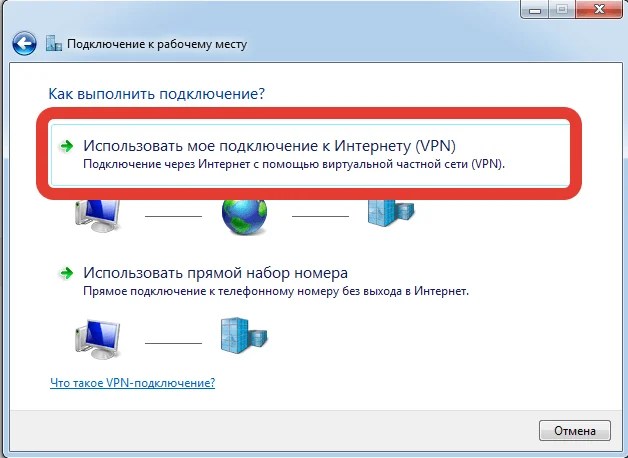
- Data transfer is also carried out differently. Specify “Use my Internet connection (VPN)”.
- Now you should set the address that you received when registering with the service that provides VPN connection services, and proceed to the next step.
- Fill in the fields "Username", "Password" and, if necessary, "Domain", then click on "Connect". You should have provided all this information when creating a profile in the service you were using.
- You won’t be able to launch the VPN right away, since not all settings have been configured yet, so just close the window that appears.
- You will again find yourself in the window for interacting with networks, where you will move to the section "Changing adapter settings".
- Specify the created connection, right-click on it and go to "Properties".
- Immediately click on the tab "Options", where activate the item "Enable login domain in Windows", which will allow you to avoid entering your username and password every time you connect, and move to the window "PPP Settings".
- Uncheck the LCP extensions option to not send information to the remote access server. In addition, it is recommended to disable software data compression for better connection quality. The connection negotiation option is also not needed; it can be turned off. Apply the changes and move on to the next step.
- IN "Safety" specify VPN type "Point-to-Point Tunnel Protocol (PPTP)", V "Data Encryption" – “optional (connect even without encryption)” and deactivate the item "Microsoft CHAP protocol version 2". This setting is the most competent and will allow the network to operate without failures.
- Close the menu and right-click on the connection again, select "Connect".
- A new connection window will open. Here fill in all the required data and click on "Connection".


That's all, the process is over, and work in the operating system will now be carried out through a private network.
Today we examined in detail all the available ways to organize your own free VPN connection on your computer. They are suitable for different situations and differ in operating principle. Check out all of them and choose the one that suits you best.
In the modern world, cybernetic space has become much more popular than the real world. Young people are more likely to spend time playing online games and social networks than going for a walk or reading a book. And this is understandable - the availability of information increases awareness and overall human development. However, for some reasons, information and social resources may be blocked by providers, government agencies, or the sites themselves. In this case, do not despair, since in most cases the blocking can be bypassed.
What is a VPN connection and why is it needed?
VPN (English: Virtual Private Network) is a generalized name for technologies that allow one or more network connections(logical network) on top of another network (for example, the Internet). Despite the fact that communications are carried out over networks with a lower or unknown level of trust (for example, over public networks), the level of trust in the constructed logical network does not depend on the level of trust in the underlying networks due to the use of cryptography tools (encryption, authentication, public key infrastructure, means to protect against repetitions and changes of messages transmitted over the logical network).
Wikipedia
https://ru.wikipedia.org/wiki/VPN
To explain it in simple and understandable words, VPN is the ability to access Internet resources through other networks. In this case, several levels of channel changing are used, which means that your IP address is encrypted, and access is provided according to the following scheme: Internet - virtual network (or several virtual networks) - Internet. At using a VPN providers “see” the connection to a certain network or server, and further requests to resources occur through an encrypted channel. Thus, data packets are returned to you regardless of blocking by the Internet provider.
When connecting to the Internet via a virtual network, the provider does not monitor traffic
The main disadvantage of a VPN is considered to be a reduction in speed while surfing and downloading files, but technology does not stand still and paid services already provide good communication speeds.
How to create and configure a VPN connection on Windows 10
There are several options for setting up a VPN for Windows 10. Conventionally, they can be divided into:
- built-in (standard OS tools);
- third party ( special programs and browser extensions, as well as functions of some routers).
Creating a VPN through Windows Settings
Creating a virtual network via " Windows Settings" - this is the most time-consuming, but at the same time the most reliable way to gain access to blocked resources. In addition, once the VPN is created, it is quite easy to manage it and, if necessary, change the server address:
- Press the Win+I key combination and go to the “Network and Internet” applet.
 In the “Windows Settings” block, open the “Network and Internet” element
 - Open the VPN tab and click on the plus icon that says “Add a VPN connection.”
 Click on the plus icon with the caption “Add VPN connection”
 - Next, fill out the form:

- We save the changes using the button of the same name.
 Click on the connection and click “Connect”
 Open VPN servers can be found on the Internet, for example, or on a similar resource.
Video: how to create a VPN connection
How to disable or remove a VPN connection
If you no longer need a VPN or you don’t like the services provided, the created connection can be disabled or deleted:

Automatic configuration of a virtual network using special programs
Like most Windows features, the creation of a VPN connection was adopted by the developers software. As a result, users got a whole market with programs that simplify creating a tunnel and connecting to virtual networks. Most of them are a small window with just one button - connect/disconnect from VPN.
One such program is HideGuard VPN. Using her example, it is very easy to see how a connection to a virtual network occurs:

Setting up via router
Unfortunately, not all routers support VPN connections. To do this, the router must have DD-WRT technology, but devices that are less than four years old almost certainly have the necessary firmware. The settings of routers vary, but in general, virtual network management is located in the same tabs:

VPN in browser
Instead of setting up a virtual connection for your entire computer, you can resort to partial VPN use in your browser. There are two possibilities for this:
- internal browser settings (for example, Opera has a built-in function with a good and free VPN);
- extensions in browser stores.
“Turbo” modes in some situations can also be considered virtual networks, but they only work when your browser has a low access speed to a certain address; in other cases, the function is ignored.
To enable VPN in Opera browser, you need to change your browser settings a little. To do this, press the key combination Alt+P, select “Advanced” in the menu, then “Security” and slightly scroll down the page with settings. We find the VPN column and switch the toggle switch to the working position.
 Turn on the VPN by moving the corresponding toggle switch to the right position
 In other browsers, you can install additional extensions that will add VPN functionality to your browser:

I prefer to use a browser-based VPN, and there are several reasons for this. Firstly, for most extensions you can set exceptions in the operation of the virtual network, and this provides huge advantages, for example, applying the service to only one or two sites. For the rest of the Internet, the original connection will be used. Secondly, when downloading files through applications and exchangers, the traffic will not exceed the amount of information received, since packets are often “lost” when passing dozens of nodes in the virtual network. And besides, I always value connection speed, and a virtual network, even a paid and fastest one, will slow down data transfer, which is unacceptable in some cases.
Video: how to install VPN in Chrome, Opera, Mozila browsers
Work with VPN on a computer under Windows control 10 is very simple. Using standard tools, you can create and configure a virtual connection. If necessary, it can be quickly removed or temporarily disabled.
Please note that the task here is not to explain everything thoroughly and technically correctly, the task is to explain it “on the fingers” so that even novice users can understand. I hope it worked out. If you have questions, ask them in the comments.
The essence of how a VPN server works is as follows:. For example, you want to go to the website yandex.ru. More precisely, connect to a server with IP 77.88.21.11 (residents of the eastern regions of Russia may be sent to a server with a different IP, but that’s not the point). When working without a VPN, your computer sends a packet (you could say a request) directly to the server with the address 77.88.21.11 and receives a response from it. When working via a VPN, your computer sends a packet to the VPN server, the VPN server sends the exact same packet to 77.88.21.11, 77.88.21.11 sends a response to the VPN server (because it was the VPN server that originally sent the request), and the VPN server sends this packet to your computer.
What do we have? Requests to the address 77.88.21.11 are sent not by your computer, but by the VPN; accordingly, the server 77.88.21.11 records the IP address of the VPN server, and not your computer.
One possible reason to use a VPN is need to hide your IP address.
Other uses – need to change traffic route. Let's take an example from life. The author of this article lives in the city of Orel (Central Russia) and wants to connect to the yunpan.360.cn server located in Beijing. The author uses (or rather, used at that time) the services of the Beeline Internet provider. As shown by the tracert yunpan.360.cn command entered into command line Windows, outgoing Internet traffic to this Chinese server goes through the United States. The trace does not show how the traffic goes back, but judging by the ping, it follows approximately the same route. Below is a screenshot from VisualRoute 2010.
This routing is due to the fact that Beeline did not pay backbone Internet providers for a more direct channel to China.
With this route, large packet losses occur, the speed is low, and the ping is huge.
What to do? Use a VPN. This is a VPN server to which we have a direct route, and from which there is a direct route to yunpan.360.cn. I (the author of the article) searched for an acceptable solution for a very long time and eventually found it. A virtual server was rented (what this is will be discussed later) in Krasnoyarsk (immediately imagine where the city of Krasnoyarsk is located) from a hosting provider. Tracing to the server showed that the traffic was traveling across Russia, the ping was 95 ms (I had a mobile LTE (4G) Internet, on a wired Internet the ping would be 5-10 ms lower).
Ping– this is the delay of the Internet signal. The delay for the passage of Internet traffic in both directions (round trip) is measured. Measure delay in one direction only standard means is impossible, because your computer sends a request to the pinged server and times the time it takes for the response to arrive.
In traces, the ping to each point (to each point of the route, otherwise called a hop-hop) is also shown for traffic in both directions.
It often happens that the route is different in different directions.
Next, a trace was made from the Krasnoyarsk server to yunpan.360.cn. Ping is around 150 ms. The tracing showed that traffic from the Krasnoyarsk server to the Chinese one goes through direct peering (internetwork interaction) between the Transtelecom and China Telecom providers.
Here is this very trace (made from Linux):
tracepath yunpan.360.cn
1?: pmtu 1500
1: srx.optibit.ru 0.361ms
1: srx.optibit.ru 0.381ms
2: border-r4.g-service.ru 0.392ms
3: kyk02.transtelecom.net 0.855ms asymm 5
4: 10.25.27.5 112.987ms asymm 8
5: ChinaTelecom-gw.transtelecom.net 125.707ms asymm 7
6: 202.97.58.113 119.092ms asymm 7
7: 202.97.53.161 120.842ms asymm 8
8: no reply
9: 220.181.70.138 122.342ms asymm 10
10: 223.202.72.53 116.530ms asymm 11
11: 223.202.73.86 134.029ms asymm 12
12: no reply
What do we see? The Krasnoyarsk server is hosted by optibit.ru (hosting is a service for placing and renting server capacity) and is connected to the Internet provider “Igra-Service” (g-service.ru). “Igra-Service”, in turn, sends traffic to yunpan.360.cn through the large Russian backbone provider “Transtelecom” (for which it pays him money). TTK directs traffic through its direct connection to the network of the Chinese backbone provider China Telecom, the ChinaTelecom-gw.transtelecom.net hop domain tells us this.
Let's remember what our problem was. Our traffic to that Chinese server went through the USA, the speed was low. What have I done? I installed a VPN on this Krasnoyarsk server. And configured my computer to work through this VPN server. What happened? Now the traffic to yunpan.360.cn did not go along the old Orel-Moscow-USA-China route, but like this:
first to the VPN server – Orel-Krasnoyarsk,
then from the VPN server to Beijing - Krasnoyarsk-Beijing.
Did you get the point? We have changed our route. What did it give? The speed of the outgoing connection from me to yunpan.360.cn has increased. Ping has been reduced. The result was achieved.
How to determine your route? For beginners, the easiest way to do this is to use the VisualRoute program, which can be found on the Internet in both licensed and hacked forms.
You need to run this program and set the following settings:

It will turn out like this:
Using this table you will see which countries the traffic passes through. Once again, I draw your attention to the fact that the trace shows the route of outgoing traffic only (that is, traffic from your computer to the server). The route in the opposite direction can only be shown by a trace made from the server to your computer. VisualRoute has a small glitch: it often shows Australia (?) as a country when it cannot determine the real geoposition of the node.
VPN– Virtual private network – a virtual private network is, one might say, your own network on top of the Internet, all traffic within which is encrypted. You can study this technology in detail. To explain it very simply, then:
- your computer and VPN server connect over the Internet
- all traffic between you and the VPN server is encrypted
- The VPN server sends it to the destination
- your IP is hidden and the IP address of the VPN server is visible instead
It is recommended to use a VPN when working through free (or simply someone else's) WiFi, since it is possible to intercept all traffic passing through the WiFi router. And when using a VPN, all traffic will be encrypted. Moreover, if you go to yandex.ru, vk.com and google.ru without a VPN, then connections to yandex.ru, vk.com and google.ru will be recorded at the level of the router and your Internet provider. When using a VPN, all connections go to the VPN server address.
There are many paid VPN services available. Their advantages include only ease of use. Disadvantages include high cost and lack of 100% confidentiality (you can write a lot, but what actually happens on the VPN server, whether traffic is intercepted, cannot be guaranteed). The inability to change the IP address in a couple of clicks should also be considered a disadvantage of paid services.
Let's compare the cost of our self-configured solution and paid VPN services. The latter cost around 300 rubles. per month. Our solution will cost $0.007 per hour. If we don’t use VPN right now, we don’t pay. If used for 2 hours every day for 30 days, this pleasure will cost us 30-50 rubles.
We will do the following:
- We rent a server for VPN.
- Let's set up a VPN on it.
- We will use them and pay only for each hour of actual VPN use.
Step #1. Server rental.
No, we will not rent a full-fledged server. We rent virtual server – VPS(virtual private server). In many cases, hosting websites on the Internet or for other purposes (including organizing a VPN) does not require large server capacities, but you need to customize the server operating system. Several operating systems cannot run simultaneously on one computer (including a server, because it is the same computer, only usually more powerful). What should I do? Virtual machines come to the rescue. This technology allows you to run an operating system inside operating system, which is called virtualization. In the case of servers, analogues of virtual machines are also created - virtual servers.
There are several common virtualization technologies. The most common are OpenVZ, KVM, Xen. Roughly speaking, Xen and KVM create their own “hardware imitation”, their own OS, etc. for each virtual machine. In the case of OpenVZ, a common OS kernel is used, as a result of which some functions (for example, making changes to the OS kernel) become unavailable, or they can be enabled or disabled only for all VPS at once. VPS on Xen and KVM are, as a rule, more stable in operation, but the difference is significant only for large projects for which server fault tolerance is critical.
VPS on OpenVZ is always cheaper, since one virtual server requires fewer resources. Due to the lower price, we will turn our attention to VPS based on OpenVZ.
Attention! Some hosting companies (companies that provide server rental services) deliberately block VPN operation on OpenVZ-based servers! Therefore, before renting such a server, you need to check with the support service (with a good hosting they should respond within 15 minutes, maximum an hour) whether the VPN will work.
To work on a personal VPN server, a minimum configuration is enough - 256 MB of RAM and a 0.5-1 GHz processor. However, not all hosting providers provide VPS with 256 MB of RAM: many have a minimum tariff of 512 MB of RAM. Such a VPS will be more than enough for us.
What other criteria for choosing a VPS exist? As you already understand, Internet traffic will constantly “walk” from you to the VPS and back. Therefore, the main canals must have sufficient capacity in both directions. In other words, the speed of the Internet connection between your computer and the VPS must be sufficient to perform the tasks you require. For everyday comfortable work, 15 Mbit/s is enough, and if you are going to download torrents via VPN, then you may need all 100 Mbit/s. But! If you and the VPS are located in the networks of different Internet providers (especially in different cities), it is unlikely that the backbone networks will “stretch” more than 70 Mbit/s within Russia (or your country) and more than 50 Mbit/s with servers in Europe.
Most hosting services require monthly payments. It is worth noting right away that the price range is very large with approximately the same quality. We will use services with an hourly rate: $0.007 per hour of our server’s work. Thus, if we use VPN for 2 hours every day, then we will pay about 30 rubles per month. Agree, this is not 350 rubles/month for a paid VPN service!
First of all, you need to go to the website and register:


Next, a page will open on which you need to specify your details. bank card. Without this, the system will not work and will not allow you to take advantage of the bonus 10 dollars (more on this later). You can specify any data, the system will “eat” fake ones.

In this case, an amount of several rubles may be blocked on your card, which will then be returned. Charges from your card will only be based on the fact of using the servers.
What to do if you don’t have a bank card? Get yourself one, it automatically gives you a virtual card, the balance of which is equal to the balance of your wallet. You can top up your wallet almost anywhere, see.

However, if you enter your Qiwi card details into DigitalOcean, the system will spit it out, citing the fact that DigitalOcean does not work with prepaid and virtual cards. In this case, you need to top up your balance by $5 via PayPal by paying with a Qiwi card.

After all this, on the same page in your DigitalOcean personal account, enter the promo code DROPLET10, which credits us with 10 dollars, which we can fully use on the servers without fear of additional charges from our card.

Ready! Now let's move on to creating a VPS. Watch the video tutorial:
When creating a server, choose Ubuntu OS version 14.04, and not any newer one, incl. do not select 16.04.
|
Server location |
Domain for ping |
|
|
Frankfurt, Germany |
http://speedtest-fra1.digitalocean.com/ |
speedtest-fra1.digitalocean.com |
|
Amsterdam 1, Netherlands |
http://speedtest-ams1.digitalocean.com/ |
speedtest-ams1.digitalocean.com |
|
Amsterdam-2 |
http://speedtest-ams2.digitalocean.com/ |
speedtest-ams2.digitalocean.com |
|
New York-1, USA |
http://speedtest-ny1.digitalocean.com/ |
speedtest-ny1.digitalocean.com |
|
New York-2 |
http://speedtest-ny2.digitalocean.com/ |
speedtest-ny2.digitalocean.com |
|
New York-3 |
http://speedtest-ny3.digitalocean.com/ |
speedtest-ny3.digitalocean.com |
|
San Francisco, USA |
http://speedtest-sfo1.digitalocean.com/ |
speedtest-sfo1.digitalocean.com |
|
London, UK |
http://speedtest-lon1.digitalocean.com/ |
speedtest-lon1.digitalocean.com |
|
Singapore |
http://speedtest-sgp1.digitalocean.com/ |
Speedtest-sgp1.digitalocean.com |
Note. For most residents of Russia and the CIS countries, Amsterdam or Frankfurt will be suitable (ping to Frankfurt in most cases will be slightly less than to Amsterdam). I recommend that residents of the Russian Far East test Singapore and compare the performance with European servers.
The location of servers abroad will allow you to use a VPN to bypass government bans on visiting certain sites (if this is relevant to you).
DigitalOcean includes 1 terabyte (1024 GB) of traffic in the price (see). For most people this will be enough. Other hosting providers have formally unlimited traffic, but it becomes unprofitable for them when the threshold of 1-2 TB/month is reached.
That's it, we ordered VPS. Congratulations. Now it's time to move on to setting it up.
Step #2. Setting up a VPN.
Don't be intimidated, the process of setting up your own VPN is as easy as two-twos!
In the video tutorial above, we connected to our server using Putty. Now let's continue.
Copy and paste (by right-clicking the mouse, as we did in the video tutorial) the command:
Now copy and paste the following into the file editing window that opens:
Press Ctrl+O, then Enter.
Press Ctrl+X.
Copy and paste the command:
Enter 1 and press Enter. We are waiting. According to the system requests, enter the desired login and press Enter. Same with the password. For the questions “[Y]/[N]”, enter Y and press Enter. After completing the setup, our login and password and server IP address will be shown.
Ready! VPN is configured!
Now open the Windows Network and Sharing Center:
Select the settings for a new connection:
Select “Connect to a workplace”:


We're waiting a little. We now work via VPN! To make sure of this, go to and make sure that our IP address shown to us matches the IP address of our VPS.

Now attention! Through personal account DigitalOcean we can turn off our VPS (droplet in DigitalOcean terminology), however, even for a server that is turned off, funds are written off at the standard rate. So we'll do backup copy our server, we'll delete it, and when we need VPN again, we'll restore it from a backup!
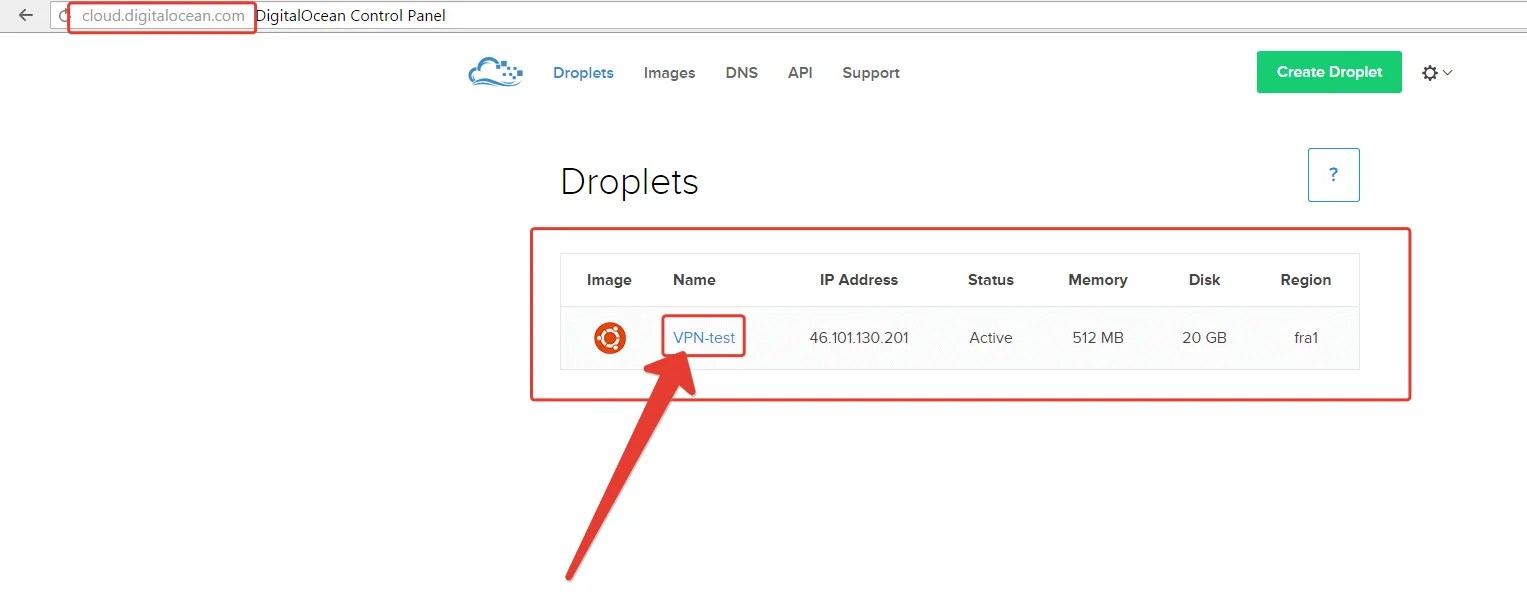
Let's move on to server management (the DigitalOcean control panel is located at cloud.digitalocean.com, you can enter it through the Sign In button on the main page of digitalocean.com in the upper right corner).
We need to create a backup (snapshot) of our VPS. But to do this, you first need to turn it off.

We wait about a minute until the server turns off. Then go to the Snapshots section, enter a custom name for the snapshot and create it:

For each gigabyte of “weight” of our VPS, 2 cents will be charged when creating a snapshot. Creating a backup (snapshot) will take a few minutes.
Now we delete the server:

All! No more money will be deducted from us for anything.
What to do when you need a VPN again
We need to create a new VPS from the backup we made before.
Click “create droplet”:
Now, as before, enter any server name in Latin letters without spaces, select the first minimum tariff, the region must be the same, the same as the one in which we previously had a server.
Just below, click on the name of the photo we took (it was gray, but should turn blue):
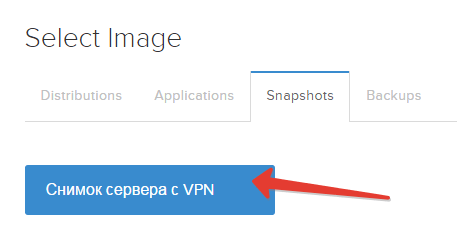
...and click the big green “Create droplet” button.
We wait about a minute.
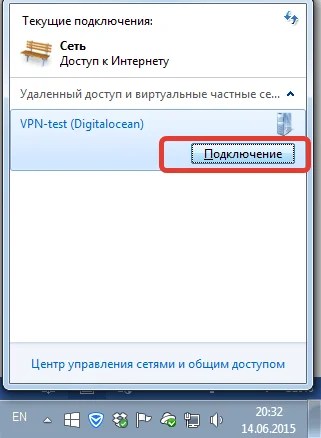
Let's see if the IP address of our server matches the previous one. If yes, then in Windows we simply resume the previously created connection:
If not, then right-click on the name of our connection and change the IP address to a new one:

Enter the new IP and click “OK”:

Attention! Now, to turn off the VPN, we don’t need to make a backup copy, we just delete the server right away, and next time we’ll restore everything from the old snapshot. It is not necessary to shut down the server before deleting. Just in case, this is the procedure in the screenshots:
We removed the VPS while not using the VPN. Now let’s restore it from the old snapshot:
Again we check whether the old IP is still there and continue working.
On the same server (or another) you can raise your personal proxy, for example, to the 3proxy software base, but this is not the topic of this article.
Found a typo? Highlight and press Ctrl + Enter