With the release of Android 6.0 Marshmallow, a truly necessary feature became available to users - automatic backup of user application data to the Google Drive service. But even though Google took care of users by adding this feature, not all developers are in a particular hurry to update their products and add a similar function to them. So after changing the device or resetting to factory settings, you have to play through the games again, change program settings to your taste, etc. Of course, having root rights on the device can help you out of such a situation. But what if it is not possible to get them? In addition, to do this you will often need to unlock the bootloader, which automatically leads to the loss of all information on the device. In this case, ADB comes to the rescue.
Few Android device users know that backup copy all installed applications and their data can be accessed without additional manipulations with their device. And in today’s article we will tell you how to make a backup of the entire system, without unlocking the bootloader and obtaining superuser rights.
How to backup all information on your device
In order not to bother yourself and save all the accumulated photos, music, videos yourself, this method will be an excellent choice. And here's what you need:
- Create a folder named Android in the root of the C:\ drive.
- Install USB drivers for your device (you can find links to universal drivers for some devices).
- In some cases, installing drivers will require you to disable authentication.
- For Windows 7:
When you turn on the computer, after BIOS boot, you must press the F8 key. In the “Advanced boot options” menu that appears, select “Disable mandatory driver signing.” This method may not work the first time, so you should repeat the action or open a command prompt as an administrator and enter two commands:
"bcdedit.exe /set loadoptions DDISABLE_INTEGRITY_CHECKS";
"bcdedit.exe /set TESTSIGNING ON." - For Windows 8:
You need to press the Win+I key combination, hold down the Shift key and select “Shutdown” > “Restart”. When you turn on your computer, select Diagnostics > Additional options» > Boot Options > Restart. When loading, select the “Disable mandatory driver signature verification” mode by pressing the F7 key. - For Windows 10:
You must hold down the Shift key and select the Start menu > Shutdown > Restart. After booting, select Troubleshooting > Advanced Options > Boot Options > Restart. Then select “Disable mandatory driver signature verification” by pressing F7.
- For Windows 7:
- Download the archive and unpack the files into the Android folder.
- Activate the “USB Debugging” item on your smartphone.
This can be done in the “For Developers” section. If this section is hidden, instructions will help you open it. - Change the duration of the standby mode.
To do this, in the screen settings you need to select the “Sleep mode” item and set the switch to the maximum possible time. - Connect your phone to your computer via a USB cable.
It is recommended to use original or good quality cable, and USB port 2.0, located on motherboard(for PC). - Change the connection type from “Charging only” to “File transfer (MTP)”.
This is not required on every device, but many manufacturers require it as a security measure before allowing ADB to work. - Open a command line and go to the created Android folder with the command “cd c:\Android\” (commands are written without quotes).
- Make sure that the computer finds the device via ADB.
To do this, you need to enter “adb devices” into the command line. When a request appears on the phone for permission to debug via ADB on this computer You must click “Ok” and select “Always allow from this computer.” If the device is visible, the text “List of devices attached” and a list of all devices (for example, xxxxxxx device) will be displayed. If instead of “device” it says “offline” or the list is empty, then you need to update ADB, check the drivers/cord, change the USB port/computer. - IN command line enter “adb backup -apk -shared -all -f path/to/backup.ab”, where path/to/backup.ab is the path to the directory and the name of the backup file.
The operation may take quite a long time, everything will depend on the amount of information on the smartphone.
How to Backup Only App Data
Unfortunately, like everything in this life, the previous method is not ideal. Not all data can always be saved correctly. It is recommended to manually save media files and documents to your PC or to the cloud, and then start backing up user application data. To do this, you will need to follow steps 1 to 10 and then enter “adb backup -apk -all -f path/to/backup.ab” in the command line, where path/to/backup.ab is the path to the directory and backup file name. After that, on your smartphone, enter a password to protect the backup copy and click the “Back up data” button in the lower right corner.
How to back up some apps
If you do not need to back up all programs installed on the device and it is enough to save the data of some applications, then you will need the following:
- Follow steps 1 to 10 from the first method.
- Install the App Inspector application on your smartphone.
- Launch the App Inspector utility and select App List (Ordered by name). Find and select the application that you want to restrict from running in the background. The package name and version will be displayed below the program name.
- Enter the command “adb backup -f path/to/backup.ab -apk name.of.package”, where path/to/backup.ab is the path to the directory and the name of the backup file, and name.of.package is the name of the package , which was previously recognized in the App Inspector.
- A window will appear on your smartphone asking you to enter a password to further protect your backup. After entering it, you need to click the “Back up data” button in the lower right corner.
How to restore data from a backup
To restore data, you only need to enter “adb restore path/to/backup.ab” on the command line, where path/to/backup.ab is the path to the backup file and press Enter. On your smartphone, enter the password in the window that appears and click the “Recover data” button. Through certain time, depending on the file size, your phone will display “Recovery Complete” in a pop-up window.
Additional information
In addition to the above, I would like to supplement the article with several more commands and parameters that can help in certain situations.
Command format for creating a backup:
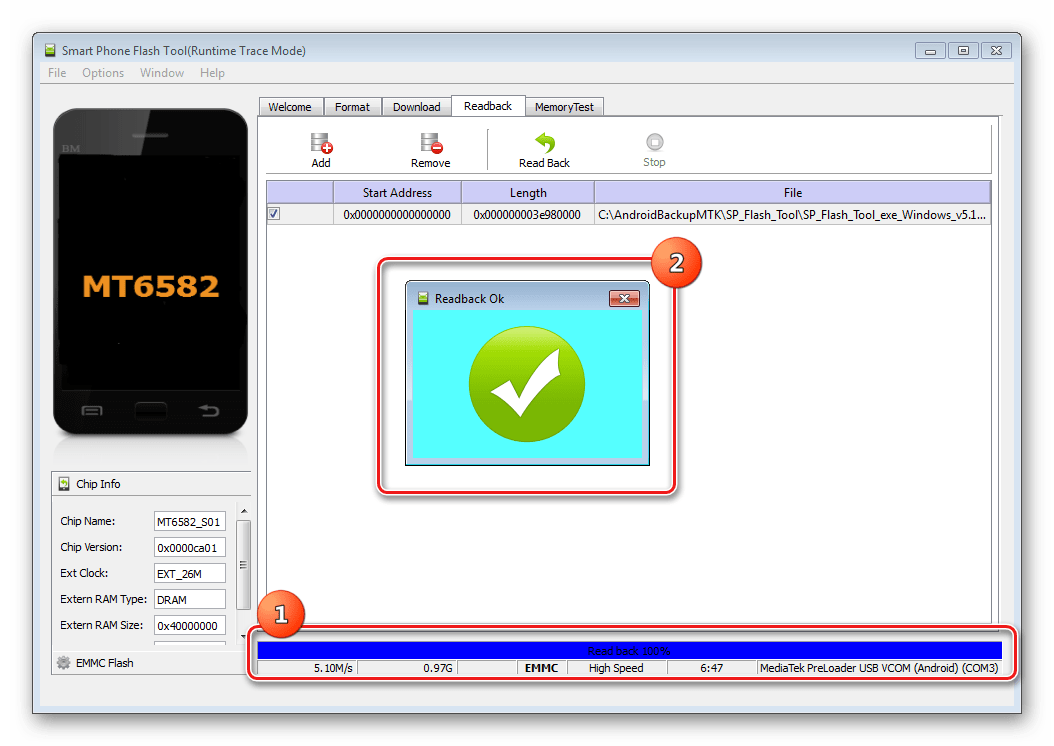
Adb backup [-f The simplest command to create a backup is: adb backup -all After entering this command, a backup copy of only the data of all applications (without APK files) will be created in the current directory with the name backup.ab. If after running this command an error occurs (something like “adb: cannot open file ./backup.ab”) you need to enter the following: Adb backup -all -f C:\backup.ab In this case, the backup file will be created in the root directory of the C:\ drive. Instead of C:\backup.ab, you can specify any necessary address and file name. Here is a description of some of the options you can use when creating a backup: F This parameter is used to indicate the path and name of the backup file. For example, "-f C:\Backup\mybackup.ab" points to the Backup folder located on drive C. The backup name is mybackup.ab. Apk | -noapk This flag indicates whether the application's APK files should be included in the backup or only the corresponding data. It is recommended to use "-apk" when the application is not available in Google Play or used more old version than on the Market. The default is "-noapk". Shared | -noshared This flag is used to enable/disable backup of the contents of the device's internal memory/SD card. The default is "noshared". It is recommended not to back up the internal memory in this way, but to manually save all necessary files, since not all data can be saved/restored. This flag is the easiest way to backup your entire system. System | -nosystem This setting determines whether system applications will be included in the backup. The default is "-system". It is recommended not to include system applications in the backup to avoid possible errors during recovery in the future. Here you can specify the names of the packages (for example, com.google.android.apps.plus) that you want to save. Only used if you need to back up a specific application. That's all. Write in the comments if it helped you this instruction and whether all information was saved correctly. Before installing firmware or other important actions, it is important to take care of the safety of your personal data. Timely backup - a backup copy will avoid the loss of important information, or will help restore the functionality of the system. In this article you will learn how to make a full backup of the system firmware or just individual partitions. With a partial backup, only certain data is saved: contacts, messages, applications, photos, notes, etc. The information received helps quick setup device, after flashing, resetting or other action. The data is also suitable for recovery on a new device. Below we will consider methods of partial backup. Note that some methods work if there is root rights. For your convenience, at the beginning of each method, we have indicated the minimum requirements for obtaining a backup copy. Requirement: Availability of a PC, cable with data transfer support, ADB or ADB Run utility. Backup options:
data section data and app; data, app and SdCard. Algorithm of actions: Install drivers for your device. For example, standard Motorola drivers are sufficient for connecting via ADB. In your case, you may need . Connect your smartphone/tablet via USB cable. Launch the ADB Run utility. If this is your first time using USB debugging, please confirm the connection to PC on the device screen. Make sure the device is connected. In ADB Run, such information is indicated in the upper left corner. Press button 9 then enter to open the backup menu. To make a copy of all partitions, press button 3. On the screen mobile device A message will appear asking you to confirm the creation of the backup. If desired, enter a password to encrypt the data. After creating a copy, a message will appear in the ADB Run window: “Press any key to continue.” The folder with your backup copy will automatically open. Close ADB Run. Requirement:
account for reservations, internet. Backup options:
application settings; call log and Wi-Fi passwords. Android OS allows you to back up some data - passwords Wi-Fi networks, wallpaper and call log. With the release of update 6.0, application settings were included in the reservation list. The information is saved in Google Drive. Important!
For detailed instructions, see our separate article on. Requirement: Gmail account, Internet. Backup options:
electronic gmail, saving games, calendar, directory contacts. In Android OS, Gmail is not only an email, but also an account required to use some services, such as Google Play. The account also allows you to synchronize some data - contacts, calendars and other information. Algorithm of actions: Requirement: having root rights. Backup options:
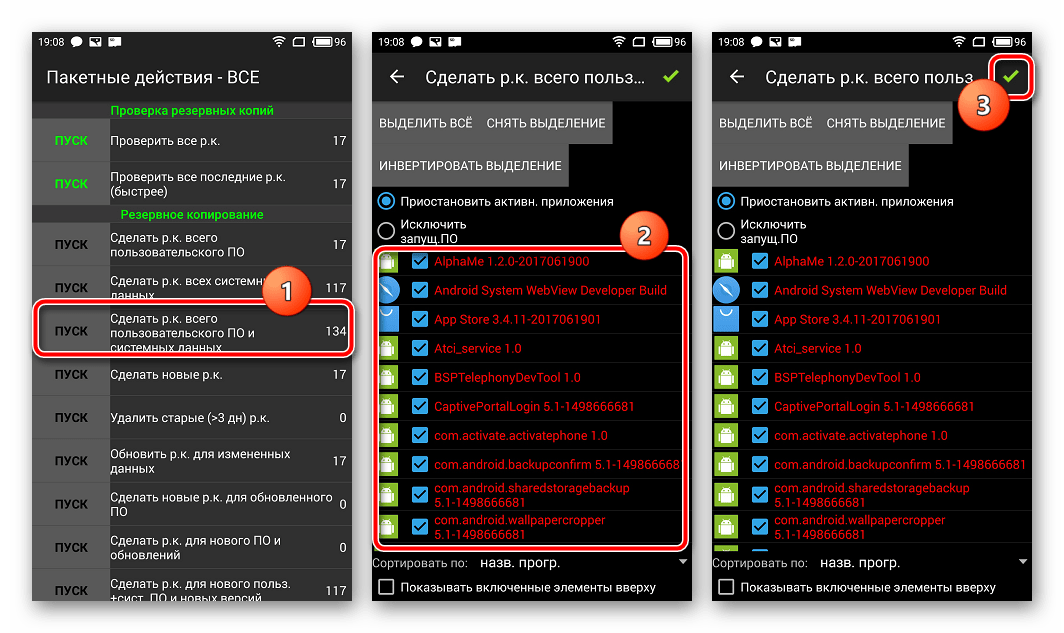
applications and application settings. Titanium Backup allows you to save only user programs, only system programs, or all applications. There is also an option to automatically download the resulting copy of the program to the cloud. Algorithm of actions: Open Titanium Backup. Give the program root access. Click on the "Backups" tab for selective saving programs. Select a utility from the list and click on the “Save” button. To create a backup copies of several applications, click on the menu button, then batch actions. Select the option to save applications. Automatic saving of applications, available on the “schedules” tab. Select the option to save or create a new task. Requirement: account, internet. Backup options:
photos video. A full backup involves saving the entire firmware. A system image is created, intended for recovery only on the device where the copy was made. A full image allows you to restore the device’s functionality after unsuccessful firmware, or restore only certain partitions. Requirement: Availability of TWRP or CWM recovery Backup options:
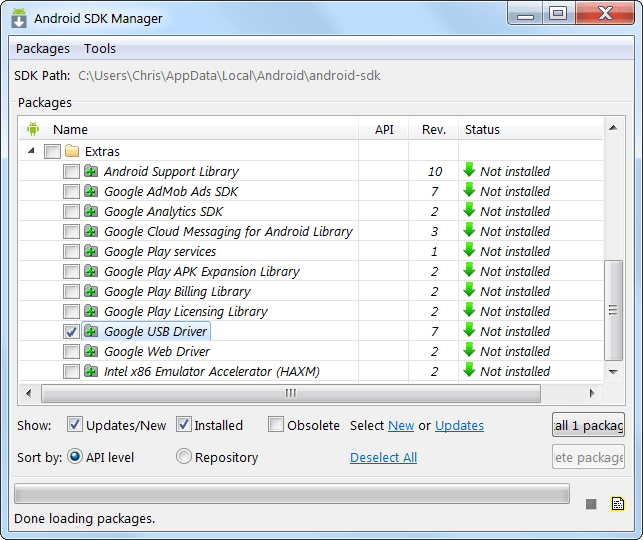
Removing the entire system image or just individual partitions. Algorithm of actions for TWRP recovery: Android includes a built-in feature to create a full backup Android phone without root rights, as well as a means to restore it. All you need is a computer and a device running Android 4.0 (Ice Cream Sandwich). You can also create and restore a backup of your Android device using the Titanium Backup utility. Titanium Backup is perhaps one of the most best solutions for backup, but it requires root rights. To create and restore a backup, we will use ADB (Android Debug Bridge) commands. This utility is included in the Google Android SDK, which you can download for free. First, you need to install the Java Development Kit (if not installed), since the Android SDK requires it. Download and install the 32-bit version of the Java Development Kit (Android SDK requires the 32-bit version even if you have a 64-bit version of Windows). Next, download and install the Android SDK. If the SDK says it can't find Java, then you may have installed a 64-bit version, in which case install the 32-bit version. After you have successfully installed the SDK, launch Android SDK Manager from the Start menu. Check the box next to Android SDK Platform-tools and click the install button to install the platform tools package that contains ADB. If you see an error, run SDK Manager as Administrator (click on the SDK Manager icon in the Start menu and select “Run as Administrator”). You must enable USB debugging on your device. You can do this from the developer tools in Android settings. Now connect your PC and your device using a USB cable. You must have drivers installed for your smartphone; usually they can be downloaded from the manufacturer’s website. Install Google USB Driver via Android SDK Manager (Extras subfolder), it might work. Remember the path where Android SDK is installed. It appears at the very top of the Android SDK Manager window next to SDK Path. You need to find the adb.exe file in the platform-tools folder. It is usually located at C:\Users\NAME\AppData\Local\Android\Android-sdk\platform-tools. Go to this folder and, while holding the Shift button, click right click mouse in an empty space in the opened context menu Select "Open Command Window." To check the adb connection to your device, run the adb devices command. Your device should appear in the list. If it is not there, then the driver is installed incorrectly. Now you can use adb commands to create a backup copy of your device files. For a full backup, run the following command: When you run the command on your phone, you must confirm the creation of the backup. You can also protect your backup with a password. Depending on the amount of data, the process may take some time. To restore a backup, you need to run the following command: To create a full backup of an Android phone without root rights, you need to be an average user who understands the peculiarities of Android, but with the help of our instructions, even a beginner can do this. We hope this feature will be available in the Android interface in the future. Many users of Android devices know that experiments with firmware, installation of various add-ons and fixes quite often lead to the device not working, which can only be corrected by installing the system completely, and this process involves completely clearing the memory of all information. If the user has taken care in advance to create a backup copy of important data, or even better, a full system backup, restoring the device to the “as it was before...” state will take a matter of minutes. There are many ways to make a backup copy of certain user information or a complete system backup. What is the difference between these concepts and for which devices it is advisable to use one or another method will be discussed below. A backup copy of personal information means saving data and content generated by the user during the operation of the Android device. Such information includes a list of installed applications, photographs taken by the device’s camera or received from other users, contacts, notes, music and video files, browser bookmarks, etc. One of the most reliable, and most importantly simple ways To save personal data contained in your Android device is to synchronize data from the device’s memory with cloud storage. The above methods and similar actions allow you to save the most valuable information. But when flashing devices, not only contacts, photos, etc. are often lost, because manipulation of device memory sections involves clearing them of absolutely all data. To reserve the opportunity to return to the previous state of software and data, you only need a full backup of the system, i.e., a copy of all or certain sections of the device’s memory. In other words, a complete clone or cast of the software is created in special files with the ability to restore the device to its previous state later. This will require the user to have certain tools and knowledge, but can guarantee complete safety of absolutely all information. Where to store the backup? When it comes to long-term storage, in the best possible way there will be use of cloud storage. When saving information using the methods described below, it is advisable to use a memory card installed in the device. If it is not available, you can save backup files to the internal memory of the device, but in this case it is recommended to immediately copy the backup files to a more reliable location, such as a PC drive, immediately after creation. From the user's point of view, the simplest method of creating a backup is to use a modified recovery environment for this purpose - custom recovery. The most functional among such solutions is TWRP Recovery. As in the previous method, when creating a backup of the Android firmware, a modified recovery environment will be used, only from a different developer - the ClockworkMod - CWM Recovery team. In general, the method is similar to using TWRP and provides no less functional results - i.e. firmware backup files. At the same time, CWM Recovery does not have the capabilities that many users need to manage the process of creating a backup; for example, it is impossible to select individual partitions for creating a backup. But the developers offer their users a good Android application, ROM Manager, using the functions of which you can start creating a backup directly from the operating system. Titanium Backup is a very powerful, yet quite easy-to-use tool for creating system backups. Using the tool, you can save all installed applications and their data, as well as user information, including contacts, call logs, sms, mms, points WI-FI access and more. The advantages include the ability to widely customize parameters. For example, you can select applications whose data will be saved. To create a full-fledged Titanium Backup, you must provide root rights, that is, for those devices on which Superuser rights have not been obtained, the method is not applicable. It is highly advisable to take care in advance of a safe place to store the backups you create. Internal memory smartphone cannot be considered as such, it is recommended to use a PC disk, cloud storage, or, in extreme cases, a MicroSD card of the device to store backups. To avoid loss of information, for example, when formatting memory before installing system software, you should copy the backup folder to at least a memory card. This action can be done using any file manager for Android. A good solution for performing operations with files stored in the memory of Android devices is ES Explorer. Additionally In addition to the usual copying of the backup folder created with Titanium Backup to a safe place, in order to be safe from data loss, you can configure the tool so that copies are created immediately on a MicroSD card. Using the SP FlashTool and MTK DroidTools applications is one of the most functional ways that allows you to create a truly complete backup of all memory sections of your Android device. Another advantage of this method is that it is not necessary to have root rights on the device. The method is applicable only for devices built on the Mediatek hardware platform, with the exception of 64-bit processors. Then in the menu that opens "For Developers" activate the item using the switch or checkbox "Allow USB Debugging", and when connecting the device to the PC, we confirm permission to carry out operations using ADB. And choose the path to save the scatter. Press the button "Read Back" tab of the same name in SP FlashTools and connect the switched off (!) device to the USB port. Upon completion of the procedure, a window appears "Readback OK" with a green circle with a confirmation checkmark inside. When the procedure for splitting the dump into separate files is completed, the following message will be displayed in the log field: "task completed". This completes the work and you can close the application window. If it is impossible to use other methods or for other reasons, to create a complete copy of the memory partitions of almost any Android device, you can use the OS developer tools - the Android SDK component - Android Debug Bridge (ADB). In general, ADB provides all the possibilities for carrying out the procedure; only root rights on the device are required. It should be noted that the method in question is quite labor-intensive and also requires the user to have a fairly high level of knowledge of ADB console commands. To facilitate the process and automate the entry of commands, you can turn to the wonderful shell application ADB Run, this automates the process of entering commands and saves a lot of time. A positive answer to the question whether the device is connected in ADB mode is the ADB Run response to the previous commands in the form of a serial number. If the method does not work, the following message is displayed: Execution will have to continue until the full list of partitions and /dev/block/ appears: The received data must be saved in any available way; there is no automatic saving function in ADB Run. The most convenient way to capture the displayed information is to create a screenshot of a window with a list of sections. Good afternoon, dear readers. Read the article on how to make a backup on Android without root rights, or with them, what a backup is. Useful programs, which will help you make a backup copy. The Android operating system is fraught with a lot of possibilities. The most useful of them is backup. Or backup - this function is also called that. If a failure occurs or you lose your smartphone, you can restore almost all the information. You just need to remember to make backups regularly Android systems. How exactly? This article will try to answer this question. First, let's figure out what exactly is meant by the word “backup”. This is usually the name for copying certain files for their subsequent recovery. You can copy data to the following places: What exactly can you copy? This is a more serious question. The operating system itself by default uploads data about your contacts, call logs, messages and much more to Google servers. Usually this is enough for any user. Third-party applications can copy all kinds of media content. For example, these could be downloaded videos or . In this case, you often specify the folders with the necessary files yourself, so there can be no mistakes - absolutely everything will be copied. There is also a backup on Android of application settings. It works correctly, however, not on all smartphones. And not all programs allow you to copy their settings. But you need to know about this possibility. Finally, there is a full backup on Android. This is when the current state of the firmware is copied - completely, from settings to some files hidden from the user. This is done in the most difficult way and often in a special way. And this is required only for those who regularly experiment with their device. Some files cannot be copied without . The fact is that the most serious settings of the operating system are embedded deep in hidden folders. As such, the user does not have access to read them. It is root rights that solve the problem - they provide access to copy absolutely any files. But most often, no root rights are required. For example, you can back up your messages, contact book, and other aspects of the Android operating system without them. Moreover, this process is often carried out in automatic mode- you may not even know about it. Android, almost from its first versions, learned to copy user information to Google servers. But at the same time, only basic information is copied - messages, call logs, content of services from the Google Play series, calendar, contacts and documents. If this is enough for you, then get ready to do the following: Don't forget that for this synchronization to work you need Google account. However, without it you can only implement an Android backup to a computer. For other actions, special applications are required, and they need to be downloaded from, where you cannot get there without the appropriate account. Of course, there are all sorts of tricks like downloading programs from third-party resources, but this is a topic for a separate article. Nowadays, many smartphones come with proprietary shells created by the manufacturer. They can implement additional backup - the data is sent to the device manufacturer’s server. For example, let's look at how to make a backup on Android installed on a Samsung smartphone or tablet: Not all people are satisfied standard features operating system. Some users are looking for information on how to make a backup on Android using special utilities. They seem to trust them more. In addition, such programs allow you to send a backup to your favorite “cloud,” while the operating system only offers servers from Google and some other companies involved in the production of smartphones. Without root rights third party programs do about the same thing as Android itself. They are able to copy contacts and messages, but nothing more. But if you give such a program superuser rights, then everything will change. The breadth of its capabilities will increase significantly. The most popular backup applications and tools are the following: And these are just the three most popular titles! On Google Play you can find at least a dozen other programs of this kind. For now, let's figure out how backup is carried out Android applications with the help Titanium Backup. This is the most popular backup program. It is free to use, although some useful features are only available in the advanced version. However, it is not too expensive; $5.99 is a reasonable price to pay for keeping your information safe. So, what does Titanium Backup copy? It seems like absolutely everything! If you give the application superuser rights (without them it simply does not work), you will get a bunch of possibilities. It's very simple: The backup copy will be in the form of a separate file. In the application settings you can specify where exactly to save the backup. The safest way is to save it to a memory card. The PRO version allows you to use Box, Dropbox and Google Drive. You can also set up an automatic backup - it will be created according to a schedule. The paid version of the program can compress files - in this case they will occupy your cloud storage or there is less space on the memory card. And even Titanium Backup does not copy the entire state of the operating system. In this case it simply doesn't make sense. If you experience a system crash and Android won't boot, you won't be able to use the recovery because you won't be able to launch the app itself. Then how to make a backup of Android firmware? Developers from Google have implemented another method that works using . Make sure the battery is at least 50% charged before proceeding further. Otherwise, there is minimal risk of the device turning into a “brick”. Can be used on different smartphones and tablets different way visiting the Recovery menu. In any case, you will need to completely turn off the device. Then the following actions are usually performed: Some devices use different buttons. For example, Samsung devices can also use the Home button. Please note that all buttons are released after a green robot with an exclamation mark appears on the screen. Otherwise, a normal reboot will occur. Well, in the Recovery Menu you need to find the “Backup and Restore” item. Navigate through the menu using the volume buttons (the touch screen does not work here) and press the appropriate item using the power button. Next, click on “Backup” in the same way. Then all that remains is to wait for the process to complete. Copying all firmware files can take from five to ten minutes - the exact value depends on the processor power and operating system load. When the process is complete, click on “Reboot now”. This will reboot the device. Unfortunately, this method may not work on some smartphones. Almost always, the “Backup and Restore” item is present in the custom Recovery menus. If you have never flashed a device, then you may simply not have this item. For operating rooms Windows systems and Mac OS X, many programs have been written that are used to receive data from a smartphone. Software developers who regularly test and experiment with portable devices typically use A.D.B.. This special program, which is used to debug a smartphone or tablet. It has virtually no interface, and all actions are carried out by entering the appropriate commands. But before that, you need to enable USB debugging on your smartphone. This is done as follows: When the checkbox is activated, you need to connect the smartphone to the computer and run the ADB program (its exe file). In fact, only with the help of this utility can you create a backup without root. For the most complete backup, enter the following command: $ adb backup -f "D:\Backup\ADB-2017-08-15.ab" -apk -shared -all -system If you don’t need APK files, then you don’t have to write the corresponding key. Of course, the path and name of the backup file may be different - we have provided only an example. If you only need to transfer contacts, messages and other information to your computer, then you can use more understandable programs. For example, an application will allow you to make such a backup on Android MyPhoneExplorer. This computer application It has a clear Russian-language interface; it does not ask for any text commands. Therefore, it will not be difficult for you to create a backup copy on your own. We will only say that this program also requires activation of USB debugging. Now you know what backup is on Android. And from now on you will not have any difficulties creating it. In conclusion, we only note that ordinary people only need to create backup copies in order to then restore the most important information in case of loss or damage of the smartphone. And for this, the usual synchronization with Google, which we talked about at the very beginning, is enough.
Partial firmware backup
Method 1: using ADB or ADB Run


Method 2: via the recovery and reset menu


Method 3: Sync Gmail

Method 4: using Titanium Backup program


Method 5: Using Google Photos
Full backup of firmware
Method 1: using custom recovery

Installing the Android SDK

Preparing the device

ADB check

adb backup -apk -shared -all -f C:\Users\NAME\backup.ab
The command will create a backup copy of all installed applications (apk files) and data on the SD card to the C:\Users\NAME\backup.ab file on your computer. Replace NAME in the command with your computer's username or specify a different location.

Restoring a backup
adb restore C:\Users\NAME\backup.ab
A confirmation message appears indicating that the backup will replace all data on the device. If a password is set for the backup, you will need to enter it.

Full system backup
Method 1: TWRP Recovery


Method 2: CWM Recovery + Android ROM Manager App


Method 3: Titanium Backup Android App


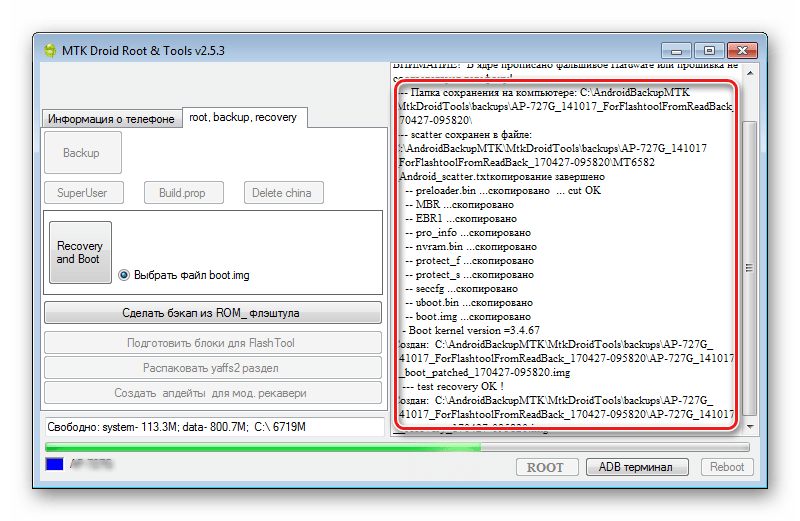
Method 4: SP FlashTool+MTK DroidTools

first the mode is activated "For Developers". For this we follow the path "Settings" — "About the device"- and tap five times on the item "Build number".


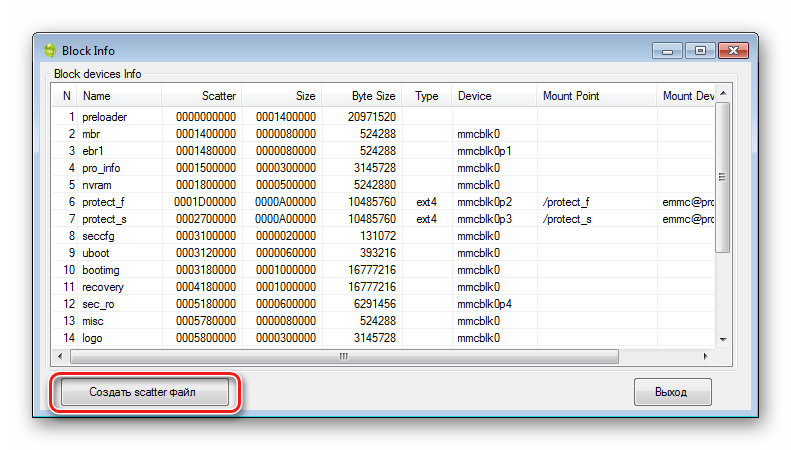


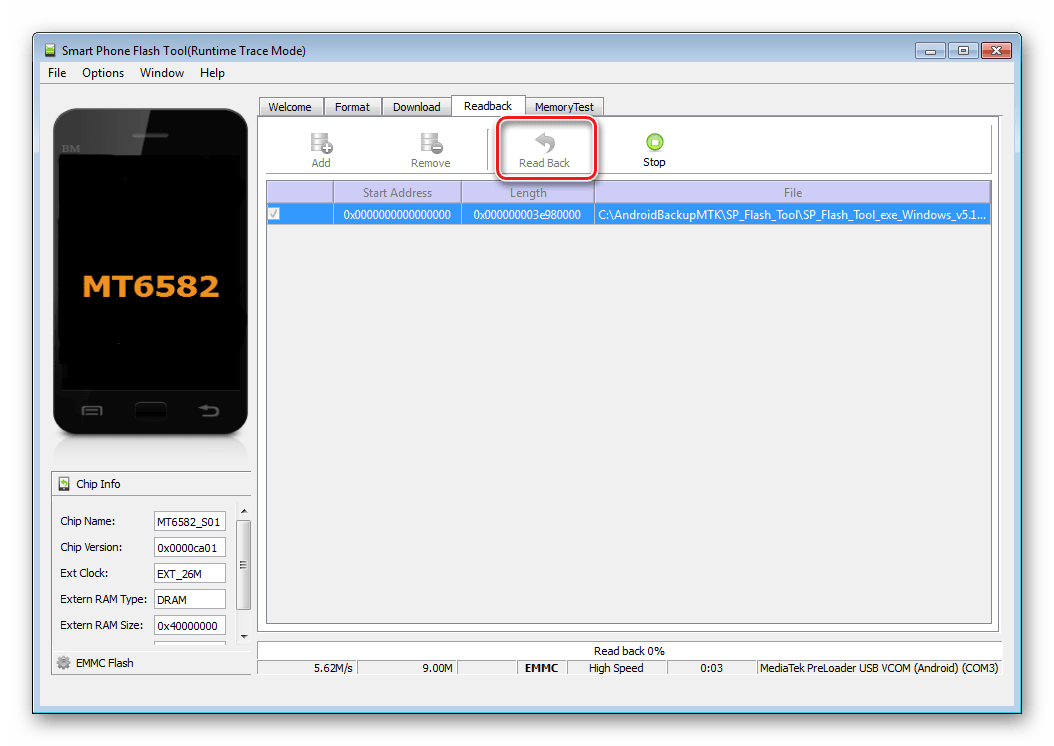
Turn on the device, boot into Android, check that "Debugging via USB" turned on and connect the device to USB. Launch MTK DroidTools and go to the tab "root, backup, recovery". Here you need a button “Make a backup from ROM_ flash drive”, press it. Open the file obtained in step 9 ROM_0.


Method 5: System backup using ADB


Types of backup
Backup on Android: Do you need root rights?
Backup using the operating system

Branded programs for backup on Android
The best backup programs for Android
Titanium Backup

How exactly to use Titanium Backup?
Backup of all Android firmware
Summing up