Word 2003 is still a popular version, so let's start with that:
Microsoft 2007, 2010, 2013
More modern versions have appeared a long time ago. They set up the page count in the same way:

How to number sheets in a document
Sometimes, for example, when writing independent works, it is necessary not to take into account the title page, 2 or even 3 pages. This can also be done quite quickly using built-in functions.
Without title page
To cancel a number on the home page:

Interesting! This method will help remove the number not only on the title page, but also on the first page of any section.

From page 2
If necessary, start numbering from the second page, do the following:

From page 3
It also happens that a document contains content in addition to the title page. Therefore, you have to set the numbering from page 3.
This can be done in the same way as in the above case:
- Create sections.
- Remove the “Same as in the previous section” function from the first two sheets.
- Enable numbering on the desired page.
- Select the “Start from 1” format.
Except some
The editor also allows you to disable numbering on certain sheets. Everything is done as standard:
- Activate the “Page Number” function.
- The file is divided into sections.
- Find the required page.
- Go to the designer and uncheck “Same as in the previous section.”
- We erase the number manually and close the constructor. On this and subsequent sheets the numbering will disappear.
- Select a sheet below. Repeat step 3. Then click on “Page Number”. Continue with the desired number using the “Start with...” format.
The result is the following:

How to set automatic numbering in the editor
Word has an interesting feature. The inserted numbering continues automatically. The numbers do not get confused even if you remove any sheet. This is quite convenient, since you don’t have to re-install them.
How to change the format
Word also allows you to change the appearance of numbers to Roman, Arabic and even letters. This can be done in a few steps:

Good to know! The “Number Format” window can also be opened by manually selecting the page number in the designer and right-clicking.

How to remove page numbers in Word
In order to remove numbers from all pages, you need to use a simple function. She's still in the same place context menu"Page numbers." 
How to format content
In addition to numbered pages, one useful navigation method is a table of contents. To issue it you need:

In the process of writing an essay, diploma or book, we all use a text document editor Microsoft Word. Proper formatting should generally include page numbering in the document. Many people have difficulties and do not know how to number pages in Word, although it is quite simple to do.
This article describes in detail how to number pages in Word, choose the numbering location, format, and also exclude numbering of any document page.
Page numbering in Word 2007, 2010, 2013 and 2016
In all versions older than Word 2003, numbering is the same. The screenshots below are based on Word 2017, but they will also work for older versions.
To add numbering in an open document, go to the “Insert” tab. In the “Header and Footer” section, click “Page Number” and select a numbering position. In the screenshot below, I have chosen the footer location with centered placement.
After this action, numbering will appear at the end of each page, as well as displaying a header and footer. To close the display of headers and footers, click the “Close Header and Footers Window” button.
If desired, you can change the numbering format, for example, by making the numbers not Arabic, but Roman. To do this, again go to the “Insert” tab and in the “Page Numbers” item open “Page Number Format”.
Here you can choose appearance, as well as what number the numbering will begin with. Why this may be required you will find out in the next paragraph.

Removing numbering from the title page
In most educational institutions, one of the requirements for document formatting is the absence of numbering on the title (first) page. If you simply enable page numbering, as shown above, then the numbering will be on the first sheet. To start numbering from the first page, but not display it on the title page, do the following.
Go to the “Layout” tab and click on the “Page Setup” link, as shown in the picture below.
Go to the “Paper Sources” tab and check the “Distinguish between first page headers and footers” checkbox. After that, click OK.

Now numbering is carried out as before, but its number is not displayed on the first page, in our case number 1.
When you want the numbering not to be displayed on the first page (title page), but on the second so that it starts with the number 1, you need to set the numbering from 0 in the menu “Insert” - “Page Number” - “Page Number Format”. the first page will start with number 0 without display, and the second page will start with number 1, the third page with number 2 and so on.
Numbering from the third page
Let's complicate the task a little. We need the numbering to be present, but not displayed on the first and second pages. After all, the first page is usually the title page, the second can be a table of contents, where numbering is also not required.
To number from the third page you will need to do an operation called “Page Break”. To begin, return all numbering settings to default if you have hidden the display of numbering on the cover page. Let's assume that on at the moment you have numbering enabled from the first page and the number 1 is displayed on the title page, the number 2 on the second page and so on.
For convenience, turn on the display of all characters in Word. To do this, on the “Home” tab, click on the “Display all signs” button.
Now that you have all the characters in your documents displayed, including spaces and empty lines, left-click on the last character on the first page of the document. Then on the “Layout” tab, click “Breaks” - “Next Page”.
Do the same steps with the second page of the document. If you did everything correctly, then the enabled display of all characters function will show you break lines at the end of the first and second pages. In the picture below they are shown with red arrows.
Now the third page is numbered 1. If you want it to be numbered 3, then in the menu “Insert” - “Page Number” - “Page Number Format” set the value to “Start from 3”.
There is only one problem left, on the first two pages we have page numbers displayed. To remove them, select the first page, go to the “Layout” tab - “Page Options”. Next, in the “Paper Source” tab, check the box next to “Distinguish between first page headers and footers.”
Do the same on the next page of your document.
Thus, we were able to make sure that the numbering on the first two pages was not displayed and started from the third, and from the number we wanted.
By the way, this method with a break allows you to start numbering not only from the third page, but from absolutely any one.
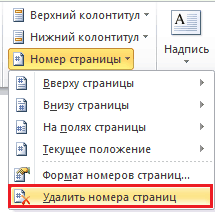
To remove numbering, double-click on any page number and press the DEL key. All numbers will be removed from the document.
Page numbering in Word 2003
There are still quite a few people who use the outdated Word 2003. In it, page numbering is done in a slightly different order than for newer versions of the program.
IN open file Word 2003, click on the top menu “Insert” - “Page Numbers”.

Set the position of the numbers (for example, at the bottom of the page) and alignment (for example, to the right). By unchecking the “Number on the first page” item, you can disable numbering on the title page of the document.

Click on the "Format" button. Specify the numbering format (for example, Roman numerals), and also specify which digit to start page numbering with.

After making changes, click OK and all pages will become numbered.

To number from the third or any other page in Word 2003, first turn on the display of all characters. After that, move the cursor to the last character on the first page and click “Insert” - “Page Break” in the horizontal menu. Do the same on the second one. From now on, numbering will start from the third page.
Instructions
Once you have finished writing your work (or started it), design the pages in accordance with your wishes or the requirements of the customer. Adjust margins, paragraphs, change font and other settings. To number pages in a Word editor document, find the “Insert” tab in the top panel of the editor. There you will see several sections, among which select "Header and Footers". Headers and footers are areas in a document that are used to add repeating information to the bottom, top, or side margins of a document. One of them is page numbers. Headers and footers are needed to automate the process of arranging pages, making notes, and more.
In the column for working with headers and footers, in the drop-down list in the "Page number" field, select the desired format for placing page numbering. As you move through the sections, click right button mice are the appropriate choice. Numbers will appear on each sheet of your document. As a rule, they are placed in the middle of the bottom of the page or in the upper right corner.

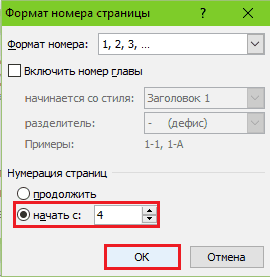
If you need to number pages in Word not from the first sheet (in scientific papers, as a rule, you need to put the number on the second or third page), then in the “Page Number” section, open the “Page Number Format” tab. There you can choose which sheet Word will start numbering from. There you can change the type of number. For example, number the sheets with letters or Roman numerals.

If you do not need to put the number on the title page, you can easily remove it while maintaining the rest of the numbering. To do this, go to “Page Layout” in the main Word panel, click on the arrow next to the page options. In the dialog box that opens, click on the "Paper Source" tab. There you will see the line “Differentiate headers and footers”. Check the box next to the "first page" option and save the changes. This is how easy it is to do page numbering in Word.

It's quite easy to create a numbered document in Word when the report goes in order from the title page. Click on the “insert” item, select “page number” → “page number format” in the right panel. On the drop-down panel, select the desired location of the number. The document is numbered “automatically”.
The style and design of numbers on even and odd pages may vary. You can achieve this effect by activating headers and footers. To get started, go to the “settings” and sequentially open the menu items “parameters” → “different headers and footers for even and odd pages” → “header (footer).  Further from the proposed text editor versions, select the one you like, and do it separately for the first and second sheets.
How to number in Word from the second page
If you want to number the document from the second page, there may be options:
1. When there is no number on the first page, but the second is numbered two. Simply put, you need to remove the number from the title page. To do this, take the following steps - double-click at the top or bottom of the page, in the “parameters” check “special header for the first page”. 
2. When the second page is numbered “1”. Everyone do the same as in the first point. The differences are in the settings; in the “start” column, set it to zero. After these manipulations, close the header and footer window. As a result, this is what you get - the number of the first page “0” is hidden, and on the second sheet there is the number “1”.
How to number a document from the third page
You can number the document from the third page. This is just as easy to do as in the first two cases. The point is to break the document into sections. Place the cursor on the last line of the second page and follow the chain “page layout” → “break” → “next page”. Place the cursor in the upper or lower corner of the third page, double-click with the right mouse, thereby turning on the header and footer editor and dividing the page into two sections. You will get a picture like this.  Go to the "insert" menu and follow the same path as for simple pagination. In this way, you can number pages from the fourth, fifth, and so on. In this case, set any serial number. Delete the numbers of the first sheets manually using the “delete” button.
When creating documents in Microsoft Word, page numbering is often needed. As it turned out, some users do this by entering numbers manually. Naturally, even a minor correction of such a text nullifies their efforts, and opening a document on another computer often brings “surprises” - the numbers are not in the places where the author put them.
Why suffer? I suggest entrusting this work to the program itself, because it copes with it much better. So, today I will tell you how to number pages in Word - at the top, bottom or in the margins. The instructions are valid for all versions starting from 2007. The only differences are in the design of the main menu.
How to number pages in Word
From the first page
You can number pages before, after, or while working on a document. To start numbering from the first sheet, open the tab “ Insert" and in the section " Headers and footers» click « Page number" Specify where to insert it - at the top, bottom, or in the margins of the sheet (right and left). Next, select any of the proposed styles. This could include: “ PageX ofY", not just numbers.
Here's what I got:

If the cursor is in the header and footer field, you can double-click on it to go to the main text.
By the way, if you don’t like the standard Word numbering style, you can edit it - change the font, size, move the numbers to the right or left, stretch or shrink the graphic addition (squares, stripes, circles next to the numbers), etc.

From a random place
Sometimes the first few pages do not need to be numbered. For example, you want to leave the title page unnumbered, followed by something else, and start counting from the second or third. To do this:
- Place the cursor at the bottom of the last page, which should remain unnumbered.
- Go to the tab " Page layout", click the item " Breaks" and in the list " Section breaks» select the next page. At this point, the document will be split into two parts, each of which can have its own markup.

- Enabling the display of non-printable characters will help you see where the break is:

- Next, go to the second part of the document (which will be numbered) and double-click on the footer area, where the serial number of the sheet should be indicated. After this, the “” tab will open in the main menu Working with headers and footers» – « Constructor».
- To leave only the first sheet unnumbered, in the section “ Options"Suffice it to note" Special header and footer for the first page».
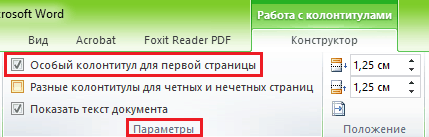
- To count from the third, fourth, fifth, etc. sheet - that is, from the place where you inserted the break, click in the " Transitions» by icon « As in the previous section", in order to break the connection between the headers and footers of parts of the document.

- Next, without closing the tab " Constructor", click " Page number" And " Number format».
- Check " start with" and enter the number. Perform the operation for each section of the document.
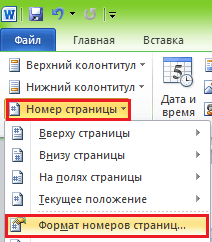
How to remove numbering
This is also very easy to do. If you noticed at the bottom of the list " Page number" section " Insert" is the command " Delete numbers" Click it and everything will be cleared.
If the document was divided into several parts, numbered separately, repeat the deletion for each.
How to number sheets if the headers and footers contain text
Entering numbers according to the instructions above will remove all notes in the margins. In order not to overwrite the text inside the headers and footers, we’ll do this:
- Place the cursor where we want to insert the number, and double-click in this place with the mouse - the “tab” will open Constructor».
- In the section " Position» click « Insert tab with alignment» and select the right, left or central placement of the sheet’s ordinal value.
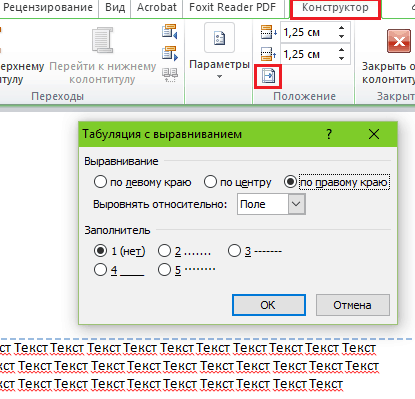
- Next let's go to the tab " Insert" and in the area " Text» click « Express blocks" Let's select " Field».
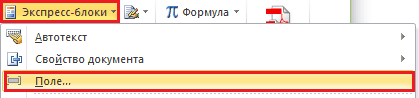
- In the list of fields, mark “ Page"and specify the format in the properties. Examples are shown in the screenshot.

Here's what I got:

Not very aesthetically pleasing, but good for clarity. I'm sure yours will turn out much nicer.
That's it, everything is simple and complicated at the same time. It’s difficult because the number of functions and settings is simply huge. And if you don’t know where everything is, you can do “archeology” for a long time, but still not get to the right tool. To make this task easier for you, such instructions are written. I hope that this one was useful to you in some way.