Many problems on a laptop can be solved if you reset the BIOS settings to factory settings (sometimes they are also called optimal or safe).
In general, this is done quite easily, it will be more difficult if you set a password on the BIOS and when you turn on the laptop it will ask for this same password. Here you can’t do without disassembling the laptop...
In this article I wanted to look at both options.
1. Reset laptop BIOS settings to factory settings
To enter the BIOS settings, the keys are usually used F2 or Delete(sometimes F10 key). It depends on the model of your laptop.
Finding out which button to press is quite easy: restart the laptop (or turn it on) and look at the first welcome window (it always indicates the button to enter the Bios settings). You can also use the documentation that came with the laptop upon purchase.
And so, we will assume that you have entered the Bios settings. Next we are interested in Exit tab. By the way, in laptops of different brands (ASUS, ACER, HP, SAMSUNG, LENOVO) the names of the Bios sections are almost the same, so there is no point in taking screenshots for each model...
Next, in the Exit section, select a line like “ Load Setup Defaults"(i.e. loading default settings (or default settings)). You will then need to confirm in a pop-up window that you want to reset your settings.
And all that remains is to exit the BIOS while saving the settings made: select Exit Saving Changes(first line, see screenshot below).
By the way, in 99% of cases with the settings reset, the laptop will boot normally. But sometimes a small error occurs and the laptop cannot find where to boot from (i.e. from what device: flash drive, HDD, etc.).
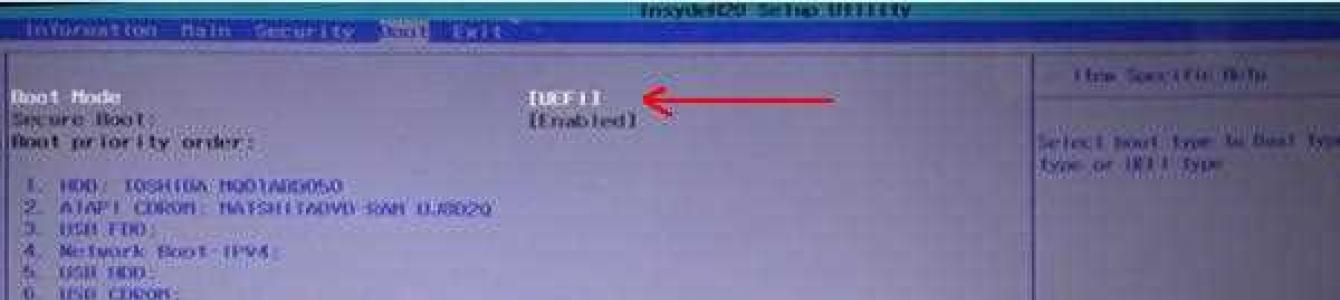
To fix it, go to Bios again and go to the section Boot.
Here you need to change the tab Boot Mode: Change UEFI to Legacy, then exit BIOS saving the settings. After rebooting, the laptop should boot normally from the hard drive.

2. How to reset BIOS settings if it requires a password?
Now let’s imagine a more serious situation: it happened that you set a password for the Bios, and now you have forgotten it (or your sister, brother, friend has set a password and is calling you for help...).
Turn on your laptop (in the example, an ACER laptop) and see the following.

To all brute force attempts, the laptop responds with an error and after several incorrect passwords are entered, it simply turns off...
In this case, you cannot do without removing the back cover of the laptop.
You only need to do three things:
- disconnect the laptop from all devices and generally remove all cords that are connected to it (headphones, power cord, mouse, etc.);
- remove the battery;
- remove the cover protecting the RAM and hard drive of the laptop (the design of all laptops is different, sometimes you may need to remove the back cover completely).


There are two contacts under the RAM strips (they are also signed JCMOS) - these are what we need. Now do the following:
- close these contacts with a screwdriver (and do not open them until you turn off the laptop. Patience and accuracy are needed here);
- connect the power cord to the laptop;
- turn on the laptop and wait about a second. 20-30;
- turn off the laptop.
Now you can connect RAM, hard drive and battery.


We need to say a few words about the “pitfalls”:
- not all laptops will have two contacts, some will have three, and to reset you need to move the jumper from one position to another and wait a few minutes;
- instead of jumpers there may be a zero button: just press it with a pencil or pen and wait a few seconds;
- You can also reset the Bios if you remove the battery from the laptop motherboard for a while (the battery looks like a tablet, small).
That's all for today. Don't forget your passwords!
As a result of setting incorrect parameters in the BIOS settings, its correct work, this manifests itself in unstable operation of the system or its complete failure. To prevent such consequences, the BIOS provides a reset function. Resetting the BIOS is bringing the BIOS parameter values to the factory settings, selected by the motherboard manufacturer as the most secure and stable.
List of the most common reasons that make it necessary to reset the BIOS:
1. The computer does not respond to pressing the Power button.
2. The computer turns on, but makes some sounds and does not want to boot operating system.
3. The computer works, but is not stable - it freezes, reboots, etc.
4. If necessary, update the BIOS version.
5. To reset an unknown password.
Reset BIOS. Method 1
Turn off your computer. Find the jumper on the motherboard responsible for Clear CMOS; as a rule, it is located near the battery. Place it from the original position (1-2) to position (2-3). Wait 10-15 seconds, move the jumper back to position (1-2). In addition, it is better to disconnect the power cable from the power supply.
Reset BIOS. Method 2
Turn off your computer. Find a coin-cell battery on motherboard. Carefully pull it out of the slot, bending the lock, and place it separately. Wait 1 minute. Put the battery back.
Reset BIOS. Method 3
If your motherboard does not have a battery, find a chip marked Dallas or Odin (they have a built-in battery) - the jumper should be somewhere nearby. Sometimes you can reset the BIOS by closing the contacts of the microcircuits. It must be said that shorting the contacts of the battery itself is sometimes very dangerous.
Reset BIOS. Method 4
Using any programming language, a value from 10H to 2FH is written to the port with address 70H, and any value that is not equal to the old value is written to port 71H. Here is an example for Borland Pascal 7.0: Port[$70]:=$10
Port[$71]:=Port[$71] xor $FF
The operating principle of this method is based on destroying the checksum of the contents of CMOS memory. After the reboot, the BIOS values will be reset to the factory defaults and the password will become standard for this BIOS version.
Turbo Pascal program code:
Begin
Port[$70]:=$2E;
Port[$71]:=$00;
Port[$70]:=$2F;
Port[$71]:=$00;
end;
Reset BIOS. Method 5
Windows includes the DEBUG utility to quickly change the contents of specified memory cells. The principle of operation is similar to the previous one - destruction of the CMOS checksum. In order to run the utility, you need to go to the Start menu, click Run and enter debug.
Then enter the following:
o 70 17
o 71 17
Q
And reboot.
Reset BIOS. Method 6

You just need to pull out the jumper from a pair of contacts and move it one contact to the side. That is, it bridged the first and second contacts, but you need to switch it so that it closes the second and third.
Sometimes you may encounter this option:

Here you need to bridge the contacts with a screwdriver or something similar.
After the necessary contacts are closed, turn on the computer, wait a couple of minutes and turn it off again. We return the jumper to its place and turn on the device.
BIOS reset!
Method three. Battery
Another option is related to the CR2032 system battery, which is responsible for the safety of CMOS data. Here it is:

To return the BIOS settings to factory settings, you need to unplug it for 15-20 minutes. How to do this? Press the clamp foot in the direction opposite to the battery, as shown in the photo:

After this, the battery should pop out of the slots. We wait 15-20 minutes and return it back. Your computer's BIOS settings have been reset!
Your computer's base hardware and time settings are stored in the BIOS, and if for some reason you're having problems after installing new devices, you've forgotten your password, or you've just configured something incorrectly, you may need to reset the BIOS to its default settings.
In this instruction, I will show examples of how you can reset the BIOS on a computer or laptop in cases where you can get into the settings and in a situation where this cannot be done (for example, a password has been set). There will also be examples for resetting UEFI settings.
Resetting BIOS in the settings menu
The first and easiest way is to go into the BIOS and reset the settings from the menu: in any interface version such an item is available. I will show you several options for the location of this item so that it is clear where to look.
In order to enter the BIOS, you usually need to press the Del key (on a computer) or F2 (on a laptop) immediately after turning it on. However, there are other options. For example, in Windows 8.1 with UEFI, you can get into the settings using downloads. ().
In older BIOS versions, the main settings page may contain the following items:
- Load Optimized Defaults - reset settings to optimized ones
- Load Fail-Safe Defaults - reset to default settings, optimized to reduce the likelihood of failures.

On most laptops, you can reset the BIOS settings on the “Exit” tab by selecting “Load Setup Defaults”.

On UEFI everything is approximately the same: in my case, the Load Defaults item (default settings) is located in the Save and Exit item.
Thus, regardless of what version of the BIOS or UEFI interface is on your computer, you should find the item used to set the default parameters; it is called the same everywhere.
Resetting BIOS settings using a jumper on the motherboard

Most motherboards are equipped with a jumper (otherwise known as a jumper) that allows you to reset the CMOS memory (which is where all BIOS settings are stored). You can get an idea of what a jumper is from the picture above - when the contacts are closed in a certain way, certain operating parameters of the motherboard change, in our case this will be resetting the BIOS settings.
So, to reset you will need to follow these steps:

At this point, resetting the BIOS settings is complete, you can install them again or use the default settings.
Reinstalling the battery
The memory in which the BIOS settings are stored, as well as the motherboard clock, are not non-volatile: there is a battery on the board. Removing this battery resets the CMOS memory (including the BIOS password) and the clock (although sometimes you have to wait a few minutes before this happens).
Note: Sometimes there are motherboards where the battery is not removable, be careful not to use unnecessary force.
Accordingly, in order to reset the BIOS of a computer or laptop, you will need to open it, see the battery, take it out, wait a little and put it back. As a rule, to remove it, it is enough to press the latch, and to put it back, just press lightly until the battery clicks into place.
We switched something wrong in the BIOS or UEFI and as a result, problems arose in the operation of the computer. You messed up something in the settings and don’t know how to return them to default. Or maybe the computer does not start at all after changes to the BIOS. Let's look at how you can reset the settings to default values.
BIOS have a direct impact on the operation of the computer and its individual components. Sometimes there are times when you need to change something - switch the drive operating mode, adjust processor settings, and the like. It may happen that we configure something incorrectly and don’t know how to reset it to its original values. It even happens that the computer may not boot at all - what to do in this situation?
Method 1: Reset via BIOS/UEFI
The best option is to reset the BIOS to factory settings. Then all the changes you made will be reset and everything will work as before. There are several ways to do this. If the computer turns on, then you can go into the BIOS and restore the default settings. Otherwise, if you cannot enter the BIOS, you will have to edit it manually.
If the computer turns on, the first screen will display information about the key through which you can Setup. As a rule, these are the Del or F2 keys.
These functions are responsible for restoring default values. Launch one of them, and then exit the BIOS by clicking on “Save and restart”.
If you have a slightly different BIOS window, pay attention to options like “Load BIOS defaults”, “Reset to default settings” or something similar. Then save the changes and restart the BIOS.
However, the situation with recovery is the same in the case of UEFI, only the graphic window is different, which is more extensive. We go to the main UEFI window and look for the option to reset to factory values.
Typically this option is located on the “Exit” tab or is displayed when exiting UEFI - to reset the settings to factory settings, click on “Load UEFI default settings” and save them before leaving the configuration.
Method 2: Reset using a jumper on the motherboard
If you can’t enter the BIOS on a desktop computer, you can reset it using the CMOS jumper on the motherboard. This is used to reset to default values.
Find the jumper on the motherboard designed to reset the BIOS. It's usually labeled Clear, CLR, CLRCMOS, or something similar. With the computer turned off, it needs to be reinstalled from contacts 1-2 to 2-3 for about a minute. After this, the settings will be reset.
Another way to reset the settings to factory settings is to remove the battery from the socket on the motherboard. It is responsible for saving BIOS settings and system clock. Remove it for a few seconds and insert it back, which will reset the settings to default values.
Many problems on a laptop can be solved if you reset the BIOS settings to factory settings (sometimes they are also called optimal or safe). In general, this is done quite easily, it will be more difficult if...
Many problems on a laptop can be solved if you reset the BIOS settings to factory settings (sometimes they are also called optimal or safe). In general, this is done quite easily, it will be more difficult if...
At the dawn of the advent of computer technology, most users were wary of such technical innovation. In case of problems, always seek help from qualified specialists. Time has passed, and there are significantly more advanced users. There are even more people willing to experiment with their PC, changing some settings in an attempt to increase performance.
Due to incorrect settings, the system may not boot
However, as a result of unprofessional actions, mistakes may be made that lead to serious problems, as a result of which it becomes necessary to learn how to reset the BIOS settings.
BIOS is special program, stored in the ROM chip. It is the BIOS that is responsible for starting the installed hardware. When turning on the PC, each user can hear a characteristic sound, after which the operating system starts.

Experienced owners confirm that this is how the BIOS tests devices and determines their performance. If a problem occurs, it is the BIOS that does not allow the operating system to boot, preventing more serious problems from occurring.
Reasons for resetting the BIOS
Since the BIOS is a kind of program, if desired, PC owners can make changes to its settings if they want to overclock the video card or the processor itself. In this regard, the most common reason why you have to reset the BIOS is overclocking the video card.
By overclocking a video card or processor, the user wants to increase the performance of the electronic computer. However, having set critical parameters for the above devices, the computer will once again stop booting, since the BIOS receives information that the temperature of a particular device has been exceeded.
And due to the fact that the BIOS considers this to be the highest risk, it prevents the operating system from loading further.
There is another reason that causes the BIOS to not work correctly. Like any program installed on a PC, the BIOS can also be updated. However, it may happen that the update files were initially downloaded incorrectly because they were intended for a different motherboard. By making such an illiterate update, the owner of a smart machine himself provokes poor computer performance.
Setting a password, which is subsequently safely forgotten, also directs the user to reset the BIOS.

Experts can name several more reasons why you have to think that the BIOS is not working correctly. When nothing happens when you press the power button, unusual sounds can only be made; If your computer reboots spontaneously or experiences frequent freezes, it is useful to reset the BIOS to factory settings on your PC.
How to reset BIOS
There are two ways to reset the BIOS, conventionally divided into technical and software.
Soft reset
It is quite possible to return the factory default settings by going to the BIOS menu. You can log in the moment you turn on your computer. When only the first inscriptions appear on the screen, the user must quickly press a certain button. This could be "F2", "F10" or "Del". In some cases, the button may be different; by reading the instructions for the motherboard, you can find out which specific button is suitable for this model of electronic computer.
By pressing the correct button, the user is taken to the BIOS menu, where you should find a parameter such as Load Optimal Defaults or something similar, since different models may have different names for this parameter.

After selecting this value, the BIOS will ask you to confirm the user's desire to reset the BIOS to factory settings. By pressing “F10”, the computer will reboot, after which the BIOS will be completely reset and the settings will return to their default state.
Resetting the factory default settings using this method is not difficult, but this method comes with both an advantage and a disadvantage. The advantage is that there is no need to disassemble the computer, violating the integrity of the warranty seal. The disadvantage is that if the reason for resetting the settings is a password that is hopelessly forgotten, then this method will be ineffective and you will have to use another method.
Technical reset
Having figured out how to reset the default BIOS settings programmatically, it would be a good idea to familiarize yourself with other options.
Initially, you should turn off the power to the smart machine, unplug the cord from the outlet, making sure that the equipment is completely de-energized.
Next you will need to remove the cover system unit and find the location where the CMOS battery is installed. Next to it you can easily find a jumper consisting of three contacts and labeled something like CLR, Clear, Clear CMOS. The jumper installed on this jumper occupies the first and second positions, the third remains free.

Now, wanting to understand how to reset the BIOS to factory settings, you need to carefully remove the jumper and also carefully insert it into the jumper again, but in the second and third positions.
To finally reset the BIOS and return the factory default settings, the user must press the power button and hold it there for up to 15 seconds. Of course, there can be no talk of any kind of switching on, since the equipment is completely de-energized. This action is carried out in order to remove the possible remaining voltage on the capacitors, thus accurately resetting incorrect settings BIOS.

The second method is almost identical. Only in this case, it is not the jumper on the jumper that is removed, but the CMOS battery. After removing the battery, the user must also hold the power button for 15 seconds.

A technical reset of settings also does not present any difficulties, but the user must understand that warranty obligations will be lost due to damage to the warranty seal. In this regard, it is important to decide which way is most convenient to reset the settings; perhaps a better option would be to take the equipment to a service center.
Because of the infidels BIOS settings The computer may completely stop working. You can correct the situation by rolling back the settings to factory settings. This function is provided on all PCs, but the reset method differs depending on the device used.
When a factory reset is required
Fortunately, the need to completely reset settings does not arise very often. Typically, the user can manually change the configurations to return the device to a working state. The following describes cases in which, without full reset parameters are indispensable:
- I can't remember the OS or BIOS password. In the first case, specialized programs or reinstalling the system can help, and in the second, only rolling back the settings.
- Errors when loading the system or BIOS. Failures are not always caused by incorrect settings, but in some situations, restoring default settings helps solve the problem.
- Incorrect BIOS parameters specified by the user when there is no way to manually restore the original settings.
Method 1: Special Applications
Computers based on 32-bit Windows have a built-in tool with which you can roll back the settings to factory settings. This method is only suitable if it is possible to log into the OS.

Please note that the method is only suitable for 32-bit Windows. This method cannot always help in restoring parameters, so it should be used only as a last resort.
Method 2: CMOS battery
Almost all motherboards are equipped with a CMOS battery. This element is responsible for storing BIOS data. If you remove the component, the parameters will be automatically reset. Be careful, not all boards provide the ability to remove the battery.

Method 3: Jumper
Modern motherboards are often equipped with a special jumper, by moving which you can reset the BIOS settings. This is done this way:

Sometimes there are boards with more than 3 contacts, in this case, focus on the names “CLRTC” and “CCMOST”. These are the necessary contacts.
Method 4: Special button on the board
Unfortunately, not all motherboards have a button that is responsible for resetting parameters. It can be located both inside the device body and outside. Usually the button is named “clr CMOS” and is highlighted in red, but this is optional. It is better to start your search from the back panel of the computer, where the connectors for connecting components are located. When you press the button, the BIOS settings will be restored to factory settings.

Method 5: Through BIOS
You can also reset the settings using the interface itself. This is a more convenient method than the previous ones, since there is no need to disassemble the device case. Using this method is recommended only for experienced users, as there is a possibility of seriously aggravating the problem with the computer.
The method for rolling back settings may vary slightly depending on the BIOS version and PC settings.

Resetting the settings to factory settings yourself is not as difficult as it might seem at first glance. You must be extremely careful and strictly follow the recommendations in the article so as not to cause even more harm to the device.
BIOS is a separate firmware built into the motherboard, which is responsible for a fairly wide range of tasks: it determines some computer settings, controls connected devices, checks the system for functionality, starts the operating system, and so on. If, for example, the BIOS settings were seriously changed as a result of careless actions, the reset procedure will help solve the problem.
Resetting the settings allows you to return the BIOS to its factory state. This procedure will be useful in cases where the computer does not work correctly, refuses to start the operating system and exhibits many other problems with its functioning.
Resetting BIOS settings
Fortunately, there are three options for resetting the BIOS, each of which can be useful in one situation or another.
Method 1: Perform a reset through settings
This method is the easiest to implement, but it may not always help, because if the computer refuses to enter the BIOS, you will have to use one of the methods given below.
In older versions of the BIOS, you will need to find the section that mentions the word "Defaults", for example, this item may be called "Load Optimized Defaults"(performing a reset to optimized settings) or "Load Fail-Safe Defaults"(performing a factory reset to fix computer problems). Having found the required item, select it, and then confirm your intention to start the procedure.

In more recent BIOS versions, which are usually found on laptops, the required reset item may be located in the exit section, that is "Exit". As a rule, this item is called "Load Setup Defaults".

And finally, in modern versions of BIOS UEFI which can be controlled not only using the keyboard, but also using the mouse, you should find the item "Load Defaults", which can also be located in the section "Exit" or "Save and Exit".
Method 2: Perform a reset using a jumper
Another method provided for resetting the BIOS, which involves opening the system unit in order to gain access to the motherboard.


Method 3: Perform a reset using a battery
There is a special battery on the motherboard that stores the BIOS settings. Removing and reinstalling this battery will allow you to reset all parameters to factory settings.

Please note that some motherboards are equipped with non-removable batteries. If the battery does not have a latch, you should not “rip out” the battery - this method simply does not suit you.
All three methods are effective. Which one to choose is up to you to decide, based on the state of your computer and your capabilities.
The user has access to a large number of different settings that relate to the operation of the computer. Therefore, if they are used carelessly, the computer may begin to work unstably or may not start at all. In this case, you need to reset the BIOS to factory settings. In this material we will talk about how to reset the BIOS settings to factory settings and thereby correct unstable computer operation.
Resetting BIOS settings via BIOS Setup
The easiest and safest way to reset BIOS settings to factory settings is to use a special option in the BIOS settings themselves, that is, in BIOS Setup. In any BIOS version there is always an option that allows you to return to factory settings; you just need to activate it, confirm the reset and exit the settings while saving the changes. After restarting the computer, it will start working with factory settings.
Using this method, you do not risk damaging your computer, so it should be used whenever possible. The remaining reset options involve some risk and can damage something if done incorrectly. Therefore, they are only for emergency cases when the computer does not turn on.
Therefore, if your computer boots and you are able to enter the BIOS, then you must reset the settings through the BIOS Setup interface. To do this, find the menu item that resets the BIOS settings to standard. Typically, this item is located in the “Exit” section and is called “Load Setup Defaults” (Load standard settings).
For example, in the case of PhoenixBIOS, you need to open the “ Exit" section and select " Load Setup Defaults"

And then exit the BIOS, saving the settings by selecting “ Exit Saving Changes" and clicking on the " Yes" button.

Some BIOS versions have two options to restore default settings. For example, in the screenshot below you can select “Load Fail-Safe Defaults" and "Load Optimized Defaults". Both of these options work the same, they load the default settings. Only the first option loads a more secure profile, which the computer should work with in any case, and the second option loads a profile with optimal settings.

On modern motherboards with UEFI BIOS there is also always an option that allows you to return the default settings. But, due to the bright and non-standard interface, it may be more difficult to find. For example, the screenshot below shows UEFI from ASUS. Here, to return to standard settings, you need to click on the “Default” button at the bottom of the screen or press F5. Then you need to exit using the “Save & Exit” option or press F10.

Also, on this board from Asus, you can first go into the advanced settings by clicking on “Advanced Mode" or pressing F7. After this, you will need to go to the “Exit” section, activate the “Load Optimized Defaults” option and exit using the “Save Changes & Reset” option.

There are many different versions BIOS and UEFI, so your interface will be different. But, in general, the reset procedure is always very similar and should not cause you any problems.
Resetting BIOS Settings Using a Jumper
If the computer does not boot or you do not have access to the BIOS, you can reset the settings using a special jumper on the motherboard. Such a jumper is on any board, but it can be located in different places and can be labeled differently. For example, it may be called CLRTC, CLR_CMOS, JCMOS, RESET CMOS, CCMOS, CONFIG, BIOS CONFIG etc. Therefore, if you do not have sufficient experience, it is better to first read the instructions from the motherboard. Such instructions should come with the board, and can also be downloaded for free on the board’s page from the manufacturer’s official website.

In order to reset the BIOS settings using a jumper, you must turn off the computer and completely disconnect it from power. After this, remove the side cover of the system unit and find the jumper on the motherboard. To reset, the jumper must be moved to a different position for a few seconds and then returned back. If there are only 2 reset contacts and there is no jumper, then these contacts just need to be closed for a few seconds.
In addition, some expensive ones may have a special button installed. This button can be located directly on the board or can be placed on the back of the computer, on a panel with ports.

If there is such a button, to reset the settings, it will be enough to simply turn off the computer and press it for a few seconds.
Resetting BIOS settings using a battery
If you are not sure that you have found the right jumper, then you can simply disconnect the battery on the motherboard. By disabling it for just a few seconds, you will reset the settings and return the BIOS to factory settings. This option is quite simple and works in any case.
In order to disconnect the battery, as in the previous method, you must first turn off the computer and completely turn off the power. After that, remove the side cover and find the battery on the motherboard. This is a small CR2032 battery, as a rule, it is located closer to the bottom of it.

Next you need to remove the battery using a screwdriver, wait a few seconds and install it back. This must be done as carefully as possible in order not to damage the motherboard. If the screwdriver comes off the battery, you can knock out small components on the board, which will inevitably result in the need for repairs.