Not all owners of modern WiFi routers TP-Link knows that you can access the settings of their network device not only through the IP address 192.168.1.1 or 192.168.0.1, but also through the hostname tplinklogin.net, simply by entering it in the address bar of your web browser, as is the case with regular sites. On some models of TP-Link modems and routers, this address is even written on the sticker instead of IP, like on all others.
The main condition for operation is that the network card must receive IP addresses automatically or the router address must be registered as the preferred DNS server.
This is what it looks like in Windows 8, Windows 10 and other versions operating system from Microsoft.
How does this work? Very simple. TP-Link modems or routers do not have their own DNS server and simply transparently transmit requests to provider servers. Despite this, the operating system of the router has a strict binding of the domain name tplinklogin.net to the internal IP, which “looks” towards the local network, that is, 192.168.0.1 or 192.168.1.1.

Accordingly, if it receives a request from a computer what IP is the hostname “tplinklogin.net”, it does not broadcast it further, but immediately issues the local address of the router.
If a different DNS server is registered on the network card of a PC or laptop, other than 192.168.1.1 or 192.168.0.1, then it, of course, will not be able to give the correct answer and the result will be a “Page not found” error.
What to do if you can’t log in to tplinklogin.net?!
In this case, try logging into the TP-Link settings not by hostname, but by IP address. That is, open a new browser page and enter the address http://192.168.1.1.

If it doesn’t work, your router model may have a default IP address of 192.168.0.1. Then try entering it in the address bar.
Separately, I would like to tell you about another hostname that is used on TP-Link network bridges and repeaters - this tplinkextender.net(Login for authorization is admin, password is admin). It may also be inaccessible and not open if there are problems with the network setup.

The solution to the problem is exactly the same as with “tplinklogin.net” - you must first try to log in via IP by entering it in the Chrome, Opera or Firefox web browser.
If this does not help, try to register addresses on the network card statically. Like this:

This doesn’t help either - then “seven troubles - one reset”. As a rule, after a hardware reset of the configuration, logging in via tplinklogin.net or tplinkextender.net to the TP-Link router returns again.
TP-link is the most popular company producing routers, routers and other network equipment. I myself have been using a device from this manufacturer for many years. Sooner or later the question arises - how to enter the configuration settings of any TP-Link router.
You never know, you will need to reflash, change the Wi-Fi password or set more detailed settings - such as parental controls for your family or blocking by MAC addresses. Everything is done very easily and there is no need to constantly call a specialist, since the device’s interface is simple and intuitive even for housewives. Let's look at all the methods from connecting via wire to connecting via wireless network from the phone.
HELP! If you have any questions when starting the router or have any difficulties, write about it below in the comments, and I will help you right away.
How to connect a laptop or PC to a router
Take a twisted pair cable. Usually it comes in a box from under the device. Plug one end into the router, into one of the LAN port connectors (they are yellow). And the second one in network card laptop or computer.
Log in via your laptop directly
If you did everything as in the chapter above, and the connection goes directly from a computer or laptop to the router via cable, then all you have to do is just launch the browser and enter the IP or DNS address in address bar. You can enter the router settings from TP-Link at the following addresses:
- 192.168.1.1 – on newer models.
- 192.168.0.1 – on older devices.
- http://tplinkwifi.net or http://tplinklogin.net are more common addresses for logging into any TP-Link model.
- Login admin.
- Password - admin or empty field.
- If you launch it for the first time, you will be asked to enter a new password for access, and then the setup will begin.
- If this router was provided by a provider, then the password can be the company name of that provider. If this option does not work, then you need to call the technical support of your Internet provider and ask for the password there.
Standard login information is also located on a label under the router.

The TP-link router menu will differ depending on the firmware and device model.
Login from laptop via WiFi
If the device is new or has a standard configuration, proceed from step 1. If the wireless network is already configured and you can connect to it, start with step 4.
- The router should have a WPS button on the back. Or a similar Wi-Fi button with a wave logo. Hold it for 3 seconds and release.
- Next, on your laptop, click on Wi-Fi in the lower right corner and select a new available network. If you have already connected to it before, then use your username and password to access the Wi-Fi. If you just started the router, then the password and network name are on the label.
- If you are connecting using WPS technology, then when prompted for a PIN or password, press the WPS button on the router again.
- Next, launch the browser and enter one of the options:
- 192.168.1.1
- 192.168.0.1
- http://tplinkwifi.net
- http://tplinklogin.net
- We enter the authentication data in the admin panel.
From a smartphone or tablet via Wi-Fi
- Launch Wi-Fi on Android or iOS.
- Find the network and connect. If the router has already been reset to the factory configuration, the name of the wireless network will have the name of the router model.
- If you do not see the Wi-Fi network of this device, it means it is not running. To start, press the WPS or Wi-Fi button on the device, and then try again to connect to the wireless network, which should already be available.
- The login, password and standard name for the Wi-Fi network are indicated on the label under the router.
- Next, launch the browser and enter the IP address of the router. Or you can configure the router through a special software for smartphone.
Program for TP-Link Tether phone
ATTENTION! This program supports only a number of routers: TL-WDR 4300, TL-WDR 3600, Archer C7, TL-WDR3500 Archer C20, TL-WR941ND_V5, TL-WR940N_V2, Archer C9, TL-WR841N V9, Archer C5, TL-WR740N V5, Archer C2 , TL-WR741ND V5, Archer C8, Archer C20i.
- After connecting, download the software from Google Play or App Store. To do this, enter the name of the program without quotes in the search bar - “TP-Link Tether”. Or you can download from direct links:
- For Android OS
- For iPhone and iPad
- Download and install.
- We launch and act according to the instructions for installing the Internet and local network.
Standard IP address does not work
If the standard address of the router is not suitable, then most likely it was changed earlier. This happened to me once - I changed the standard address and forgot which one. But don’t worry, it’s quite easy to recognize.
- Launch the console. To do this, press start and enter “CMD” in the search bar. Double click on the application.
- Enter – ipconfig and press Enter.
- Scroll up a little and in the “Default gateway” line you will see the IP to enter the settings.
If the line is empty, then there is a problem in the connection between the two devices. You need to connect directly to the LAN port. If you are already connected directly, check the integrity of the cable. One of the indicators on the router should blink. The network card on your PC or laptop should also blink.
Password doesn't work
Forgetting your admin password is quite easy. If you were the one who did the setting, then it’s worth remembering the combination; perhaps you wrote down this data somewhere - try to remember. As was already written earlier, if the setup was done by engineers from the provider, then it’s worth calling tech. support or reset the router to factory configuration.
NOTE! But remember that after the reset, you will have to do the Internet and Wi-Fi settings again. But there’s nothing wrong with that; our portal has all the available instructions for setting up all known routers - just enter the model name in the search bar at the top and read the article.

- We find the RESET button on the back of the device (it can be combined with WPS). The button may be recessed and look like a small hole, so you will need a paperclip or needle to activate it.
- Press it for 10-12 seconds until the router reboots.
- After that, use your standard login details.
Doesn't work after resetting to factory settings
This most likely occurs due to the fact that the PC or laptop has a static IP address with a different subnet.
- Left click on network connection in the tray.

- Next, select "Network and Sharing Center."
- Now click on the link "Changing an adapter setting."
- Click right click mouse to an available and enabled connection and then go to "Properties".

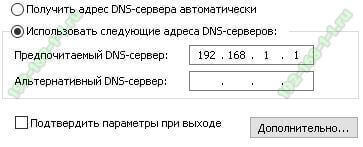
- Select the TCPv4 protocol and click "Properties".
- In the top field put automatic detection IP. And in DNS, set the parameters as in the picture above: 8.8.8.8 and 8.8.4.4.
- Click "OK", to apply the settings.
Still won't log in
In this case, the router may be broken. First of all, let's call the TP-Link technical support number:
- +7 495 2285560 – for Moscow and the Moscow region.
- 8 800 2505560 – you can call from any region of the Russian Federation, the call is free.
- +7 495 2285560 – for calls from Belarus.
- The settings and firmware of routers, modems, and switches can be viewed on the official website.
If telephone numbers are not available, then you can describe your problem in a letter and send it by mail - [email protected].
From home network, etc.. In order to go into the settings of the router, you first need to find out the IP address of the router, which will also be discussed. Also, this instruction will help you log into the web interface of a modem, access point and other similar network equipment from such popular manufacturers as D-Link, TP-Link, Asus, ZyXEL.
Are drivers needed?
No. You do not need to install any drivers anywhere to configure or use the router. If the kit includes a disc, it will only contain documentation. Drivers may be required for modems that connect to USB ports, but we are not talking about them now.
Default IP address, username and password
Now directly about how to “log into the router” (as modern users like to say). If the router is new, then its settings are factory settings. These settings are called "default" or default settings.Most manufacturers indicate the details directly on the router itself and designate them as Default settings: IP, username and password. Look for a sticker with this information on the bottom or back of the device:
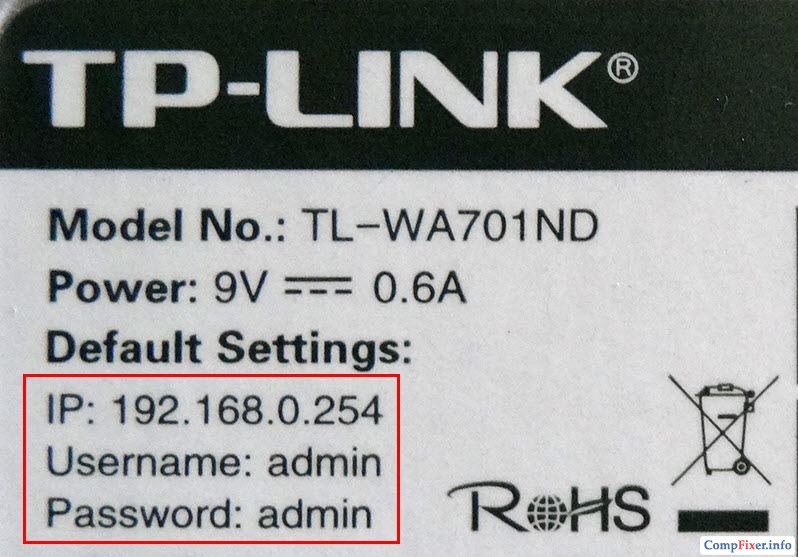
If for some reason the sticker is missing or damaged, open the instructions and it will indicate what the default IP address, login and password are for your router. Instructions are always included. It can be either on a disk, or in the form of a paper brochure, or both.
Typically, by default, modern routers have the following settings:
IP address: 192.168.1.1 or 192.168.0.1
Username: in most cases admin
Password: admin or empty
To enter the router settings, you need to type http:// in the address bar of your browser.<ай-пи адрес>. For example:
http://192.168.1.1
Enter the IP address in the address bar to enter the router settings
If the address is entered correctly, you will see a page asking you to enter your username and password.

Login page for the D-Link DIR-300 router web interface
And this is what the authorization page for routers from TP-Link, the most popular in our latitudes, looks like: 
Instead of an IP address, the sticker may indicate the host (site name) for logging into the web interface. For example, http://tplinkwifi.net or my.keenetic.net. Enter it into any of your browsers and you will be automatically redirected to the configuration page.
How to find out the router's IP address if the standard one does not fit
1. View the IP address in the network connection properties
Open Network and Sharing Center

Find your connection and click on the appropriate link

Click the Details button

In the window that opens you will see the line:
Default Gateway IPv4: 192.168.1.1

Router IP address
The address specified in this line is the IP address of the router through which your computer accesses the Internet. Now you can write http://192.168.1.1 in the address bar of your browser, then enter your username and password and get into the router settings.
If you cannot connect to the router (it does not give you an IP address via cable or you do not know the wireless network security key), then all you have to do is reset the router and configure it again: i.e. set your passwords and settings.
Read about how to reset your router.
2. View the IP address of the router in the network environment
Go to the section Net.
In the section Network infrastructure find your router. Select Properties:
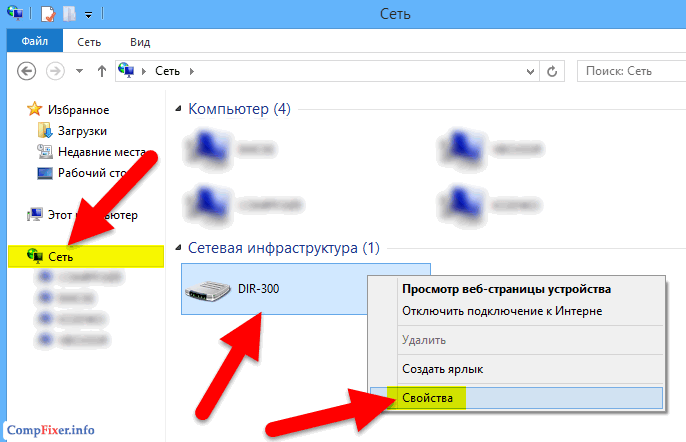
On the tab Network device The IP address of the device will be displayed, through which you can access its settings:

3. How to find out the IP address of a router using the command line
Enter the command ipconfig and press Enter:

In the column Main gateway The IP address of the router will be indicated, which is what you need. Now copy it, paste it into your browser's address bar and press Enter. You should then see your router's settings web interface.
The most common default router IP addresses and passwords
So, in this article we have described in detail all the setup steps and now you can correctly connect the equipment, find the address of its web interface and go to the router settings. If you have any questions, ask them in the comments.
TP-LINK is one of the leading brands in the production of network equipment. Modems of this brand are distinguished by their affordable price, reliability and functionality sufficient for home use. Many users of this product are interested in how to log into system settings TP-Link router. This is done in literally a couple of minutes. You need to know the authorization data and connect the device correctly.
Connecting to a computer or laptop
You can configure the router directly (via cable) and via Wi-Fi. Some users use a regular (not Wi-Fi) modem, so we will look at how to connect a router to the Internet and a PC/laptop in a classic way. Please note that if the kit does not include a LAN cable (or it is of the wrong length), you will have to purchase it separately.
Once a location has been selected (taking into account the availability of an outlet), follow the instructions below:
- Take the power supply and plug it into a power outlet. Connect the wire plug to the power connector on the router (indicated by the abbreviation 5V-XA, where instead of X there will be a number depending on the amperage of the model).
- Connect the Internet cable to the WAN (INTERNET) port. As a rule, it is presented in a single copy, and it differs in color from the rest.
- Take a network cable and then connect the network card port on your computer to one of the LAN connectors. As you can see, you can connect several devices to the modem (for the router in the image there are only 4).
Please note that on the computer's network card, the connector has LEDs that should blink when packets arrive. As soon as the TP-Link router is connected, go to the main menu.
Login to the web interface
The router has more than 20 different functions, which are controlled through a special interface. To enter it, you need to know three main parameters:
- Device IP address;
- username;
- password.
If at least one parameter is missing, you will not be able to log in. But this situation is one of the most unlikely. The necessary information is on the label attached to the case. It is indicated by the Default Settings block. Make a note of the IP, Username and Password fields.

- On a laptop or personal computer open a browser (Chrome, Opera, Firefox or standard).
- In the address address, type the IP indicated on the router label. Click Enter.
- You will be taken to the login page. Here you should enter Username (usually the word admin) and password.

If there is an input error, you will only receive a message that the data you entered is incorrect. The number of attempts is unlimited. This is how you enter the settings of the TP-LINK router. All necessary changes are made in the menu (including connection settings).
Reset to factory settings
Inexperienced users may set incorrect parameters and, accordingly, disrupt the operation of the device. A factory reset will help return the default settings. It is provided at the hardware and software level. Resetting will also help return the default password and login login. This can be useful when attackers gained access to the device and changed data.
A hardware reset to factory settings is performed through a special button on the panel - RESET. It must be held for 10 seconds. Successful completion will be indicated by the simultaneous lighting and extinguishing of all LEDs on the front panel. Typically, the button is "pressed" into the housing (to prevent you from accidentally pressing it), so use a paperclip, pen, or toothpick.

Some models have a combined WPS/RESET button. If you press it for 5-7 seconds, the WPS function is activated. Reset is performed by holding for 10+ seconds.

A factory reset is the easiest and fastest method to return the router to its default settings, and then start setting it up again.
A soft reset is performed in the system menu:
- Open the "System" section. Click on the Factory Settings tab.
- There will be only one button in the window called “Restore”. Click on it and wait for the process to complete.

You can perform a reset for several reasons: operating problems were discovered, you lost your login data for the web interface, you need to roll back the state to reconfigure.
Possible login problems and their solutions
In some situations, users cannot access the router menu. This may be due to the following reasons:
- there is no connection to the device (the cable, ports are damaged, drivers for the network card are not installed or the card is not working);
- automatic learning of IP addresses is not enabled;
- you are using the wrong address to log in;
- The router has a hardware failure, which makes it impossible to access the web interface.

- Update the driver for the network card or try connecting the router to another computer/laptop. Download the driver only from the official website of the manufacturer. Standard remedy Windows updates do not always find the latest versions.
- Set to automatically obtain IP addresses.
The last point can be done through the operating room interface Windows systems. The instructions include the following steps:

In most situations, this move allows you to enter the settings without problems. Also try resetting TCP/IP protocols through the console. This is done by one team. After entering it, restart your computer, and then try to get into the router settings.
Good afternoon, dear readers. In recent years, the population of our country has widely surrounded itself the latest laptops, portable tablets and mobile phones, having a built-in Wi-fi module, which makes it possible to connect to wireless networks anywhere.
Wi-fi solves the long-standing question of “how to do without wires” and allows you to distribute the Internet throughout your entire house or apartment. Today we will figure out how to set up a tp link router while gaining access to Wi-Fi in your home. And at the same time we will consider other related problems.
Questions that we will address in this article:
How to connect a router to a PC;
How to set up an Internet connection;
Setting up a Wi-fi network, setting a password;
And much more.
Before starting the instructions, I would like to remind you that Wi-Fi is absolutely harmless to health. I am writing about this because I have often heard the opposite from my interlocutors. Yes, and more. TP-Link TL-WR841N router is the ideal solution for connecting home internet in terms of price/quality ratio.
Connecting TP-Link TL-WR841N
In total, there are 6 buttons and connectors on the back panel of the TP-Link TL-WR841N:
1. On/off;
2. Input for power cable;
3. WAN input for connecting to the Internet;
4. LAN inputs for connecting the router and PC;
5. QSS button;
6. Reset button.
The first step is to connect the router to your computer or laptop. To connect the router, you need to plug an Internet cable from your provider with an RJ-45 connector into the blue WAN input, and plug a twisted pair cable from your computer into one of the yellow LAN connectors.
After this, you need to connect the power cable and make sure that the router turns on.
Entering the settings of TP-Link TL-WR841N
After this, you need to log in to the router control panel. Open any browser (Opera, Mozilla, Google Chrome or Internet Explorer). In the top line, enter the following address: “192.168.1.1” or “192.168.0.1”.
An identification window will pop up. It requires you to fill in the fields “User name” - admin, “password” - admin. Having completed all this, we will go to the main window in which we can change tp-link settings tl-wr841n.
The username admin and password admin are the default settings. If it says to you that “the login or password is incorrect,” then most likely the router has already been configured earlier and you need to reset the settings to the factory settings by pressing the Reset button.
Setting a password
The first necessary procedure is to change the standard login and password to a unique one. No one is forcing you to do it, however, by following a number of simple procedures you will be completely confident that your router is reliably protected. There will be no incomprehensible traffic costs due to neighbors stealing it.
Do not forget that after changing your login and password and connecting with personal data, you should write them down in a special notepad. Otherwise, you may subsequently lose the opportunity to access the Internet and then you will have to re-establish the connection.
Go to the menu “System Tools” - “Password”.
Sometimes it happens that Internet providers do not provide such services as automatic setting DNS server addresses.
In this case, they must be entered into the required sections, checking the “Use these DNS servers” checkbox.
2nd option – Static IP address. This setup and installation method is a little more complicated. In this situation, all variables that connect to the Internet are independently registered.
In the “Network” menu - “WAN”. We define the “Static IP” connection option and enter all the relevant values from the agreement with the Internet provider.
3rd option – “PPPoE” - login is carried out by entering your login and password. Some providers use this method in addition to static IP. In this case, you need to enter the “IP” and “Subnet Mask” data.
As a result of these actions, the router’s MAC will be identical to the computer’s and, as a result, the Internet connection will function. You need to pay special attention to the fact that if you are setting up a Wi-Fi router from another PC, you must fill out the MAC yourself in a specially designated field.
Setting up a Wi-Fi network
In our instructions this is the most important place, which must be studied and followed very carefully. The overwhelming group of users purchases and personalizes a router solely to simulate a wireless network with the ability to access the Internet.
The process of entering settings will not take too many minutes.
In the “Wireless Mode” menu - “Wireless Settings”. You are required to enter data with the “Network name” and “region” parameters. You must remember to save all your actions.
“Encryption” - select the “Automatic” item.
“PSK Password” - a personal code is filled in that protects accessibility Wi-Fi networks. This is the password that will be required to connect to your wi-fi network.
After all the actions performed, it will be necessary to save the changed settings. After which you will be able to use the Internet.
That's all. As always, I suggest you watch a training video based on the material in the article.
If you have any questions, be sure to write them in the comments.